Sunday, December 16, 2012

Archive Fillable Forms

See Creating an Archive of Past Posts for an explanation of archive postings.

Read this set of posts to see how you can create a fillable form.

Forming Up Your Genealogy--Part 1 Introducing Fillable Forms
Forming Up Your Genealogy--Part 2 Using Google Forms
Forming Up Your Genealogy--Part 3 Finding Form Controls
Forming Up Your Genealogy--Part 4 Finding Form Controls
Forming Up Your Genealogy--Part 5 Adding Text Form Field
Forming Up Your Genealogy--Part 6 Adding Check Box Field
Forming Up Your Genealogy--Part 7 Adding Drop-Down List Feild
Forming Up Your Genealogy--Part 8 Enabling Protection
Forming Up Your Genealogy--Part 9 Planning Form
Forming Up Your Genealogy--Part 10 Setting Up Auto Fields (Bookmarks)
Forming Up Your Genealogy--Part 11 Getting Copy of Updated Family Group Sheet
Forming Up Your Genealogy--Part 12 Checking Spelling
Forming Up Your Genealogy--Part 13 Creating Research Logs
Forming Up Your Genealogy--Part 14 Creating Research Logs
Forming Up Your Genealogy--Part 15 Creating Research Logs
Forming Up Your Genealogy--Part 16 Recreating Sample Forms
Forming Up Your Genealogy--Part 17 Using the Quick Access Toolbar
Forming Up Your Genealogy--Part 18 Creating Certificates as Fillable Forms
Forming Up Your Genealogy--Part 19 Creating Custom Tab on the Ribbon
Forming Up Your Genealogy--Part 20 Creating Custom Tab on the Ribbon
Forming Up Your Genealogy--Part 21 Creating Custom Tab on the Ribbon
Forming Up Your Genealogy--Part 22 Selling Forms

eBook
  1. Click here to go to the ePub on 4shared.
  2. Click here to see post with download instructions. 

New Post: Fillable Family Group Sheet...you can download it from my SkyDrive. (obsolete)
New Post: Update to Family Group Sheet Fillable Form...you can enter dates in any format.
New Post: Family Group Sheet Fillable Form and Shading on Fields...turn off shading.
New Post: Click here to download a fillable family group sheet, which is an MS Word document.

Thursday, December 13, 2012

Archive Using Paint for Graphics

See Creating an Archive of Past Posts for an explanation of archive postings.

Read this set of posts to see how you can use Paint to do screen captures and create graphics.

Much Ado About Graphic Software...Part 1 Capturing a Screen
Much Ado About Graphic Software...Part 2 Drawing Rectangles and Ovals
Much Ado About Graphic Software...Part 3 Adding Call Out and Drawing Lines
Much Ado About Graphic Software...Part 4 Understanding Graphic Types
Much Ado About Graphic Software...Part 5 Viewing and Zooming
Much Ado About Graphic Software...Part 6 Using Tools
Much Ado About Graphic Software...Part 7 Changing Colors
Much Ado About Graphic Software...Part 8 Resizing and Rotating
Much Ado About Graphic Software...Part 9 Building Graphics from Clips
Much Ado About Graphic Software...Part 10 Moving Pieces of Graphics

Additional posts that may be of interest...
Table It!...Part 7...Turn Word Table into Graphics
Forming Up Your Genealogy--Part 18--Certificates
Sampling Colors to Match Colors
Adding Text to a Photograph (Watermarking Photos)

I'll add a link for an eBook as soon as I am able.

Wednesday, December 12, 2012

Archive Setting Up Tables

See Creating an Archive of Past Posts for an explanation of archive postings.

Use these links to read the series of posts that explains how to set up tables and use them for genealogy.

Table It!...Part 1 Introduction with tip for adding a row mid-table on the fly
Table It!...Part 2 Inserting a table
Table It!...Part 3 Resizing columns
Table It!...Part 4 Using Pop-Up Menu
Table It!...Part 5 Turing Word Tables in Graphics
Table It!...Part 6 Turing Word Tables in Graphics
Table It!...Part 7 Turing Word Tables in Graphics
Table It!...Part 8 Using Table Properties
Table It!...Part 9 Understanding Borders and Shading Options
Table It!...Part 10 Using the Borders Tab
Table It!...Part 11 Affecting Cells
Table It!...Part 12 Adding Cell Padding
Table It!...Part 13 Formatting Rows
Table It!...Part 14 Formatting Cells
Table It!...Part 15 Using Menus and Pop-Ups
Table It!...Part 16 Aligning Cells
Table It!...Part 17 Changing Text Direction
Table It!...Part 18 Using AutoFit Options
Table It!...Part 19 Using Options on Pop-Up Menu Word 2003
Table It!...Part 20 Using Options on Pop-Up Menu Word 2003
Table It!...Part 21 Finding Properties on the Ribbon Word 2007/2010
Table It!...Part 22 Using the Design Tab on Ribbon Word 2007/2010
Table It!...Part 23 Using the Layout Tab on Ribbon Word 2007/2010
Tip for Selecting a Table
Tip for Using a Table to Control Page Layout with Graphic
Tip for Using a Table to Create Certificates

As soon as I am able, I'll add a link for an eBook.

Monday, December 10, 2012

Creating an Archive of Past Posts

I'm going to start a Christmas break...well sort of. Over the next few weeks, I'm going to create an archive of postings that put some of the series posts in order; that is, posts with links that should make it easier for anyone new to the blog to read some of the series postings. I'm also going to try to use the archive posts to create eBooks too. I'm planning on using different tools and different combinations to see what I like best.

So if you're a veteran reader of this blog, you can ignore these posts because you'll have already read the information. If you're relatively new to this blog, you might want to pay attention in case I put together a page of links you need.

For each of you, I wish you a Merry Christmas, a Happy Hanukkah, a Fun Kawanzaa, or a Happy Holiday, whichever works in your corner of the world. I'll be back sometime after January 1st.

Friday, December 7, 2012

Collaborating with PDFs

I've already written about:
Working with the Popups
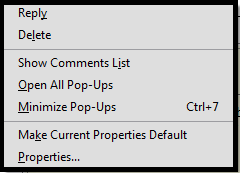
This popup appears when you have the Annotations 
pane open and you right-click a note or highlight in the PDF.

This popup appears when you have the Annotations
pane closed and you right-click a note or highlight in the PDF.

The difference in the two popups is based on whether you have the Annotations pane open. 
  • In a long document, you're most likely to have the Annotations pane open (first popup above) because it's easy to click notes or highlights to move to a new location in the document. 
  • In a short document, you're most likely to have the Annotations pane closed (second popup above) because you don't need to navigate. 
If you right-click on a note or highlight in the Annotations pane, a similar popup appears.

Most of the commands are easy enough to understand. The Reply and Delete commands are worth a bit of a look. 

Collaborating (Replying)  
If you send an annotated PDF to another person, they are able to respond to questions. This post of course assumes that the person to whom you send the annotated PDF has a version of the Adobe Reader in which Comments are enabled (most likely Adobe Reader X). If the recipient doesn't have this version of Adobe Reader (or a recent version of Adobe Acrobat), they will be able to see comments and highlights; however, they will not be able to reply. 

To reply:
  1. Open the PDF. 
  2. Right-click a note icon in the body of the PDF or a note in the Annotations pane, if you have the pane displaying. A pop-up menu appears. 
  3. Click the Reply option. An entry field appears below the note. 
  4. Type your response, and then click anywhere outside of the note.

  5. Save the PDF. 
  6. After you are finished replying, send the PDF back to the person who sent it to you. You can continue sending the PDF back and forth with replies to each other as needed...collaboration. 
Deleting Notes or Highlights

To delete one note or highlight
  1. Right-click a note or highlight in the body of the PDF or in the Annotations pane, and the popup menu that appears includes a Delete option. 
  2. Click Delete to delete the note or highlight. 
To delete several notes and highlights:
  1. Click the Comments button to display the Annotations pane. 
  2. Select the notes and highlights you want to delete.
    Contiguous: Click the first note or highlight you want to delete, hold down the Shift key, and select last note or highlight you want to delete. All notes and highlights between the first and last notes and highlights are selected.
    Non-contiguous: Click the first note or highlight you want to delete, hold down the Ctrl key, and select another note or highlight you want to delete. Only the notes and highlights you click are selected. 
  3. Right-click any selected note or highlight. A popup menu with a Delete option appears. 
  4. Click Delete to delete the note or highlight.
Help File
As you would expect, Adobe provides an extensive Help file, which includes video. Click here to visit the site and update your PDF skills.

Wednesday, December 5, 2012

Popup Menus on PDF

I've already explained:


Click the document to see a larger version.
Click the Esc key to return to this post.
Popup Menus
When you right-click a highlight or a note in the body of the PDF, this popup menu appears. 


When you right-click any note or highlight in the Annotations pane, this popup menu appears.


As you can see, the popup lists each contain similar items and a few different items. In addition, you have some buttons on the Annotations pane together with a search field. 


In the next post, I'll start talking about what you can do with each of these options.