Showing posts with label Tables. Show all posts

Sunday, September 23, 2012

Forming Up Your Genealogy--Part 18--Certificates

State conference time in Florida is busy if you are on the FSGS board. As the Florida Lines newsletter editor, I'm on the board. Because of my layout and design experience, I'm frequently drafted for tasks outside of my normal newsletter duties. Last year it was pulling together the conference syllabus. This year it has been designing a new pioneer certificate. Just as a f.y.i., I thought you might like to know how I approached this task, the functions I selected, and the design elements I considered.

Here are a few of the current contenders for the final certificate.

  • Certificates are on landscaped paper (8-1/2x11) with 0.5 margins.  
  • Variables in the forms have been set up as fillable fields: Descendant, Pioneer, (certificate) Number. 
  • Electronic signatures will be added so that the President and Chair don't have to sign individual documents. 

Orange Blossoms


This certificate layout uses a table. 

Column 1 = green stripe...filled the cells with a green from the orange blossoms photo (used Paint to sample color and get color formula)
Column 2 = orange blossoms
Column 3 = green stripe
Column 4 = FSGS logo and text
Column 5 = empty column to create a vertical space and a line for the right text alignment
Column 6 = green stripe

Row 1 = green stripe
Row 2 = orange blossoms and text
Row 3 = green stripe 

Table borders are set to None
I used Paint to create the orange blossoms. It's one photograph repeated four times in a column. 

Pioneer Border


This certificate layout is mostly flowing text. The border and the outline of the state are a watermark created in Paint and saved as a .png to maintain the colors. To match the colors, I sampled from the FSGS logo. The text for the certificate simply flows over the watermark. The signature area at the bottom of the certificate is a table (three columns and one row), which makes placements of the elements easier. Table borders are set to None

Pioneer Stripe


This certificate layout is a table. Table borders are set to None.

Column 1 = blue stripe with Florida (used Paint to sample color and get color formulas)
Column 2 = empty column for white stripe
Column 3 = blue stripe with Pioneer
Column 4 = empty column for white stripe
Column 5 = blue stripe with Certificate
Column 6 = empty column for white stripe and left margin for left text to alignment 

Text flow uses merged cells. Row one has all of the cells from columns 7 to 9 merged.
Column 7 = certificate number and presentation date
Column 8 = empty column for spacing
Column 9 = signatures 

Row 1 = majority of certificate text
Row 2 = Certificate number and President's signature
Row 3 = Presentation date and Chair's signature

Design Element
Take a close look at each certificate. The design element that makes them work that you might not immediately see is that for the most part I picked one margin and I stuck with it. The first certificate has text that is flush right. In the second one the text is centered. The third certificate is (mostly) flush left. In Orange Blossom and Pioneer Stripe I used an empty column to create an accent line to serve as a margin.

If you are interested in layout and design, I can't speak highly enough of a book: The Non-Designer's Design Book by Robin Williams. Williams offers practical suggestions that almost anyone can follow to create more attractive layouts. Over the years, I've referred back to this book again and again to refresh my memory on what this lady has to say about designing.

As always, if you have questions, send me an email or post a comment.

Thursday, June 7, 2012

Slippery Table Squares


When you are working with a table, have you ever noticed the two small squares that appear and disappear at the beginning and end of the table? They have a use.
  • Upper Square: Click this square once and you select the entire table. For example, you might want to click this button when you need to copy and paste a table.
  • Lower Square: Point your cursor at this square and your cursor turns into a double-arrow. When you see the double-arrow, click your mouse button once and hold it. Your cursor turns into cross-hairs. Move your mouse and Word resizes the entire table.
The squares can be slippery little buggers--appearing and disappearing as you move your cursor near them. If you're having trouble grabbing one, click anywhere inside the table once to anchor your cursor to the table, and then you should be able to click a square successfully.

Thursday, April 19, 2012

Table It!...Part 23...Layout Tab on Ribbon

Click once to display a larger version of the ribbons graphic and then press the Esc key to close it.

The Layout tab, like all tabs in Word, is divided into groups. Word grouped commands on tabs based on logical association. Sometimes it's easier and faster to click a button on a tab than to right-click in a table and display the pop-up menu. You'll learn to make the choice of one or the other on the fly. It will be a matter of which option is most easily accessed. I'll start on the left side of the Layout tab and address the option by group.

Table Group
  • Select: Click this option to display a drop-down list of select options. You can select a cell, column, row, or the entire table.
  • View Guidelines: You've seen this one before. When you remove all the boarders from a table, you can select the table and then click this option to see the shadow of the lines of the table, making working with the table easier.
  • Properties: You've probably seen this option too much! Click the Properties button as another way of displaying the table properties dialog.
Rows & Columns Group
Options in this group enable you to add and delete cells, rows, columns, and tables. If you click the small arrow in the lower right of the group, you'll find all of the insert cell options. You've seen these options on the pop-up that appears when you right-click in a cell.

Merge Group
Options in this group allow you to merge or split cells and split tables. These are all topics you've read about and know how and when to use. They too are available on the pop-up menu.

Cell Size Group
  • AutoFit: Click this button to display the following options: AutoFit Contents, AutoFit Window, Fixed Column Width. These option appear on the Insert Table dialog. If you don't remember, see Table It!...Part 2. They also appear on the pop-up menu when you right-click in a table.
  • Height/Width: Look at the cells to the right. Use the up and down arrows to affect the height of rows and the width of cells. You've done this same task moving the buttons on the ruler to resize columns. You can resize rows using the ruler on the left of the page. You read about this in Table It!...Part 3...Resizing Columns.
  • Distribute Rows/Columns: Click anywhere in table and click these button to cause the even distribution of rows and columns. When you select a table and right-click on it, these options appear on the pop-up menu.
  • Table Properties: Click the arrow in the lower right of the Cell Size group and the Table Properties dialog appears.
Alignment Group
  • Cell alignment buttons: Select one or more cells and then click a button to realign text in a cell.
  • Text Direction: Based on the reading statistics, this one seems to be a favorite. Merge a few cells, type some text, and then click this button to alter the text direction.
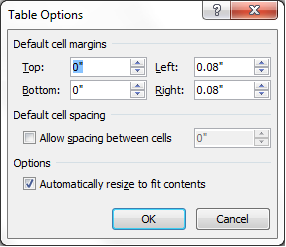
  • Cell Margins: Click the button to display the Table Options dialog. The big item on this dialog is the cell padding...the distance between the text and the border...add a little space so it's easy for your reader to distinguish the text from the border.
Data Group
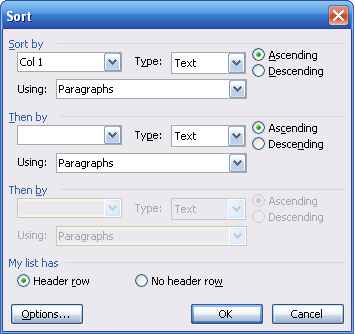
  • Sort: Click this button to display the Sort dialog and sort rows in a table. Note that you can't sort a table that includes merged cells. If you're trying to sort a list that isn't in a table, look for this same button on the Home tab in the Paragraph group.
  • Repeat Header Rows: Select a row in a table (most likely the first row or two and then click this button to have the header repeat when the contents of the table spills onto a subsequent page...think long table.
  • Convert to Text: Select a table, and then click this button to do what the button says...convert text that is currently in a table to plain text. A convert dialog appears. You pick a divider (paragraph, tab, comma, or other). Remember that a space is a valid divider.
  • Formula: Click at your own risk...I'm not going there.
What Should You Take Away
Again, where you select an option to apply it (ribbon? pop-up?) will depend on what you have displayed and what you can get at fastest. However, if you know where the options are, you have choices, which is why Word places options in more than one place...an accommodation that you'll come to love as you begin to remember all of the places where Word tucked away these options.

That's it for tables...I think...unless you post questions...

Tuesday, April 17, 2012

Table It!...Part 22...Design Tab on Ribbon

Click once to display a larger version of the ribbons graphic, and then press the Esc key to close it. 

When you click in the cell of a table, the Table tools with tabs appears. You can use options on the Designer tab to quick format a table.

Using Pre-Formatted Options

  1. Add a table with four columns and four rows. 
  2. Add text in each cell. It doesn't matter what the text is. 
  3. In the Table Styles group, the default layout is a plain table. Click any other layout to see what happens to your table. 
  4. In the Table Styles Options group, click to add or remove a check mark beside an option; for example, click Total Row to format a total row at the bottom of your table. 
  5. Click the Shading drop-down to change colors appearing in the table.
  6. Click the Borders drop-down to change the borders that appear. 
Borders Drop-Down
  • Select a borders option from the upper portion of the drop-down list or you can select Borders and Shading at the end of the drop-down to display the dialog that you've used in the past.
  • Select View Gridlines to turn on the lines around cells. You use this option when you don't have borders applied but you need to see where the cells are (for example, merged cells). The option is a toggle: click once to turn it on and once to turn it off. 
  • Select Draw Table if you're a driven soul who wants to design a table free hand. I've never been that driven. 
Draw Borders Group
Use these options to design a table free hand. Again, I've never been that driven that I've used these option. However, you should be aware that they are there in case you can't find a pre-formatted table that you like. 

Next Post
We'll look at the Layout tab, and then for the most part we'll be finished with tables. If you have questions, please post them. 


Thursday, April 12, 2012

Table It!...Part 21...Ribbons or Word "Outs" Properties

Click once to display a larger version of the ribbons, and then press the Esc key to close it.

Word 2007/2010 users have a ribbon rather than a menu. After you click in a table, the ribbon updates to include Table Tools with Design and Layout tabs. They appear only when your cursor is in a table. 

If you display a larger version of the graphic above (or open a Word document and click in a table), you can see the various options that are included on the ribbon. If you've read the posts for the 2003 menu, you should recognize many of the options that appear on these tabs. In addition, you should see that many of the tasks you do in Table Properties are out on the ribbons. The availability of these options on the ribbon means less clicking for you. 

This post is just to introduce the ribbon. In my next post, we'll start going through the options on the ribbon. 

Tuesday, April 10, 2012

Table It!...Part 20...Word 2003 Menu

All we have left to go is the bottom of the Word 2003 menu.
  • Table AutoFormat: Click this option to display the Table AutoFormat dialog. On this dialog, you'll find many pre-formatted tables. Find a table format that you like, select it from the list, and Word add the formatting from the sample table but not the text. You must add the text to complete your table. This option provides a short cut to table formatting. I never use this option because I know how to build my own tables. However, you should click around to see if that situation is true for you too. You might find a table format you love...and you won't have to build it for yourself. In Word 2007/2010, the pre-formatted tables are visible on the ribbon.
  • AutoFit: When you create a table, you select the auto fit option. See Table It!...Part 2 for more information. Having the options on the menu allows you to select the the table and apply a fit option on the fly and after you've already created the table. I find I use this option when I've copied a table from some place else. When I paste the table, it might be too wide for the layout. When that happens, I can select the table, click an auto fit option, and not spend time adjusting the columns manually using the buttons on the ruler.
  • Distribute Rows/Columns Evenly: When you've messed around with a table a lot, you can sometimes wind up with a bit of a mess. If you find you have a few columns that should be about the same size, you can select the columns and click the distribute option on this menu. Word will distribute the columns evenly without you having to adjust them manually using the buttons on the ruler. The same thing holds true for rows. When you work with tables for a while and you get creative, you'll be amazed at how often you'll use these options.
  • Heading Rows Repeat: This option is useful for pages that run on more than one page. Select a row in a table and apply this menu option to cause the selected row to appear at the top of the table on subsequent pages. You've seen this option before when working with row formatting. The availability of this item on the menu simply makes it easier to apply on the fly rather than selecting the row, displaying the table properties, and add a check mark to the box on the Row tab. You also seen other options--Split Table.
  • Convert (Text to Table/Table to Text): This option allows you to do what it says: convert. If you have text in a table and change your mind, you can select the table and convert the table to text...remove table formatting. If you have text that you'd like to put into a table, you can select the text, select the Text to Table option, and Word applies table formatting. In either case you need to do some clean up; however, by now you should be pretty well versed in tables to handle it.
  • Convert-related dialogs: You should recognize most of the options on these dialogs. Items of interest: 1) Separate text with/at: You can enter a space when converting table to text. 2) Nested tables refers to a table within a table. I can't see where you would do that but post a query if you have the need and I'll write about it.
  • Sort: This option is one handy little item. Highlight a table and it lets you sort entries in the table. The dialog you see below is for a table. The most I've ever had to change was to tell it what column to sort by and whether I wanted ascending or descending order. Now here's a little secret. Highlight text that isn't in a table and it lets you sort text by paragraph...remember those hidden codes? It counts a paragraph as everything between the paragraph marks. I use this option to alphabetize lists that I don't want to put into tables.
  •  Formulas: I don't use them and I can't think of reason you would. However, if you think of something and can't hack your way through using the Help, post a comment. I'll see what I can do with it.
  • Show Gridlines: When you alter the borders of a table, one of the options you have is to remove a border. You might have any number of reasons for doing so. When you're working, it's sometimes helpful to see where the borders would be if you had them displaying. Select the table and click this option to turn on the gridlines without affecting the borders. In other words, you just get to see where the borders would be if you had them.
Next Post
We tackle the ribbons that Word 2007/2010 users see. You'll be doing lots of the tasks we've discussed for the Word 2003 menu. The difference is location of the option.

Wednesday, April 4, 2012

Table It!...Part 19...Word 2003 Menu


The Word 2003 menu includes a few items we haven't addressed and we'll go over the first half in this post and the remainder of the options in the next post. You'll find out why when you get to the Split Table option.

Draw Table--We've talked about this option. If you like maximum control, click Draw Table. A drawing pencil appears in your doc and you can draw individual cells. After you have drawn cells, click in your document to get rid of the pencil and get your cursor back. I'm usually not driven enough to use this method.

Insert/Delete/Select--I'm assuming you can use these options to insert, delete, and select to deal with all or part of tables.

Merge Cells/Split Cells...--We've used these option. Highlight two or more cells to merge them. Or, highlight merged cells and click the Split Cells... option to restore the cells.

Split Table--This option allows you to split a table at any logical place. Using this option has design implications. You have to decide if you're happy to have a table just run from page to page without regard for clunking information for presentation. Consider this table.


You can handle the layout in one of two ways.

  • Let the table run from page to page. You should highlight the heading row and apply the Heading Rows Repeat option to have the heading appear at the top of each page. You should also disable the Allow row to break across pages option so that you don't have part of a cell at the bottom of a page and the remainder at the top of the next page. This layout is used for tables that go on for page after page. See Table It!...Part 13...Row Formatting for a review.
  • Split the table to chunk information for presentation purposes. If you look at the table above, you can see that the gray row near the bottom of page 1 is the visual break for the next McKee family in the census. Since the first family takes up most of the first page, you could use the Split Table option to split the table and place the next McKee family (and perhaps additional families) on page two. 
Split a Table
  1. Confirm that the heading row does not have Heading Rows Repeat applied.
  2. Select the heading row and copy it. Point your cursor at the heading row just outside the left side of the table. Word changes your cursor from an I beam to an arrow. Click once and Word highlights the heading row. Copy the heading row (Ctrl + C). 
  3. Click your cursor before the first character where you want to insert the break. In the case of the example above, you would click in front of Illinois.
  4. Paste the heading row (Ctrl + V).
  5. Split the table. In the example, click your cursor before Dwelling in the heading row you just added, and then click Table on the main menu to open the Table menu and select Split Table. Word inserts an empty line. 
  6. Add a page break to move the newly split second half of the table to the next page. To do so, click in Dwelling once. On the main menu, select Format and then Paragraph. The Paragraph dialog appears. Select the Line and Page Breaks tab, click the option Page break before, and then click OK. You use this method to eliminate spacing problems. 
I'm pretty sure you're scratching your head by now. You need to create a few tables and experiment with using the Split Table option to understand how it works. I'll do the remainder of the menu in the next post.

For Word 2007/2010 users, you have all of these same capabilities. They've just been moved from a drop-down menu to the ribbon. So, if you've read this post, you'll see similar instructions again when I begin talking about options on the ribbon. 

Monday, April 2, 2012

Table It!...Part 18...AutoFit


Again...When your cursor is in a table and you right-click, the pop-up menu that appears includes table related options. The last two options in the group we've been looking at are Borders and Shading... and AutoFit.

Borders and Shading...
If you click this option, you see a familiar dialog...one that we've spent lots of time on. See these posts:
Table It!...Part 10...Borders Tab
Table It!...Part 11...Affecting Cells

AutoFit

  • Select AutoFit to contents if you want the width of a column governed by its contents. For example, a column with three characters in it will be narrower than a column with ten characters.
  • Select AutoFit to window if you want a table that has equal columns spaced across the width of the page. In addition, you can make adjustments on the fly. 
  • Select Fixed column width if you want the table to resize itself in relation to the margins; that is, the entire width of the page. You can set the width using the up and down arrows to create a table that isn't as wide; that is, it doesn't go margin to margin. In addition, you can make adjustments on the fly

You've seen these options before in Table It!...Part 2. See that post for more details.

Upcoming Posts
If you're a Word 2003 user, we have a few more options to look at on the Table menu.


If you're a Word 2007/2010, you have options we need to look at on two tabs: Design and Layout.

I'll finish up the Word 2003 options, and then we'll tackle the Design and Layout tabs.

Wednesday, March 28, 2012

Table It!...Part 17...Text Direction


Merge Cells
Frequently, when you change text direction, you merge cells first. Remember the original census table? To get the sidebar with the rotated text, I first had to merge cells in the first column. 

  1. Open a Word document and insert a table with four columns and four rows.
  2. Select the cells in the first column, and then right-click in the selected area. Word assumes you are going to merge cells and replaces Split Cells...with Merge Cells on the pop-up menu.
  3. Click Merge Cells and Word converts the selected cells into one cell. 


Note: Also, you can highlight merged cells and
split them using the Split Cells... option. 

Change Text Direction
  1. Click in the merged cell and type the text you want to rotate. The spacing won't be what you want it to be; however, we'll fix any problems later. For example, type: 1850 Census Entries for McKee in Randolph Co., Illinois
  2. Right-click in the merged cell to display the pop-up menu.
  3. Click Text Direction to display the Text Direction - Table Cell dialog.
  4. Look at the option buttons and the Preview to the right.
  5. Select a direction option.

  6. Select the cells that should be shaded gray, and then right click to display the pop-up menu.
  7. Select Borders and Shading... to display the dialog and add shading.
  8. Use the buttons on the ruler to resize the columns
Next Post
I'm going to continue working my way through all of the commands. So stay tuned for more in my next post. 


Monday, March 26, 2012

Table It!...Part 16...Cell Alignment

One routine table task is selecting text alignment. Like cell padding, selecting text alignment adds to readability. Depending on what section of a table you've selected (a cell, a few cells, a row, a few rows, or the entire table), you can select an alignment.

Word 2003: Use the pop-up menu to select cell alignment.

Word 2007/2010: Use the pop-up menu or the alignment buttons in the Alignment group on the Layout tab of the Table Tools menu to select cell alignment.

  • Flush Left: Buttons on the left are flush left (top, middle, or bottom).
  • Flush Centered: Buttons in the middle are flush center (top, middle, or bottom).
  • Flush Right: Buttons on the right are flush right (top, middle, or bottom).

Changing Alignment
  1. Select part or all of a table (a cell, a few cells, a row, a few rows, or the entire table)
  2. Click a button with a different alignment.

By default, table alignment is flush left top. You can see that in the graphic above. Do you want to accept this default? Sometimes yes; sometimes no. Your selection depends on your table and what understanding you are trying to convey; for example, a flush right alignment is frequently used for a column that presents numerical amounts like money.

Heading Row(s)
The first row (or two or three rows) of your table are considered heading rows. They explain what information is contained in the columns that make up the table. As a general rule of thumb, I use an alignment that causes the text to be flush left bottom or flush centered bottom. The bottom alignment is a visual cue to my reader that this text is different. When I add bold and a gray fill (like you did in the sample), you tell your reader that the text in these cells are the key to the table.

Sub-Heading Row(s)
Sub-headings appear in the middle of the table visually dividing the table. Generally, I use a flush left alignment and then add bold and a fill color so that readers can easily see the visual break.

Table Entries
The data entries that I make in tables are usually flush left top (the default).

Getting Creative
I've made suggestions in this post for creating a basic business table. However, you should experiment with using alignment for a more decorative effect.

Thursday, March 22, 2012

Table It!...Part 15...Menus

Word 2007/2010
Right-click in a table to display this pop-up menu. 

Click in a cell, and then click the Layout tab on the Table Tools tab to see the menu above. There's a second tab (Design) that we'll look at later. Note that Table Tools appears only when your cursor is in a table (context sensitive display). Click the graphic to see a larger display, and then press the Esc key to return to this post. 

Word 2003
Right-click in a table to display this pop-up menu.  

Select Table to see this drop-down menu.
Pop-Up Menu
Regardless of the version of Word you're using, you can that some of the more commonly performed tasks--for example, aligning text in a cell (Cell Alignment)--is on the pop-up menu. A particular option might appear in other places in Word but it also appears on the pop-up menu so that you can use the option on the fly.

I'm not going to do more today than show you these menus. You should look at them to familiarize yourself with what is on these menus. In upcoming posts, we'll go through each of the options on the menus. 

Wednesday, March 21, 2012

Table It!...Part 14...Cell Formatting


The Cell tab on the Table Properties dialog is the last tab that we'll be looking at for properties. Here's a run down.
  • Size/Preferred width: You can set column widths. I prefer to do this using the ruler because you can see the table when you start changing column widths.  
  • Vertical alignment: You can select an alignment for cell text flush to the top or bottom or centered. Word includes another option on a pop-up menu that is easier to use for setting alignments. 
  • Options button/Cell margins: Click the button to display a Cell Options dialog. The dialog should look familiar. It's similar to the Table Options dialog that we looked at in part 12 when we looked at cell padding. This one is a bit confusing...bear with me. 
    • If you use the Table Options dialog to set cell padding, Word applies the setting to the whole table.
    • If you select the entire table and then use the Cell Options dialog to set cell padding, Word applies the settings to the whole table. If you're using Word 2003, use this method to set cell padding for tables. 
    • If you select one or more cells (for example a column or a row) and then use the Cell Options dialog to set cell padding, Word applies the settings to the selected cells only. You may find that you can use this option to call extra attention to an area of a table without using anything more. 
  • Options button/Options: Click the button to display a Cell Options dialog. 
    • Wrap text: Leave this option selected so that text will wrap automatically within each cell.
    • Fit text: Select this option when you want the system to force everything you type into one line. Word will alter the font size to accomplish the tasks. I've never found a use for this option; however, you should play with it and see how you feel about it. I can see where you might want to use the option in a title row. 
Next Post
We'll be looking at the pop-up menu and the main menu (ribbon) options. A few options you've seen on properties tab also appear on the pop-up or the main menu and are easier to use from those locations. So, until the next post, I hope you're having fun with tables. 

Wednesday, March 14, 2012

Table It!...Part 13...Row Formatting

Row Tab

Going through the remainder of the Table Properties tabs will be much easier because the dialogs include fewer fields and buttons.
  • Size: Fields in this group allow you to set a height for the row. I rarely use this setting, because if your text over fills a cell in the row, your reader won't be able to see all of the text by just looking at the table.
  • Options: Allow row to break across pagesI routinely select this option when creating long tables. As I complete rows in a table and the table expands to the end of the page, when the text in a cell in the row goes to the next page, the entire row moves to the next page. Having Word automatically move the row gives your table the polished look of a professional document.
  • Options: Repeat as header row at the top of each page
    I routinely select this option when creating long tables. Select a row in the table as the title row (usually the first row), display Table Properties, and then select this option on the Row tab. As the table gets longer and Word automatically moves the last row on one page to the top of the next page, Word also adds the heading row automatically. You need to note that you can only edit in the original heading row, and when you do edit, the changes appear in each of the automatically generated heading rows. Also, of note, you can select more than one row as heading rows (stacked headings).
  • Previous Row/Next Row buttons
    When you are applying formatting using the Row tab, you can click these buttons to move from row to row. When you use the buttons, Word selects the entire row. By that I mean Word selects all cells in the row and the little square at the end of the row that you see when you turn on hidden codes.
    What is important to remember about selecting the  entire row is that the little square at the end includes formatting codes for the row. The best way to see this is to add color to a row and then clicking to the right of the row (between the border and the little square at the end) to add a new row. The row that Word inserts includes the color as part of the formatting of the row. 
Column Tab
The Column tab simply has the option of setting specific widths for columns. I avoid this tab for the same reason that I avoid the Size field for a row. It's too restrictive.

Next Post
We'll look at the Cell tab, and then we'll start looking at menu selections that allow you do other table-related tasks; for example, rotate text in a cell.

Monday, March 12, 2012

Table It!...Part 12...Cell Padding


Review
We've been working on a table using the Table Properties. After you insert a table, you display the properties by right clicking anywhere in a table to display a popup menu, and then selecting Table Properties from the menu.

The last item on the Table tab that we need to look at is Options. Click the Options button to display a popup.


Default cell margins
The fields Top, Bottom, Left, and Right control the distance between the cell border and the text within the cell. The space is also referred to as cell padding, which is white space. White space enhances the readability of a document. Thus cell padding makes the contents of a cell easier to read because a reader can readily distinguish text from border lines...think in terms of old eyes.

If you look closely at the details of rows in the samples below, you'll see that the second version is longer. Click the sample and you'll see that the second table has more white space above and below the text within the cell. To be precise, the top and bottom cell padding is 0.08". You'll need to play with these settings to see what you like. My preferred setting is 0.03" for all four settings.

Click the graphic to see a larger version of it.
Press the ESC key to return to this post.

If you stop and think about this, you already know another way to control the space before and after text...our good old friend Styles. If you create a style named TableCell, you can use it to control the space before and after text with the style applied to it. In addition, if you create a style names TableHead, you can add the bold attribute and apply it when you apply the style to the heading line of a table. Creating styles to control space and attributes is yet another example of the choices you make when deciding how to affect text in a document. The choices are what make Word so useful to its many fans.

Default cell spacing (Allow spacing between cells)
Click the check box to enable the size-field arrows (called spinners). The size field defaults to 0.01. Change the setting to 0.03 and then click OK to apply the setting. Word creates a table within a border. This option is one of the decorative elements that you can use to create interesting table layouts.

Options (Automatically resize to fit contents)
Accept the default to have the table resize itself automatically based on the size of cell contents. This option applies to eventual width of the table. I never use this control. There are too many other places where you can control width that are much easier to display and use than this particular control.

What You Should Take Away
Controlling cell padding adds to the readability of your tables and you have one option on the Table Options dialog to create a decorative table.

Next Post
We'll be looking at the next tab on the Table Properties: Row. This tab includes options that are useful for long tables that cover more than one page.

Wednesday, March 7, 2012

Table It!...Part 11...Affecting Cells


Review
We've been working on a table using the Table Properties. After you insert a table, you display the properties by right clicking anywhere in a table to display a popup menu and then selecting Table Properties from the menu.

Further, we've been working specifically with the Borders and Shading dialog to affect the borders around cells and apply colors. On the Table tab, select the Borders and Shading button and you'll see the dialog below.

Remember that:
  • Borders affect the lines around tables and cells.
  • Page Borders affect the lines around the entire page (we haven't used this tab).
  • Shading affects fill color for tables and cells.
Affecting One or More Cells
In this post we're going to affect only a few cells within the table. 

Before you display Table Properties, if you select one or more cells in a table, Word assumes you are attempting to make a change that applies to the selected cells. It updates the Apply to field to Cell. Any changes you make using the Borders and Shading dialog tabs are applied only to the selected cells. You are going to do this task frequently when creating title columns. You did that task when you created the sample table in the post Table It!...Part 6...Creating the Table.

However, there are lots of other ways to affect cells that you might find useful.

For example, when you present a table, you may want to call attention to a few lines within the table and add notes below the table about the selected area. There are lots of ways to do this task. One of them is simply to select the cells you want to highlight and then make selections from the Borders and Shading dialog. In the case of the table above, I highlighted the cells, and on the Borders tab, I picked the Grid setting, a thicker style line, and a width of 3 points. 


Here's another version of the table. To get this type of presentation, I highlighted the cells, and on the Shading tab, I applied a color.


We've been doing these changes using the Table Properties, which is one of a few ways to get to the Borders and Shading tab. One of the things that makes Word confusing is that you can frequently get to the same dialog to complete a task from many different directions. The method you pick depends on what you are doing.

After you have an existing table, you can display Borders and Shading by click in the table so that Word knows you're in a table and using any of these methods.
  • Right click to display a popup menu, select the Table Properties, and select the Borders and Shading button. You'll use this method when you have several tasks to complete on properties tabs.
  • Right click to display a popup menu, and then select the Borders and Shading option from the menu. You'll use this method when you just want to change just borders and shading.
  • In Word 2007/2010, click the Borders or Shading button in the Table Style group on the Design tab, which is a Table Tool (context tool that pops up when you click in a table).
Can you find another way to the Borders and Shading dialog? I'd say yes, there's probably a few I haven't discovered. The one you'll use will depend on what you're trying to do and what you think about at that moment. However, as usual, I'm trying to give you as many options as possible.

What You Should Take Away
  1. There's more than one route to the Borders and Shading dialog.
  2. Pay attention to the Apply to field.
  3. With a little work and experimenting, you can construct tables that will add interest and appeal to your work.
Next Post
We're going to be talking about the Options button which displays a dialog that affect cell padding among other things.

Monday, March 5, 2012

Table It!...Part 10...Borders Tab

Click graphic to see larger version.
Press the ESC key to return to this post.

When you insert a table, Word makes choices for you automatically.

  • In Settings, Word selects All, which means that each cell has a border around it.
  • In Style, Color, Width, Word selects a solid line with a 1/2 point width and automatic color (black).
  • In Apply to, Word selects the table. 
You can see the results in the Preview. The Preview on this dialog is different from other previews in that you can use it to make changes...some of the same changes you can make by clicking a button in Settings.

Setting Options: None

Select None and Word removes all cell borders. A table without borders is handy when you want to present a list and you don't want to deal with setting tabs. Word leaves light cell borders so that you are aware that the table is there. However, when you print, the borders do not print. I use this type of table frequently.

Be sure to compare the dialog above with the first dialog. Notice that Word updated the Preview so that it no longer includes cell borders. Notice also that the buttons surrounding the preview have been turned off. You can use these buttons to turn the lines on or off. Again, Word is simply giving you lots of ways to work. Depending on what I'm doing, sometimes I use the Setting buttons, and at other times, I use the Preview buttons. 

Setting Options: Box

Select Box and Word adds a cell border along the outside of the table and updates the Preview to reflect your selection. Be sure to notice the Preview buttons that are selected above. In addition, Word shows the light cell borders so you can see the interior grid; however, the lines do not print. I use this type of table less often; however, you might find a use for it that I'm not thinking of. 

Setting Options: Grid

Select Grid, and then adjust the line width in the Width field. Word adds a heavy outline around the table. The interior of the table also includes border lines that are of a lighter weight. Notice that Word has also updated the Preview to match your selections. 

Setting Options: Custom
I've never found a reason to learn to use the Custom button. The other options have always served my needs. 

This circumstance has been particularly true since I started using Word 2007 and 2010. If you click Design on the Table Tools tab and look in the Table Styles, you'll see you have lots of other pre-formatted table options. If you start selecting the different styles, you should recognize when you're looking at a solid border or just the light border that will not print. 

Other Options on Dialog
  • Style: Be sure to scroll down the list of possible line styles. It's a long list with lots of choices. 
  • Color: I'll bet you know the drill on this one. Click the drop-down to see the color palette
  • Width: Be sure to click the drop-down to see the different widths you can select. b.t.w. One point is one seventy second of an inch...a tiny bit...experiment and see what works for you.

Too Many Possible Combinations...
As you can already see, the possible combinations are so many as to overwhelm. My advice is as usual. Experiment, and then pick what works best for you.

Preview

Remember that the Preview buttons also are available. Here's an example of when you might want to use these buttons. In the example above, I selected Grid, and set the line width to 2 1/4 points. I then clicked the vertical border button in the Preview; it's circled. The result is that I have a normal grid table with only horizontal borders that will print. The vertical dotted borders show but will not print; they simply are a guideline to remind you that you're working with a table. 

Apply to
So far we've accepted the default of applying the changes we are making to the entire table. However, you can apply lots of these changes to a paragraph or a cell. We'll talk about these possibilities in the next post. Right now you need some practice with working with a whole table before we start working with smaller chunks like cells. So happy tabling until the next post. 

Monday, February 27, 2012

Table It!...Part 8...The Properties


With your mouse, right-click in any cell of a table and the popup menu appears. The popup menu is context sensitive, which means that you will see table-related menu options only when your cursor is located in the cell of a table.

If you select the option Table Properties, the following dialog (or one similar to it) appears.

You've seen this before in Part 4.

Properties are a group of tabs that allows you to control tables more precisely. Depending on how you work and what your preferences are, you might be perfectly happy with using the ruler (remember the ruler) and menu selections; however, a few changes are easier on Properties tabs. Of note, when you make changes using Properties tabs, the changes apply to the entire table (unless you make other choices).

Table Tab
This tab allows you to dictate the width of the table you insert in your document. For example, if you want a small table that takes up only one half of an 8 1/2 x 11 inch page, you would want a table that is never more than 4.25" wide. Here's a sample of what the table might look like.
Hidden codes are visible so that you can see all of the markings. Here are the choices I made on the Table tab to get the result above.


Create your own table and reproduce the table and text that I have above, and then start clicking the different options in Alignment and Text wrapping to see how it affects your table.

The Table Positioning dialog, which you can see after pressing the Positioning button, allows you to make additional adjustments; that is, you can fine tune the table.

A few other buttons are on this tab too: Borders and Shading and Options. I'll talk about these additional buttons in the next post. 

Wednesday, February 22, 2012

Table It!...Part 7...Turn Word Table into Graphics

Brace yourself. It's another zinger!

If you remember, I'm trying to place a landscape size table into a portrait oriented document. I've also made the assumption that since the original project was a report to a client that the document is several pages in length. To get the table to appear mid-document, I need to convert it to two graphics and turn the graphics. I've talked about a similar task once before. See Turn the Graphic or Turn the Page and Flip that Graphic for more information on what your options are and why you would want to rotate the graphic instead of the page. At any rate, we want a document that ends up looking like this...


Notice that this sample has mirrored margins and the second page has running text beside the graphic.

To capture part one of the table:
  1. Open the landscape Word document with the table. 
  2. Set your view to about 70%. You need to adjust your display so that you can capture all of the table on page one in one window. Depending on your screen size, you might need to fuss with your system a bit to get the same results. After page one of the table has been turned into a graphic, you can resize it as you would any other graphic.
    --Word 2003: On the View menu, click Zoom. Under Zoom to, enter 70%. Or, if you happen to have the Standard toolbar displaying, you can enter 70% in the Zoom box, which most likely has 100% in it.
    --Word 2007/2010: You can use the slider in the lower right of the page. Or, you can select View, and then click the Zoom button to display the Zoom dialog. In Percent, enter 70%, and then click OK
  3. Click the PrintScreen button. Word adds a copy of your screen on the Word clipboard (temporary memory area). If you're working on a laptop, you need to press a combination of color coded keys. On my laptop, I press FN +PRTSC
To create the graphic:
  1. Open the graphics program Paint. Select Start, All Programs, Accessories, and then Paint. The program opens. 
  2. Paste the screen capture. Hold down the Ctrl key and type V (Ctrl + V). 
  3. Click the Select tool.
  4. With your mouse, click in the upper left of the table on page one and move your cursor to the lower right of the table section on page one. 
  5. Let go of the mouse. Paint has added a dotted line around the selected area. The outlined area is what your graphic will look like.
  6. Crop the selected area.
    --In Windows 2007/2010, click the Crop button beside the Select tool. Paint displays the cropped area.
    --In earlier versions of Windows, copy the selected area (Ctrl + C). Open another instance of Paint.  Select StartAll ProgramsAccessories, and then Paint.  Paste (Ctrl + V) the selected area. 
  7. Save the cropped table. Select File, and then Save As to display the Save As dialog. 
  8. In File name, add a name; for example, 1850 Table 1.
  9. In Save as type, select PNG (*.png). Your version of Paint might default to .png. Just be sure to confirm you have the right file format selected so that you don't loose color in the graphic. 
  10. Click the Save button. Do not leave Paint or close the graphic. 
To rotate the graphic:
  • In Paint 2003 or 2007, select Image, Flip/Rotate, Rotate by angle, 90 degrees, and then click OK.
  • In Paint 2010, select Rotate on the Home tab, and then select Rotate Left 90 degrees
Save the graphic. If you're asked if you want to replace the current version, select yes.

To create part two of the table:
Repeat the instructions above to convert the section of the table that is on page 2 of your landscaped Word document. After you have the two graphics, you're ready to insert the graphics into a document.

You might have to use your imagination on this part. Or, if you happen to have a document that is several pages long, open it, save it under another name (for example, Junk), and complete these instructions to see how the graphics are inserted.

Insert graphics into document:

  1. Open the document in to which you want to insert the graphics. 
  2. Type the text: 1850 Census Entries for McKee in Randolph County, Illinois.
  3. Apply a Heading 3 style.
    (See Electronic Table of Contents and Styles if you need help applying a heading style.)
  4. Make a local change so that the title is on a new page. Right-click to display the popup menu, select Paragraph, click the Line and Page Breaks tab, select Page break before in the Pagination group, and then click OK
  5. Press the Enter key to create a new empty line. 
  6. Insert the part one graphic.
    --In Word 2007/2010: Select Insert, and then select Picture. The Insert Picture dialog appears. Locate the page one graphic (1850 Table 1), click it once to select it, and then click the Insert button.
    --In Word 2003:  Select Insert, and then select Picture. Select From File to display the Insert Picture dialog.  Locate the page one graphic (1850 Table 1), click it once to select it, and then click the Insert button.
  7. Repeat steps 5 and 6 to add the page 2 graphic (1850 Table 2 if you followed the naming convention).
To adjust text wrap:
This step is optional and will depend on how much room you have on the page where you placed the last graphic. If you look at the particular example that I've created, the graphic covers about 1/3 of the page, which means that about 2/3 of the page is empty. You can leave the space empty...white space isn't necessarily a bad thing...or you can change the text wrap option around the graphic, which will allow you to type text in the 2/3 of the page that is empty.
  1. Right-click the graphic to display a popup menu.
  2. Select the Square text wrap option.
    --Word 2007/2010: Select Wrap Text, and click Square, and then click OK.
    --Word 2003: Select Format Picture, click the Layout tab, and then click the Advanced button.  Click  Square, and then click OK.  
  3. Click your mouse to the right of the graphic. Your cursor will begin to flash in the first line beside the graphic. 
Comments
Your page should be finished and should look similar to these pages.
Can you spot the one change that you could make to the second page graphic? Look at the alignment of the two graphics. The graphic on the second page is slightly higher than the one on the first page. The graphic on the first page has a title that is pushing it down on the page. You have two options to fix the alignment.

  1. Click the graphic to select it and press the Enter key to add an empty line before graphic. One empty line is frequently enough to create a better alignment...not perfect but better. You can make a local change using the Paragraph dialog to get the alignment closer (add space before/after to adjust the graphic alignment). For help, see Spacing: Before/After in the post Format-->Paragraph. You may also want to add a page break, which also affects spacing. While you have the Paragraph dialog open, click the Line and Page Breaks tab, click Page Break Before in the Pagination group, and then click OK. If you think you're going to complete these steps more than once, create a style (I call mine Spacer).
  2. Click the graphic and do not release your mouse button. Use your mouse to move the graphic down so that it's more closely aligned. 
So are you gasping yet? I am...actually I'm talking to the trainers at work to see if I can use some software to produce what are basically movies. If we're going to get this complicated, I perhaps need to get a bit more sophisticated.

Upcoming posts are going to involve creating the sidebar title and exploring the many other options that are included in table-related dialogs. We'll also create additional tables. I'll pick up posting on tables again at the beginning of next week.