Thursday, November 29, 2012

Adding Text to a Photograph


I'm constantly amazed at the stuff I never identify as a problem. I've been sitting on a Facebook page reading all about several photographs that were lifted on Ancestry. Apparently, person one posted photos on Ancestry and person two took photos, cropped head shots, and added the photos to their tree...but misidentified the people in the photos. I've never had this problem but it's generating lots of traffic as people debate what you can do about the problem, whether it's a copyright violation, and how you go about adding a watermark to a photo.

I googled Watermark Photos and received lots of hits. In a light read, I can see that much of it is swatting a fly with a sledgehammer. If you have a need to do this task, you can do it directly in Paint.

Adding text to a photograph:
  1. Find a photo to which you want to add text or a watermark. 
  2. Open Paint. Select Start, All Programs, Accessories, and then Paint
  3. Open the photo. Select File, Open, navigate to the photo, and select it.
    Note that whatever format the photo is currently in (most likely .jpg) is the format in which it opens in Paint. After you add text, you will save the photo and it will be saved in the same format. 
  4. Save the photo under a new name (for example, Lillie with notes). Completing this important step preserves the original photo file. 
  5. Use the Text tool to add text to the photograph.
    --Click the Text Tool button, move your cursor over the photograph. The arrow cursor turns into an I-beam cursor.
    --Click somewhere in the photo and drag your cursor to draw a box. Paint adds an outline and the Text tab appears.


    --Type the text you want to add to the photo. 
  6. Use options on the Text tab to format the text. As long as you do not click outside of the text box outline, you can select text in the text box and apply formatting. 
  7. After you have the text you want in place, click anywhere outside of the text box outline to make the text a part of the picture.
  8. Save the annotated photo.  
I'm assuming that most of the Font buttons you see will make sense to you. The Background buttons may be a bit of a mystery. 
  • Opaque: Click it to make the background of the text box solid.
  • Transparent: Click it to make the background of the text box transparent (default).
If you need help with picking colors for the text (like gray if you want a more subtle watermark), see the post Much Ado About Graphic Software...Part 6.

To move the text--for example, to render the photo unusable--use the handles of the text box to re-size the text box so that the text is positioned in an inconvenient location for copying. 


And finally, if you make a mistake, use the undo key combo (Ctrl + Z) to make it all go away and start over. 

So there you have my suggestion for making lifting your photos a little harder for those who have sticky fingers. 

Wednesday, November 28, 2012

Highlighting Text in a PDF

In addition to Adding a Note to a PDF, you can add highlights to call attention to text in a PDF. The process is similar to adding a note.

To add highlights to text:
  1. Open a PDF, and find a line you want to highlight.
  2. Click the Comment button to open the Annotations pane.
  3. Click the Highlight Text option in the Annotation pane. Your cursor changes from an arrow to an I beam. 
  4. Hold down your left mouse button and run your cursor over the text you want to highlight.
  5. Let go of your mouse button at the end of the text you want to highlight. 
  6. Look for notation for the highlight in the Annotations pane.


If you make a mistake while highlighting, use the undo (Ctrl + Z) to remove it and try again. You can also use the undo key combo if you add a note by mistake and want to remove it.

You can use the highlight in combination with notes, or you can use them separately. All notes and highlights appear in the Comments List of the Annotations pane. Each entry in the pane is a link. In a long PDF, you can click a note or highlight to scroll to that place in the PDF.

When adding notes or highlights, I've had you click the Comment button to open the Annotations pane. However, you should also notice that there are buttons for Notes and Highlight on the toolbar.
 
When you click the Sticky Note or Highlight Text option in the Annotations pane, the Notes and Highlight buttons in the toolbar are also selected. If you just want to add notes and highlights without displaying the Annotations pane, you can use the buttons. The main reason for knowing about the Annotation pane is that you can use it for quick navigation and to do several other tasks, including replying to notes or highlights...as in collaboration. 

Tuesday, November 27, 2012

I hadn't even had my coffee yet!

I opened my email this a.m. to a surprise. RootsTech 2013 was confirming me as a speaker. Now this piece of info was really interesting. I had indeed submitted the Paint preso (my thinking was no guts, no glory) but I had heard a while back that it wasn't accepted. They turned down about half of the submissions this year because they didn't have room in the schedule. I assumed I was in good company with others who had been disappointed. So this second email immediately raised my suspicions that something was up.

Since I'm in Florida and up early for work, I sent off emails to David and Devin--the two people to whom questions were to be directed--asking that they confirm that this email was correct. Like I said my sensors were on overload. Out of curiosity, I started clicking links to the speaker's website and they worked! I thought I can be honest or I can have lots of fun. Alas, I was honest. Besides I had to get to work.

Well neither David nor Devin answered me directly and a subsequent attempt to use the links (I had to try!) lead me to a page that said: If you're having trouble logging in, please email blah, blah, blah.

Then, at 2:19 EST, a most apologetic email arrived with the explanation that a piece of third-party software had messed up. The email included a promotional code that I can use to register for RootsTech 2013 at a reduced rate until 30 December.

Since I knew I wasn't presenting, I had checked out the RootsTech 2013 schedule and I didn't see anything that would tempt me to go. Truth be known, I'm still working on stuff I got from attending RootsTech 2012. Piling more on top with 2013 didn't seem like a reasonable plan. Also, I've been looking at other national conferences to see if they had anything that would cause me to part with dollars.

Anyway--the upshot of all of this is that for just a few brief foggy pre-coffee moments this a.m. I had the rush, I had the panic, I had the validation that one must get from the acceptance of a proposal made for a national/international conference. Maybe I'll have better luck next time.

Monday, November 26, 2012

Adding a Note to a PDF

When I find a PDF I'm interested in, I frequently find a need to add notes to the PDF before I file it away or send it off to someone else. In you have the latest version of the Adobe Reader (I have Adobe Reader X Version 10.1.4), it's easy to add notes and do a few other tasks. 

To add a note:
  1. Open a PDF and click the Comment button in the upper right of the page. The Annotations pane displays to the right of the PDF.
  2. Click the Sticky Note option at the top of the Annotations pane and move your cursor over the PDF. Your cursor appears as a Notes icon.
  3. Click in the area of the PDF where you would like to add the note. A notes pop-up appears with a box for text entry.
  4. Enter text, and then click anywhere outside of the pop-up. A small sticky note appears in the PDF. In addition, note text appears in the Annotations pane.
  5. Point your cursor at a sticky note in the PDF  and a small pop‑up with note text appears. 
  6. Drag and drop the sticky note icon to a new location if necessary. 
  7. Save the PDF. Save it with a new name if you want to have the original version of the PDF plus your version with notes.
If you look at the tools and other options appearing in the Adobe Reader, you can see many other possibilities for actions. 


Wednesday, November 21, 2012

eBooks and MS Word

I've been trying to find some time to play with eBooks and see what I could or would like to do with them. To have something to work with, I took all 22 of the Fillable Forms posts and worked them into a Word document. I converted the Word document into an ePub (a type of eBook). If you look at the most common types of eBooks, they are usually manuscript books; that is, mostly running text. The eBook I produced is more complicated than a family history would normally be because of the amount of formatting it includes. However, I wanted to see how converting the file would affect the formatting.

Creating Source Word Document
To create an eBook, you need a source file. You can create that document using MS Word, save the document (doc or docx) as the source, save the document as a web page (html), and then convert it using Calibre, which is an eBook management program. Following is a list of what I noticed I had to do or not do when creating my Word document.
  • Start with a new Word document...just the blank default page that Word displays. 
  • Add text. If you have existing text, flow the text into the new document. Re-apply styles as necessary. Anything that has a Heading 1 or 2 style applied will start on a new page in the ePub and that appears to be a default setting.  
  • Make as much of your text flush left as possible. I didn't select a document that had footnotes so I don't know how they would or would not get converted. 
  • Avoid using tables. You can get them in but the formatting can sometimes get messed up. If you've used tables for placement of text in relation to a graphic, make it all flush left because layout has no meaning in an ePub. 
  • Don't add headers, footers, or page numbering. Page numbering is added when the file gets converted to an ePub. This number can shift depending on the device on which it is displaying and the direction in which the device is held.
  • Don't try to layout the page, because it has no meaning when the file gets converted to an ePub. 
  • Don't try to add page breaks of any sort. Again, the file needs to be free to appear as it will on different devices with page breaks that move. 
  • Add a table of contents (TOC) after you have a few sections in the document. Go to the beginning of the document, and insert a TOC. Pick a TOC option that gives you a two level TOC (associated with Heading 1 and 2). 
  • Remember that your text can be appearing on a small screen, which means running text is your best bet.
  • Remember that your graphics can be appearing on a small screen. They may need adjusting.
  • Remember to save your document as a Word document (doc or docx)...the source. 
  • Remember to save your document as a Web page (html)...the file to convert to an ePub. 
Using Calibre to Convert to ePub
Calibre is a free piece of software, which you can download to your system. I read the Getting Started document. However, I have to say, Calibre is sooo easy to use, you can pretty much hack your way through it.

To convert a Word doc (html) to an ePub using Calibre:
  1. Click the Add books button. 
  2. Navigate to the directory with your document saved as a Web page (html). 
  3. Select the document, and then click Open. Calibre adds the file to a list. 
  4. Select the file in the list if necessary, and then click the Convert books button. The Convert dialog appears. 
  5. Click the Output drop-down in the upper right of the Convert dialog if you want to create a file in different outputs. I accepted the default of ePub because I have a Nook and Android tablet (ASUS). It's easy to look up the different formats and the Calibre documentation includes an explanation. 
  6. Complete the fields on the right, including author and publisher, and then click OK. Calibre converts the file.
  7. Click the View button to see the results in Calibre.
  8. Click the Save to disk drop-down, and then click Save to disk in a single directory. The Choose destination directory dialog appears.
  9. Navigate to where you'd like to save the copy of the ePub, and then click the Select Folder button. Calibre saves the ePub to that location. 
  10. On your system, navigate to the location where you saved the converted file. You're looking for a file that looks like this:

    This file is the one that you need to load to a hosting website from which you can distribute the book. 
If you don't want to distribute your book freely, you can also attach it to an email to send it to someone who can download it to their system and sideload it on a device. The point is that after you have the file  in the ePub format, you can send it to someone or to a cloud or to any spot where you can store an ePub file. You can stop right here or you can continue reading to see what I did to make the ePub available as a download for anyone.

Making Your ePub Available for Download
While producing an eBook is a relatively easy task, finding a place to store it where people can download it can be difficult. While looking for information on how I might add my ePub as a download from this blog, I saw this:

So I followed Rajan's suggestion. I joined 4shared, uploaded my ePub, and made it a public file that anyone can download.

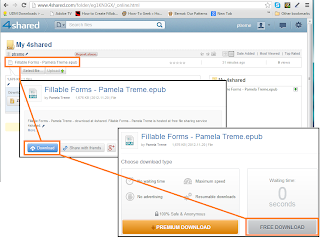
To download the ePub from 4shared:
  1. Click here to go to the ePub on 4shared.  
  2. Click the ePub link to display a screen with a Download button. 
  3. Click the Download button to display the page with the ePub download on it. 
  4. Click the Free Download button.

    The Save As dialog appears. 
  5. Select a location to save the file, and then click the Save button. After the ePub is saved on your system (laptop or desktop), you can sideload it to a Nook or Android device. 

Calibre is a keeper!
My initial project was to convert a Word document into an ePub, which Calibre was able to handle with ease. I'll be able to produce any document I need using Word, format it for the output (print or eBook), and then for the eBook version use Calibre to convert Word html to whatever eBook format I need for distribution.

In addition, I can see that Calibre is a piece of software that I never knew I needed. Using Calibre to manage my eBooks is much easier than any dedicated reader software I've used. For eBooks that do not prevent conversion, I can use Calibre to convert them into the format I need for my devices and sideload the converted file directly to a device using the Device button that appears when I plug one of my devices into my laptop. I can even shop for books directly off of Calibre when I click the Get books button, and then Stores...and Calibre's list of book sources is long with many I've never explored before...yet one more way to spend money...Oh joy!

Important: If you sideload from Calibre, make sure you click Eject this device from the drop-down Device button menu before you remove the connecting USB from your laptop. If you do not, you might harm the connected device.  

Upshot
So there you have my experience with the Word/Calibre/4shared combo. I'm sure there are other ways to do this same task. I plan to keep reading and seeing what's out there. However, I have to say that this experience has confirmed what I've come to believe about MS Word. Understanding how Word works and learning to use it well is power because the basis of everything you've been reading about here is a lowly MS Word doc.

Monday, November 19, 2012

Switching Tabs in Web Browser--Keyboard Shortcut

Most people pick up the keyboard shortcut for switching between running programs quickly; that is, Alt + Tab. Lesser known is the keyboard combo that allows you switch between open tabs in a web browser.

When I'm digging for death/obituary/burial location type of information, I can have several tabs open in a browser as I move from site to site. (For a sample of this type of use, see Web Wobblings.) Truth be know, I can have different browsers going at once (Internet Explorer and Chrome...and sometimes Firefox too) each with several tabs opened. I can use Alt + Tab to move between browsers; however, I have to click tabs as I search for a webpage on the open tab I need. Or, if I want to move through the tabs in a browser quickly, I can use the keyboard combo Ctrl + Shift + Tab.

Saturday, November 17, 2012

Pinterest...Saving Boards as PDFs

I don't toss and turn each night obsessing over the loss of my Pinterest boards. However, if you do, you might be interested in knowing you can save your boards as PDFs.

Chrome Print Dialog with Preview of PDF, which includes active links to websites in completed PDF

Creating PDF with Chrome
  1. Open Pinterest and display a board.
  2. Press Ctrl + P (print). A Print dialog appears with a preview of the PDF. 
  3. In Destination, click the Change button, and select Save as PDF. Be sure to notice the additional options to send to OneNote or Google Drive if you happen to use those applications.

  4. Click the Save button at the top of the Print dialog. A Save As dialog appears.
  5. Select a location to store your PDF. The system creates the PDF with active links to individual websites. 
Creating PDF with Internet Explorer or Firefox
  1. Open Pinterest and display a board.
  2. Press Ctrl + P (print). A Print dialog displays.

  3. Select PDF Creator or any similar Adobe PDF option. Be sure to notice the additional option to send to OneNote. The PDF Creator dialog appears.

  4. Add a subject and keywords if you plan to use file properties to search for the PDF. (See Are we there yet? for more info on file properties, which provide Windows-related file finding assistance.)
  5. Click the Save button. A Save As dialog appears.
  6. Select a location to store your PDF. The system creates the PDF with active links to individual websites.
P.S. Having your boards saved as PDFs makes them instantly portable...thus the name Portable Document Format, which means you can post the PDFs with active links or email them. The sky is the limit. The bonus is that you can stop obsessing about possible losses.

Wednesday, November 14, 2012

Pinterest Article on Inspiration and paper.li

Based on the page count I get when I talk about Pinterest, several readers of this blog are interested in that particular website.

I subscribe to Daily Pinterest News, which is a paper.li daily. The issue today includes an interesting article: How Pinterest can Inspire You to Write More Blog Posts.

If you don't know about paper.li, here's a bit of a rundown on it. If you visit paper.li  you’ll find that it describes itself as a place where you can start an online newspaper today. Like many things on the web, paper.li isn’t that straight forward.


So let me start from the beginning. A person with a Twitter account can use paper.li to organize shared Twitter links into a webpage that is easy-to-skim and that looks like an online newspaper homepage. Paper.li creates the newspaper homepage automatically based on tweets (short messages) that a Twitter user posts, lists a Twitter user creates on Twitter, or hash tags a Twitter user adds to tweets. The same sort of model applies to posts on Facebook.

Is all of this Greek to you? You’re not alone. However, that doesn’t mean that you can’t enjoy all of the tweeting and automatic organization, and have a window into the breaking news and hot tips of the Twitter world. How you might ask? Because paper.li is a publisher, it has a newsstand…a newsstand that you can browse. 

How to Browse the paper.li Newsstand and Read a Daily
  1. Open your web browser, and enter the following address: http://paper.li. The paper.li home page appears. Or, just click here.
  2. Scroll to the bottom of the page to the section with this title: Newsstand staff pick.
  3. Look in the lower right for this link: Check out the newsstand--> 
  4. Click the link. A search page appears. You can search for papers or people. 
  5. Enter Pinterestgenealogy, or any other area of interest in the papers search field, and then click the Search button. The dailies that have included the topic you entered in their description appear.
  6. Scroll through the list to see the available dailies. 
  7. Click a newspaper name to display it.
  8. Click a headline of an article--it's a link--to go to the website where the article appears. 

Screen Shot of the Daily Pinterest News on paper.li.
 
If you want more complete info on paper.li, go to the About page on the paper.li website. If you're interested in creating your own newspaper, you’ll find set up instructions on the paper.li Help page.
 

Tuesday, November 13, 2012

Tagxedo...Word Cloud Software

I'm a word cloud junkie. I like word clouds because you get to make art from words. You can use a program like Paint to create a word cloud. Or, if you're lazy like me, you can use a generator. One of my favorite generators is Wordle.

However, a new generator has entered the market: Tagxedo (tag-SEE-doh). Tagxedo, which is in Beta testing at the moment, bills itself as a word cloud with styles. The Tagxedo link above will take you to the gallery where you can see word clouds of people who are easily recognized. With Tagxedo, you can upload an image and turn the image into a word cloud.

I'm just beginning to play around with this new toy but I can already see that if I had an outline of a county, I could add the places where my family lived in the county and have a nifty piece of art to use on a blog.

One word of caution. These pieces of software usually come with terms of use. If you decide to reproduce a tagxedo on something like a book cover, I would recommend writing to the software owners to confirm that you are within the terms and/or get permission to use the piece of art for your project. If your project doesn't involve a charge (that is, you aren't charging for your book), you should be able to use the tagxedo but it must include the following attribution: http://www.tagxedo.com.

I'm sure that as I play with this new toy and learn how to use it well, I'll be writing about the experience. Writing about software is after all what I do. So you can expect to see more on this topic.

P.S. If you find that you're interested in word clouds, click here to visit an educational website with more information on word cloud software.

Monday, November 12, 2012

Writing an Engaging Intro

I'm going to switch things up on you. Many moons ago, I wrote an article that I meant to do something with and never quite got around to it. I recently submitted it to the Illinois State Genealogical Society's Education Committee. For those of you who won't see it from that source, I thought I'd publish it here. The article is about writing an engaging introduction...usually the hardest thing you'll do whether you're writing an article or a book. So here it is.

Writing an Engaging Intro

Writing articles is the natural outcome of any research project. If you are only doing the research and not reporting your conclusions, you're doing only half of the job. However, the thought of writing anything causes many people to have flash backs of miserable academic experiences, and so, they put off that part of the task. That's unfortunate because when the facts are fresh and you're inspired by what you've found out, you're likely to write the best piece of your life. 

Writing is a learned skill. The more you do it the better you get at it. I have found that many times people simply need a nudge to get them started. You don't have to be a great author to write an article about your family and have it published in a quarterly. Most society quarterly editors are begging their members for articles. With a little care and an analysis of what you know, you can write an article with a great introduction, which is half of the battle.
 
A well-constructed introduction draws your reader into your article. Unfortunately, too many authors are stuck in the chronology mode, thinking that they must start at the beginning of a person's life. Family-related writing frequently starts with this type of sentence, "Henry James was born in South Carolina on 5 September 1835." The introduction frequently continues with a dry recitation of facts. Your readers will read your article because they want the information. The problem is that they aren't going to enjoy it. In this article, I'm going to try to change that for you by giving you some suggestions that might help you write engaging introductions.
 
When I start writing, I use a few premises as a guide. The first premise is that every person's life includes drama, happiness, loss, silliness, tedium, fun, and work. The second premise is that people's lives frequently follow a pattern or illustrate a theme, which can be summed up in a word or two. The questions I ask myself are:

  1. Can I interpret the evidence I have to identify a theme?
  2. Can I state that theme in just one or two words?
  3. Can I write an introduction that supports the theme?
 
Let's start by looking at the timeline of a person's life--in this case, one Agnes (McKee) Anderson. 

  • 1802 Agnes is born in Ireland.
  • 1830 Agnes marries James Anderson.
  • 1830 to 1837 Agnes and James have children in Ireland.
  • 1837 everyone in McKee family except Agnes moves to the United States.
  • 1851 Cheshire, England census shows Agnes and family working in cotton weaving industry.
  • 1854 Agnes' husband James dies, leaving her with four children.
  • 1857 - 1859 all of Agnes' children marry in England.
  • 1860's brings grandchildren and Agnes is making her home with her oldest daughter.
  • 1864 Agnes' son-in-law dies leaving her youngest daughter a widow with two small daughters.
  • 1867 Agnes (age 65) emigrates from Liverpool, England to New York City, and on to Illinois with her youngest daughter and two granddaughters.
  • 1870 Agnes is living on a farm in Galum, Perry County, Illinois.
  • 1870's Agnes dies sometime after the 1870 US census.
 
Can I interpret the evidence I have to identify a theme?
A few years in Agnes' life are pivotal. In 1837, Agnes is having her youngest child while her entire family is packing up and moving to America, leaving Agnes behind. Some time between 1837 and 1851, Agnes packs up and moves from Ireland to England, leaving behind everything she knows. In 1854, Agnes' husband dies and Agnes moves in with her oldest daughter. In 1867, Agnes packs up and moves to America, leaving her urban English home of many years and her older children and many grandchildren in England. She moves from urban to rural life.
 
Can I state a theme in a just one or two words?
The fact that jumps out to me is that Agnes is always separated from family members, and once separated, she frequently never sees them again or at least doesn’t see them for long periods of time. When the McKee's move to the United States, Agnes' father dies before Agnes makes her way to the U.S. When Agnes leaves England, she never sees her older children or her English grandchildren again. The word I would choose to define Agnes' life is alienation. That's not to say that Agnes was never happy or satisfied; but, one could observe that she is always being left or leaving. The people she cares about are never in one place.
 
Can I write an introduction that supports the theme? 
My first task is to find a starting point and construct an opening sentence. Any one of the movements would work. When Agnes' family left Ireland for the United States, Agnes must have felt deserted. Can I empathize and imagine what she must have felt and remain true to the facts? The move from Ireland to England must have been frustrating for Agnes. She is leaving everything she knows for a place that is farther from her family in the United States. She seems to accept her fate. But life held one more move for Agnes. The move that is perhaps the most traumatic of all when circumstances force Agnes to move from her English home at an advanced age when she probably least expected it. Agnes dies in the bosom of her family but also as a stranger in a strange land bereft of her English children and grandchildren. The last move is the move with which I chose to start the introduction. 


Here's the opening of an article about Agnes (McKee) Anderson.
 

In the fall of 1867, a 65-year-old Irish widow named Agnes (MCKEE) ANDERSON boards the ship Helvetia at Liverpool, England. Traveling with her are her young widowed daughter Mary Jane (ANDERSON) ASHWORTH and two orphaned granddaughters—Mary Louise Alice and Agnes Eleanor. As Agnes sails from Liverpool bound for New York, she leaves behind her English home of many years, her older children, in-laws, and many grandchildren. Her familiar world and her family simply slip away until they are no more.

Agnes is fleeing the deteriorating conditions in County Cheshire, England. As the Civil War raged in the United States, cotton shipments from the former colonies stopped, unemployment at English cotton mills mounted, and the food riots started. By the time Agnes leaves, the English government—in an effort to ease pressures in the Cheshire area—was paying passages to anywhere outside of England. I’m guessing that Agnes, Mary Jane, and the children took advantage of the government's offer and naturally decide to join the remainder of Agnes' McKee family in Randolph County, Illinois. The fact that Agnes knows exactly where her family is hints that a thread spread across the Atlantic 30 years earlier when Agnes’ family left Ireland is still holding strong and fast.

The women arrive in New York on 30 December 1867. Agnes, Mary Jane, and the two small granddaughters must find their way through Castle Garden. Immigrants can stay at Castle Gardens if they have no other accommodations. Many immigrants do and describe parts of Castle Garden being covered with maps. They explain that agents list your options for going west and tell you the costs. Immigrants also describe the high walls that prevent the predators of New York from gaining access to unsuspecting immigrants with an eye toward stripping them of anything of value. The scene must have been dizzying for a woman of 65 with her daughter and granddaughters in tow.

The idea is that when you start an article at an interesting point in a person's life, you jump into that person's life with both feet and take your reader along for the ride. With your reader on board, you can then write a transition that allows you to begin a chronology-based history for the person. For example, I could start the next paragraph with, "Nothing is Agnes' early life hints at the alienation that awaits her later in years. Agnes' life begins in Ireland where she is born 3 July 1802. The oldest daughter of Alexander and Mary Jane MCKEE, Agnes grows up on a farm in blah blah blah blah..."
 
By the time you start writing about the more mundane facts of the person's life, your reader is hooked and can't put your article down. As you write your article and get to the part of the person's life that you started your article with, you will have created a frame that allows you to bring the person's life full circle. You can then write about the remainder of the person's life and state any conclusion you have come to based on your research. 

So fire up your word processor and use the questions from this article to create a framework for your next article intro. With a little thought, you can write an intro that will have your readers begging for more. With a little practice, you can write an engaging introduction for every article you write, and well written articles are always a welcome addition to society quarterlies. 


Thursday, November 8, 2012

Shhhh...Pinterest Adds Secret Boards

Collecting gift ideas on Pinterest for your genealogy friends? You can now do it in secret.

Earlier this week Pinterest sent an email to users explaining that Pinterest would be down for maintenance. When I signed in to Pinterest today, I had a splash screen that announced the addition of the ability to add three secret boards.

When you add a board now, a new field appears in the form: Secret. Click the Off button to change it to On and add the board as a Secret board.


According to Pinterest:
"When you add a pin to a secret board, it won’t show up anywhere else on Pinterest—not in the category sections, Popular, Everything, anyone’s search results, your followers’ home feed, your own home feed, or even pins or activity pages on your profile."
If you want more information about this new feature, display Pinterest, and then select Help from the About drop-down menu. Look at the menu on the left of the Help page, and click Support. You'll find an announcement: Announcing Secret Boards: Important Launch Information.

I'm not too sure yet how useful this new ability will be for genealogists. After all, we generally are trying  to get everybody to look at what we post. Of course, genealogists struggled with using Pinterest in the beginning but eventually discovered lots of interesting ways of using it. I'm sure that the use of secret boards will evolve in the same way.

Wednesday, November 7, 2012

Table as Graphic

With this particular type of blog, I am able to see what search terms are leading users to this page. Recently, someone was searching for information on turning a table into a graphic. If you're a longtime reader of this blog, you know that the answer is to create the table, do a screen capture of the table, open Paint, paste the screen capture, clip the area with the table, and save the table as a .png, .gif, or .jpg. You can then insert the graphic into other documents and rotate and resize it as necessary. 

Here's a sample of what the end product looks like.


Following is a list of the posts you need to complete this task:

I find it interesting that I've written enough that I'm beginning to circle back on myself and posting links rather than writing instructions. 

Sunday, November 4, 2012

I'm Back!

Seven certificates and one program later, I'm finished with the forms (some fillable, some not) and the banquet program that the state society needed for the conference, which is next weekend. Members of the FSGS have put in long hours trying to make this conference a standout. I'm hoping they have a roaring success on their hands. With the certificates and program, I've been able to participate even though I'm unable to attend the conference.

During all of this mass production, I did realize one thing that I was doing that might be of interest to anyone who reads this blog.

Color Sampling and Filling
If you look back at the sample certificates I posted earlier, they all include color. The certificates use different layouts; however, they all have cells filled with a color that matches another color in the certificate.

  • For Orange Blossoms, I sampled a green in the leaves to create the green borders.
  • For Pioneer Border and Pioneer Stripe, I sampled blues in the society seal to create the blue on blue border.
Long ago, I learned that you can't guess at these colors. Something that looks great on a computer screen can look awful in print and match nothing.

I use Paint to sample the color that I want to insert into a Word document, frequently filling the cell of a table with color.

To sample a color: 

  1. Confirm that you have the color version of the graphic for which you want to sample colors. The graphic needs to have any of the following extensions: .bmp, .jpg, .gif, .png, or .tif. 
  2. Open Paint (select Start, All Programs, Accessories, and then Paint). 
  3. Open the graphic (select File, Open, and then open the graphic). For example, in my case, I was opening a color scan of the state society seal.
  4. Click the color picker tool, and then click a color in the graphic. Color 1 in the Colors group updates to that color. 
  5. Click the Edit colors button. The Edit Colors dialog appears.
  6. Look for the Red, Green, and Blue numbers. The numbers you see are the formula for the color.

    See Much Ado About Graphic Software...Part 6 for information on tools and colors for older versions of Paint. 
  7. Jot down the three numbers. Be sure to note which is red, green, and blue.
To insert the color in a Word table: 

  1. Open a Word document, and add a table with three columns and three rows. 
  2. Right-click in the center cell of the table. A pop-up menu appears.
  3. Select Borders and Shading to display the Borders and Shading dialog.
  4. Click the Shading tab in the dialog. 
  5. Locate the Apply to field and select Cell from the drop-down list. 
  6. Locate the Fill field, and click the drop-down arrow beside it. The Theme Colors pop-up appears.
  7. Click More Colors. The Colors dialog appears.
  8. Click the Custom tab. 
  9. Enter the Red, Green, and Blue numbers you jotted down for the color formula, and then click OK. The dialog closes.
  10. Click OK on the Borders and Shading dialog. Word adds the color to the center cell of the table. 
This example isn't very realistic or practical. However, if you look at the sample certificates  you can see how I used color sampling and the fill option in Word to create frames and stripes for the certificates.

Assuming that nothing more is needed for the state conference, I should be back to my regular posting. So if you have questions, please send them along.