With Christmas coming up, I've decided to take a short break. I need to get some rest and regroup so that I can figure out a direction for this blog. I've covered lots and lots of what you can do with MS Word. Perhaps I've covered most of what you need, perhaps not. I need to re-read the blog to spot holes and come up with a plan to fill them.
If you have questions, please email me (info@technology-tamers.com). I'll be happy to answer them in the upcoming year.
I do hope that each of you has a lovely Christmas and a happy New Year. See you in 2012.
Tuesday, December 20, 2011
Wednesday, December 14, 2011
Generated Lists Part 6
Cross-referencing is a normal part of any large document. For example, if you've created an appendix with several census pages...captioned of course, you will probably want to insert cross-references to the census pages in the running text of the pages of chapters. You want your readers to be able to flip to the page with the graphic of the census page so they can see the evidence for themselves.
You've already read about adding page number cross-references based on heading styles. (See the post Adding an Electronic Page Number for a Cross Reference.) You can use the exact same steps to add page number cross-references to default labels like Figure and to labels you've added like Census.

Your cross-reference might look like this:
The first time I can find the McKee family in the United States is in the 1855 Illinois State census. See Census 3: 1855 Illinois State census on page 135. Since the family appears on the 1851 English census, I'm assuming they emigrate to the United States between 1851 and 1855.
The text that is bolded in the sentence above would be electronic cross-references that you inserted using the Cross-reference dialog. If you go to page 135 and change Census 3: Illinois State census to Census 3: Illinois State Census, Randolph County, you don't need to locate every place in the document that you've added the text cross-reference. Just update the document and Word will make the changes for you.
Spending time practicing this particular skill is worthwhile because it can save you time and trouble when your documents get larger and you're editing it in fits and starts. You won't remember every place you've added a cross-reference, but if you've taken the time to set up electronic cross-references, you don't have to because Word remembers it for you.
You've already read about adding page number cross-references based on heading styles. (See the post Adding an Electronic Page Number for a Cross Reference.) You can use the exact same steps to add page number cross-references to default labels like Figure and to labels you've added like Census.

In the Cross-reference dialog, when you select a reference type, for example, Census or Figure, Word lists every caption you've entered using that label.
In the field Insert reference to, select Page number to have Word insert an electronic page number, and then select the caption from the list, and click Insert.
In addition, you can select a text option to insert caption text in the field Insert reference to. If you have occasion to change caption text, Word updates the text any place you've added it as a cross-reference as part of the normal update process (Ctrl + A, and then F9...Update entire table.)
The first time I can find the McKee family in the United States is in the 1855 Illinois State census. See Census 3: 1855 Illinois State census on page 135. Since the family appears on the 1851 English census, I'm assuming they emigrate to the United States between 1851 and 1855.
The text that is bolded in the sentence above would be electronic cross-references that you inserted using the Cross-reference dialog. If you go to page 135 and change Census 3: Illinois State census to Census 3: Illinois State Census, Randolph County, you don't need to locate every place in the document that you've added the text cross-reference. Just update the document and Word will make the changes for you.
Spending time practicing this particular skill is worthwhile because it can save you time and trouble when your documents get larger and you're editing it in fits and starts. You won't remember every place you've added a cross-reference, but if you've taken the time to set up electronic cross-references, you don't have to because Word remembers it for you.
Monday, December 12, 2011
Generated Lists Part 5
Have you looked at figure text from as asthestic point of view? What font does it use? Is the point size too large or too small? What controls the attributes applied? The answer of course is a style.
When you insert a caption, Word automatically applies the Caption style.
Of course, you know exactly how to change a style to suit your tastes.
When you insert a caption, Word automatically applies the Caption style.
Of course, you know exactly how to change a style to suit your tastes.
- Display the list of styles.
- Right-click Caption. A pop up menu appears.
- Select Modify. The Modify Style dialog appears.
- Change whatever you like.
Wednesday, December 7, 2011
Generated Lists Part 4
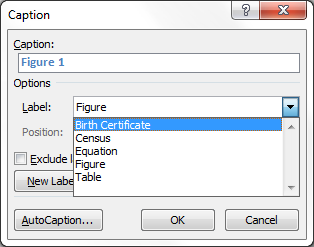
When you add labels, Word keeps the labels, assuming that you'll want them in other documents. So don't be surprised if you open a new document and start to insert a caption and find labels you've added in the past. When you open the Caption dialog, Word may or may not pick the label you want to use. You can switch to a new label in a couple of clicks.
Switching Labels
When you open the Captions dialog, click the drop-down arrow in the Label field, click a new label, and the caption in the Caption field above updates. Type the text of your caption, and then select OK.
Switching Labels
When you open the Captions dialog, click the drop-down arrow in the Label field, click a new label, and the caption in the Caption field above updates. Type the text of your caption, and then select OK.
When the list of labels gets out of hand...and it will, you can select a label and delete it.
Deleting a Label
Select the label in the Label drop-down list, and then click the Delete Label button. Word removes the label from the list. When you open new documents, the label won't appear in the list. Note that you cannot delete the default labels: Equation, Figure, Table.
Upcoming Posts
We still have more to do with labels...lots of fun to come.
Tuesday, December 6, 2011
Internet Genealogy Article
If you look on page 44 of the Dec/Jan issue of Internet Genealogy, you'll find an article by yours truly. The article covers using Joliprint to convert webpages into PDFs...pursuing a paperless world.
Basically, you find a webpage (and you have to be on the lowest level page), copy the address (the http:// bit), go to Joliprint, paste the addess in the Save your links... field, and click the Joliprint it button. Joliprint responds with a first rate PDF of the webpage without all of the webpage spam...that is all of the surrounding stuff the page...like ads.
I'm hoping to have additional articles published in Internet Genealogy. Of course, there are never any promises with this sort of thing and it requires that I get off my duff and write. We'll see what I manage to accomplish.
Monday, December 5, 2011
Generated Lists Part 3
Let me set a scene...you've written a book. At the end of the book you have appendices. One appendix has all of the censuses sorted by year and location. Other appendices have scanned copies of birth, marriage, and death certificates. Another appendix has scanned copies of wills. You want to be able to easily list them at the beginning of each appendix. You might also want to add these types of lists after the table of contents at the beginning of your book. How do go about getting different lists? You create new labels using the .
Creating New Labels
 Inserting Lists
You can add labels for anything you want. If we refer back to the scene I presented, we would have labels for Birth Certificate, Marriage Certificate, Death Certificate, and Wills.
Editing Labels
After a label is inserted, you can edit the text you added after Word inserted the label and number. For example, if your caption is:
Census 35: 1900 Federal Census, New Orleans, Orleans Parish, Louisiana
You can edit the text in the orange font.
Updating the Lists
When you have several of these lists, updating all of the lists at the same time becomes the most efficient way to work.

Creating New Labels
- Click your cursor above or below the first census graphic. Where you put the caption doesn't matter as long as you do it in the same place...consistency...pick one and stick with it.
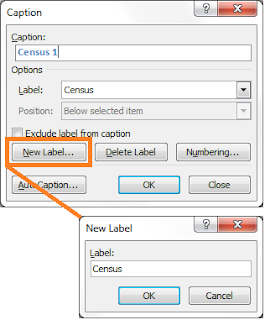
- Open the Caption dialog.
- Click the New Label... button. A pop up appears.
- Enter the word Census in the field Label, and then click OK.
- In the Caption field, enter the remainder of the caption. For example, type:
: 1850 Federal Census, Sparta, Randolph County, Illinois - Click OK. Word inserts the caption.
- Add the remainder of the captions to the census graphics in the appendix.

- Click your cursor before the first census graphic in the appendix. You might want to add a page break to have the list appear on a blank page at the beginning of the appendix.
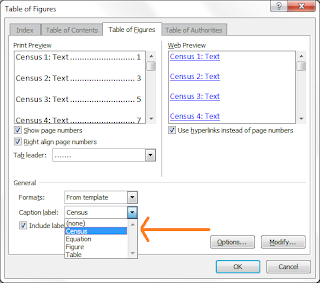
- Display the Table of Figures dialog.
- Confirm that Census is select in field Caption label.
- Confirm that Tab leader field has the leader dots selected, and then click OK. The list appears.

You can add labels for anything you want. If we refer back to the scene I presented, we would have labels for Birth Certificate, Marriage Certificate, Death Certificate, and Wills.
Editing Labels
After a label is inserted, you can edit the text you added after Word inserted the label and number. For example, if your caption is:
Census 35: 1900 Federal Census, New Orleans, Orleans Parish, Louisiana
You can edit the text in the orange font.
Updating the Lists
When you have several of these lists, updating all of the lists at the same time becomes the most efficient way to work.
- Select the entire document (Ctrl + A).
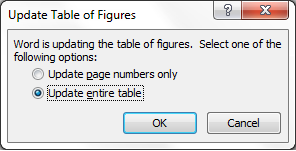
- Press F9. An update dialog appears.
- Click Update entire table, and then select OK. Word will cycle through tables; therefore, you might see this dialog multiple times. Repeat this step each time the dialog appears.
Future Posts
We're not finished with this topic yet. So stay tuned to see what else you can do with labels.
Friday, December 2, 2011
Generated Lists Part 2

Adding a List of Figures
After you've added several captions below figures, you can insert a list. You can insert the list after the table of contents. Or, you can place it anywhere else in the document--for an example, you might have the list in a appendix at the end of the book. To insert the table of figures, you use the Table of Figures dialog.- Open the document you created...the one with the inserted captions.
- Click your cursor in the place where you'd like to insert the list of figures.
If you're trying to place the list at the end of a table of contents, add a few empty lines and then add a page break (Ctrl + Enter). - Display the Table of Figures dialog.
--Word 2003: Select Insert, Reference, Index and Tables, and the Table of Figures.
--Word 2007/2010: On the Reference menu, locate the Captions group, and click the Insert Table of Figures button.
The Table if Figures dialog appears. - Confirm that Tab leader field has leader dots selected, and then click OK. The list appears.
As you add more graphics and captions to your document, you are going to want to update the list. To do so, highlight any portion of Table of Figures, and press F9. A dialog appears.
Other Types of List
They are possible and we're going to talk about them in upcoming posts. The process is similar and just as easy as what you've experienced in the previous post and this post. So stay tuned because there's more to come.
Subscribe to:
Posts (Atom)