Wednesday, April 27, 2011

Flip that Graphic

Please read the earlier post for today before you read this post.

For this post, I'll be talking about Paint. Paint is a low level, under appreciated piece of software. I’m going to do just a bit with it in this post. However, I use Paint extensively to complete small graphic-related tasks on the fly. In my opinion, it’s worth the time it takes to learn to use Paint. Many of the skills you learn when using Paint are directly transferable to more sophisticated graphics programs.

Rotating a Graphic
1. Open Paint. Select Start, All Programs, Accessories, and then Paint. The program opens.
2. Select File, Open, and open the graphic you want to rotate.
3. Rotate the graphic.
In Paint 2003 or 2007, select Image, Flip/Rotate, Rotate by angle, 90 degrees, and then click OK. You may have to rotate 90 degrees more than once to get it right.

In Paint 2010, select Rotate on the Home tab, and then select Rotate Left or Rotate Right.

4. Copy the graphic (hold down the Ctrl key and type A for all).
5. Return to your Word document and paste the graphic on the page (hold down the Ctrl key and type V to paste).

Copying the graphic rather than trying to save and then insert it allows you to bypass the issue of graphic type. If your graphic starts as a .jpg, it will still be a .jpg when you paste the graphic in your Word document.

If you try to save a .jpg, you get a warning. If you persist, the picture will pixelate; that it, it looks like it fades and gets a grid look to it. This problem is a limitation of Paint.

So there you have...rotating on the fly.

Turn the Graphic or Turn the Page

Inserting a graphic that is wider than it is long means one of two things:
1. You have to turn the graphic so that it is longer than it is wide.
--OR--
2. You have to turn the page so that the orientation changes from portrait to landscape.

To complete option 1, you need to know something about a graphics program like Picasa or Paint or any number of other graphic programs that allow you to rotate a graphic. Here's an example of a document that has been rotated.


Assuming you are able to rotate a graphic, you can then simply insert the graphic into a portrait page.

To complete option 2, you need to know how to create a Continuous section break, change your page orientation, insert the graphic, insert a second Continuous section break, and change your page orientation. Here's a sample of what the page looks like.


If you think I'm hesitating, you're not far off. I'm debating how much I need to explain about using graphic programs. In my own books, I prefer to use option 1 because the page layout isn't interrupted. All of my headers and footers are in the same place. However, I have lots of experience with graphic programs and access to high-end graphics programs at work.

Option 2 is often easier for a person who doesn't know a lot about graphics programs. However, as you can see from the sample page above, your page layout is disrupted. Instead of having your header and footer running along the top and bottom of the page, they are running along the sides of a printed page.

In either case, your reader is going to have to turn the book sideways to see the graphic. It's a matter of the location of your header and footer along with the page number that is the issue.

So I'm just going to stop at this point as I ponder what I need to do and say. We may end up taking a short trip out of Word and into Paint.

Monday, April 25, 2011

Picture This!

You've figured out how to put a document together with mirrored margins and working headers and footers. You have a portriat oriented document; that is the text is printing on the length of the paper. You reach a place in your document where you want to add a graphic; for example, a descendants chart. However, the chart is too wide to fit on a portrait oriented page. You need a page that is landscape oriented--wider than it is long. Here are a few suggestions for dealing with the problem.

1. Convert the chart to a graphic, and then rotate the graphic so that it's printing sideways. You can then insert the graphic into a portrait page.
2. Save the chart as a PDF, and then rotate the PDF so that it's printing sideways. You can then insert the PDF into a portrait page.
3. Insert a Continuous break, change the orientation of the page to landscape, insert your chart, add another Continuous break, and change the orientation back to portrait.

Each of these methods is going to require a bit of explanation. Each of these methods has pluses and minuses. This post is just an introduction to the problem and possible solutions. The solution you use in any set of circumstances is going to depend on what software you use to create and/or convert the graphic. So stay tuned. There's more to come.

Friday, April 22, 2011

Preview of Coming Attractions

After you understand how to set up mirrored margins and work with headers and footers, you have a real need to use the Print Preview tool. The tool allows you a view that you can use to check headers and footers and your layout in general.

The look you get is from 50,000 feet...you couldn't care less what the text says because you aren't editing. If you try editing, you'll find yourself clicking and getting no satisfaction. You must close the print preview version before you can again click in the document and edit. Instead, you are looking at a picture when you're in print preview...the overall look and feel of your document.

While your layout decisions are made early in the process of producing a book, using Print Preview is one of the things you do later in the process. You need some text in your document to make any judgements on how well your layout is or isn't working. You most definitely want to check your document before you go to production regardless of the media...PDF (electronic) or print (hard copy). In addition, for anyone who hates to kill trees for no reason, Print Preview is for you.

Now here's the best part. When you look at the picture, you can see what you like in the layout and what you need to change in the layout. When you do your first layout, you may over do it, which is a common reaction. You can make changes, and because Same as Previous is engaged, you can make changes to lots of pages by correcting a few pages.

Lets suppose that you added a revision date in the inside margin of the header. If you printed your book you would see the following in the headers of a left and right page on each side of the bound edge of your book.
Click the graphic to see a larger version of it.

In the design process, you've missed adding a copyright statement in your header or footer. Since the date is repeating, you might want to change one of the revision dates to an appreviated copyright; for example, All Rights Reserved @ 2011 by Pamela A. Tremé.

In fact, you might want to move both the copyright and the revision date to the footer because you like the way that looks better.

You go into your document and you change the First Page footer in chapter 1 to add the revision date, and then you change your even page footer to include your copyright statement and your odd page footer to add the revision date. The changes cascade throughout the chapter and every First Page footer of your document.

Your next step should be to check what the print preview version of your document looks like.

Word 2003
Click File, Print Preview. Your display should show two pages side by side automatically. If that doesn't happen, use the size field in the menu above to get the correct display. To close the print preview version, click the X in the upper right of the screen.

Word 2007
Click the Office button in the upper left of the page. A menu appears. Click Print, and then Print Preview. Use the slider bar at the lower right to zoom so that two pages to appear side by side if the pages do not display side by side automatically. To close the print preview version, click Close Print Preview. It's worth adding the Print Preview button to the Quick Access Toolbar. See the post Displaying Buttons You Need.

Word 2010
Click the File tab, and then select Print. The print options and preview appear to the right of the menu. Use the slider bar at the lower right to zoom so that two pages appear side by side. It's worth adding the Print Preview button to the Quick Access Toolbar. See the post Displaying Buttons You Need.

The two pages below are what you would see if you made the suggested corrections and opened a printed copy of your book.

Now the confession...It is possible to edit while in the print preview version. However, I find it cleaner to close the print preview version and fix whatever offending item I've found in my layout in the print layout version. When I'm working on a book, I find myself going into and out of the print preview version on an as needed basis. My final check of a document before I create a PDF or print a hard copy is always the print preview version. After the final check, I close the print preview version and produce my document.

As always, I hope you go online to read more about this topic. If you Google the following term, you'll see what other people have to say about print preview: Print Preview Word 2003 (or 2007 or 2010).

Wednesday, April 20, 2011

Correcting Page Numbers in Headers or Footers

When you insert a New Page section break, page numbers in your header or footer can restart at page number 1. If it should be page 151, you have to fix it. More than likely the Same as Previous didn't engage or you've introduced some other element while editing. Having page numbering start over at 1 is very easy to do...especially when you don't want to do so.

Fixing Page Numbering
1. Access the header or footer with the page number...remember you just double-click in the area.
2. Highlight the number (hold down your Ctrl key and pass your cursor over the number).
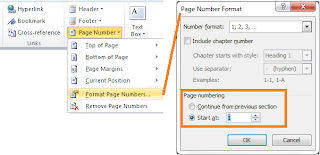
3. Display the Page Number Format dialog.
Word 2007 or 2010
Click the Insert tab and locate the Header & Footer group. Click Page Number drop-down arrow. A menu appears. Click Format Page Numbers.

Note: The same selections are available on the Header & Footer Design tab that appears on the far right when you access a header or footer. Or, you can right-click the page number, and select Format Page Numbers from the pop-up menu. Like most tasks you can complete in Word, Word has many paths to the same dialog.


Word 2003
Click Insert, and then select Format Page Numbers.

4. In the Page numbering area, click Continue from previous section.
5. Click OK. Your page number resets to the correct number.

Another use of this screen is to start a page number on any number you want.
1. Confirm that Same as Previous is turned off.
2. Display the Page Number Format dialog.
3. Select the field Start at, and enter the starting page number you want.
4. Click OK.

This ability is handy when you want to use a different sort of numbering for another section of your book; for example, you might want to use Roman numerals for the Table of Contents, Preface, or Foreword. To get Roman numerals to appear, look at the top of the dialog and click the drop-down arrow beside Number format. Roman numerals are one of the options.

Just remember that you need to work with the New Page section break and the Same as Previous to get the desired results.

Monday, April 18, 2011

When Headers and Footers Go Awry

After you know how to set up mirror margins and add headers and footers, creating a book is just a few steps away.

Preliminary
--Write separate chapters (Word documents with just your text).
--Be sure to apply heading styles to your text.
--Be sure you have an even number of pages...remember slip sheeting.

Construct a Book
--Open a blank document and set up mirror margins and headers and footers.
--Put in a few blank pages at the beginning of your document for an electronic table of contents,
--Insert a New Page section break for your first chapter and update headers and footers.
--Insert the text from chapter one. See the posting Stringing Documents Together.
--Insert a New Page section break for your second chapter and update headers and footers.
--Insert the text from chapter two.
--Repeat until you have added all of the chapters.
--Insert an electronic index if you added the entries.
If you haven't, you can do it later and insert the index at any time. Just insert a New Page section break and then follow the posted instructions to insert an electronic index.

All of this is very ideal world. If you follow the instruction exactly, all will be right with your world.

Documents aren't created in ideal worlds. You can follow these instruction exactly and end up editing and cause your headers and footers to go awry.

Headers and footers are easy to fix...if you know the trick.
1. Go the last page of your document, and look at the footer and header.
2. If they are correct, scroll up to the next header and footer.
3. When you find a header or footer that is incorrect, look to see if the Same as Previous is turned on.
4. If yes, turn it off and fix the footer or header.
5. If no, look for a section break that you didn't intend to put in.
As you move toward the beginning of your document, you'll come to a place where all of the footers and headers are correct.


If things get too bad, you can start from scratch. Follow the book instructions above to create chapter 1, and then copy and paste the text of chapter 1. Because the text and the header and footer on any given page are on different layers of the document, you can place the text without affecting the header or footer. Repeat the instructions to add each subsequent chapter.

If you never have to look at this post again because all of your books are ideal, you'll still use what you learn here when you begin to deal with templates. The instructions I've been posting are lots of what you need to know to create templates. We are not going to go into templates yet. However, before the end of the year, I'll get to them. They're fun. With the background you'll have by the time we get to them, they won't be intimidating.

Saturday, April 16, 2011

Page Breakin' Ain't Hard to Do

Everything I've said about headers and footers up to this point has been about setting up headers and footers, accessing headers and footers, and snippets of information you might want to consider putting in your headers and footers.

When we left off, I had you setting up mirror margins and checking two options on the Layout tab of the Page Setup dialog:
--Different odd and even
--Different first page

If you played around with a document that is several pages long, you discovered that the snippets of information that you put in an odd page header or footer repeated in all pages that included an odd page header or footer. The same holds true for any snippets of information you placed in an even numbered header or footer.

Here's what we didn't address:
1. What do you do with the different first page?
2. What do you do when you're finished with Chapter 1 and you need to change the header snippet to Chapter 2; that is, you're starting a new chapter?

Dealing with First Page Header and Footer
Because you checked the option, the header and footer of the first page of your chapter is separate from even and odd page headers and footers. The separation allows you to put something different in your first page header.

For example, do you have a family crest that you'd like to place in the center top of the first page of each chapter? Or, do you want to repeat a smaller version of a cover graphic? You don't have to put anything at all in the header. You can just use the white space as a signal to your reader that a new chapter has started. When your reader thumbs through your book, they'll see the white space breeze by and know they are in a new chapter in a flash.

With this layout, you've most likely included page numbers in your footer, and you're going to want the page numbers to be continuous; for example, 1-20 for chapter 1, 21-36 for chapter 2, 37-44 for chapter 3, and so forth. Be sure to notice that chapters always end on an even number page. If you remember when we started talking about printing on two sides of a piece of paper, the front side was an odd numbered page and the back side was an even numbered page. So, if your text ends on page 35 of chapter 2, you need to create a page 36, which will be blank. The blank page is call a slip sheet. Look for a previous post on slip sheeting.

So make a decision on what you do or do not want to add to your first page.

Starting a New Chapter


Look at the circled Section start with the default selection New page . Your selection in this field tells Word when to start a new chapter with a First Page header and footer.

Using the Option:
1. Open the document I had you create so that you could play with headers and footers.
2. Confirm that it's several pages long.
3. Scroll to the end of the document.
4. Double-click your footer and confirm that it's an even page footer.
If it's an odd page footer, double-click in the text area to close your footer, click your cursor at the end of the text, and enter a page break (hold down the Ctrl key, and press Enter). Word inserts an even numbered page. Press Enter a few time to add a few blank lines.

5. Double-click in the text area to close your headers and footers.
6. Insert a Next Page section break.
For Word 2007 or 2010, select Breaks on the Page Layout tab. A drop-down menu appears. Under Sections Breaks, select Next Page.

For Word 2003, click Insert on the menu bar, and then select Break. The Break dialog appears. Under Sections break types, select Next Page.

A new blank page appears.

7. Double-click in the header of the new blank page.
You'll find that it's a First Page Header. You'll also find that any changes you made to your first First Page, appear in this page automatically. Notice the Same as Previous off to the right. Word has copied your first First Page.

8. Close your header and add more text to your document.
When you naturally overflow to a new page, you'll notice your header says the same thing it did in Chapter 1. That's because this header also has the Same as Previous applied. You can break it and make this header and subsequent even numbered pages say Chapter 2.

9. Remove the Same as Previous.
In Word 2007 or 2010, notice that you've had a new tab turn up with the title Header & Footer Tools Design. Click the tab, locate the Navigation Group, and click the highlighted Link to Previous.

In Word 2003, on the View menu, click Header and Footer, and then click Link to Previous .

The Same as Previous disappears, and you can type anything you want in the header. For these instructions, type Chapter 2. If you look at previous even headers, you'll notice that they are unaffected.

10. When you get to your first odd numbered page, remove the Same as Previous and update your header as necessary.

This same process works for footers that have Same as Previous applied.

Have fun playing with this, because next we are going to start talking about troubleshooting when something goes wrong and Word gets confused.

P.S. If you check my research blog, you'll find that I've been consumed with a British website. That's why I missed posting yesterday. Somehow I think my fellow researchers will understand.

Wednesday, April 13, 2011

Mirror, Mirror on the Wall Who Has the Best Layout of All?

When you look at the headers and footers that publishers use for their books, you notice that the pages are right-handed pages with odd numbers and left-handed pages with even numbers. The layout is referred to as mirrored. The position of the page numbers and perhaps other items in the headers or footers are in mirrored positions; that is, exact opposites on facing pages.

The layout provides easy navigation for your reader. However, pages are also set up in this manner to accommodate duplex printing, which involves printing on both sides of a piece of paper. The ability to print in this manner gives you the polished look of a professionally produced document.

In addition, if you plan to use a print on demand service like Lulu (www.lulu.com), you will need to have your document set up with a mirrored layout for their high speed, high resolution printers and binders. You could just buy layout services from someone like Lulu or me; however, the sticker shock may be more than you bargained for. Besides, why would you be reading this blog if you're not up for a little adventure with Word?

To make this layout possible, you need to alter the Normal layout of one page to a mirrored page which accounts for two pages (the front and back of one piece of paper).

1. Open a blank document and display the Page Setup dialog.
Word 2003
Select File, and then Page Setup. The Page Setup dialog appears.

Word 2007 or 2010
Select the Page Layout tab and locate the Page Setup group. Click the small arrow in the lower right of the group. The Page Setup dialog appears.


2. In the Multiple pages field, click the drop-down arrow and select Mirror margins.
3. Notice that your preview changed from one page to two. The pages represent the front (odd numbered) and back (even numbered) pages for one piece of paper.

Next, you need to pick your Headers and Footers options.


1. Click the Layout tab.
2. Click the option Different odd and even.
3. Click the option Different first page if you want to use a graphic at the beginning of each chapter. This option has lots of other uses but we'll get into that later. For these instructions, click the option.
4. Click OK.
5. Look at your document. It doesn't look one bit different than when you started.

Complete these steps to see the changes you've made.
1. Add text so that you fill five or six pages. It doesn't matter what the text is.
2. Open a header or footer (double-click above or below the typing area).
3. Look for a few new items...
First Page Header and First Page Footer
Even Page Header and Even Page Footer
Odd Page Header and Odd Page Footer.

If you keep typing, the even and odd page headers repeat.

When you add text to an even header (for example, a book title), the book title appears on all pages with an even header. When you add text to an odd header (for example, a chapter title), the chapter title appears on all pages with an odd header.

Play with this for a while. Be sure to notice that your headers and footers have preset tab stops, which I'll talk about later. For the moment, I think I've probably exhausted your attention span and/or patience. I'll pick up this topic in my post on Friday. We still have lots to look at and do.

Monday, April 11, 2011

Space for Headers and Footers

Professionally produced documents include navigational and publication information in headers and footers. Readers use this information to flip through a document and locate infomation quickly. Therefore, an understanding of headers and footers is essential if you're going to produce documents that meet muster.

The default for any document is one inch margins. Within the one inch at the top and bottom of the page is one half inch that is reserved for header and footer text. The text might be an automatic page number, a book title, a chapter title, and a revision date. This information runs from page to page as you type along in your document. Depending on how much information you place in your header and footer, your reader can use it for navigation.

Make a point of looking at books to see how publishers use headers and footers to help you navigate their books.

I divide my genealogy books into chapters. So I might have:

Chapter 1: The Immigrant Family
Chapter 2: The First Cousins
Chapter 3: The Second Cousins

When I add the chapter number and title to my header, a reader can fan through the pages and know about where they are in the book. If they've located something of interest in the table of contents, they can fan through the pages until thet see the chapter title in the header, slow down, and look for the exact page.

The first step in knowing how to deal with a header or footer is to know where the space for each element is controled. The two circled fields show the amount of space that is reserved for a header or footer. Like any other field, you can change the default if you need to; however, making the decision to change the size of a header or footer should be part of your overall layout decisions. To start, you just need to know where to find the fields. Notice that any changes made get applied to the whole document.

Go take a peek at the Layout tab.

Word 2003
Select File, and then Page Setup. The Page Setup dialog appears.

Word 2007 or 2010
Select the Page Layout tab and locate the Page Setup group. Click the small arrow in the lower right of the group. The Page Setup dialog appears.

On the Page Setup dialog, click the Layout tab.

There's lots more you need to know. This post is just the second of many related to footers and headers.

Friday, April 8, 2011

Numbering Pages

When I wrote about inserting an electronic Table of Contents and Index, I assumed that you knew how to add automatic page numbering to pages. Adding page numbers is a basic skill. However, if you’ve never done it, you simply might not know how to do it. Covering this topic also gives me a chance to make some introductory remarks about headers, footers, graphics, and main page…hint if you think of them in layers it helps.

Insert Page Numbers: Word 2003
1. Open a document and confirm that your view is Page Layout. Click View, Print Layout to change it. This view shows a print version of your document, including headers and footers.
2. Click Insert, and then Page Numbers. The dialog appears.
3. In Position, accept the default of Bottom of page (Footer).
4. In Alignment, accept the default of Right.
5. For Show number on first page, you can leave it checked or you can remove the check mark. Page numbering will start on page 2.
6. Click OK. The page numbers appear in the footer of your document.

Insert Page Numbers: Word 2007 or 2010
1. Open a document and confirm that your view in Page Layout. Click View and locate the Document Views group. Click Print Layout to change it. This view shows a print version of your document, including headers and footers.
2. Click Insert, and locate the Heading & Footer group.
3. Click Page Number. A menu appears.
4. Click Bottom of Page. The sample menu appears.
5. Click Plain Number 3. The page numbers appear in the footer of your document.


When you look at the page number in Word 2003, the number just appears as grayed out below your normal typing area. If you want to add information to the footer area—for example, a revision date, double-click near the page number. When you do so, the footer (and header) appears. You can type in the footer (and header) but not in the body of your document. To return to the body of your document, double-click in the body. The footer (and header) gray and you are again able to type in the body of your document but not in the header or footer.

When you look at the page number in Word 2007 or 2010, you can see the footer because Word has automatically opened it for you. The assumption is that you might want to add information—for example, a book or chapter title for document navigation. You can’t type in the body of your document until you close the footer. To do so, double-click in the body of the document. The footer (and header) gray and you are able to type in the body of your document again but not in the header or footer. If you want to display the footer area again, double-click near the page number.

Playing with this should lead you to understand that your document is layered. If you could turn your electronic page on its side and look at its thickness, you would see layers.

1. The layer with your typing area.
2. The layer with your graphics, floating over your typing area.
3. The layer with your header and footer, floating over your graphics layer.

If you can learn to think of your documents as layered, your understanding of how graphics, and headers and footers work expands. When you can separate the layers, you have a better chance of fixing graphics, and headers and footers when things go astray. I’ll continue talking about headers and footers in subsequent posts. In the meantime, take a few minutes to play with the layers.

P.S. Pattie and I are going to see Megan Smolenyak in Lakeland, Florida. Look out Imperial Polk! The Tech Tamers are coming.

Wednesday, April 6, 2011

Are We There Yet? Follow Up


I realized very early this morning that when I told you how to add property columns, I forgot to tell you how to remove the columns you don't want to see.

When you right-click a column title and the pop-up menu appears, you click a column title to add it. Windows adds the heading.

To remove a column, right-click a column title and click an item that has a check mark beside it and Windows removes the heading.

If you click the More option at the bottom of the pop-up, a Choose Details dialog appears and you can click column titles to add and remove columns. Column titles with check marks appear and those without check marks do not appear. When you click OK, Windows updates the columns based on your selections.

Tuesday, April 5, 2011

Are we there yet?

When I start talking to people about finding documents on their systems, I find that lots of people do not understand the navigational tree structure that is used to present documents in Windows. They get frustrated when they’ve saved a document and lost it. They start clicking on the tree while muttering some very unkind words about computers, programmers, and Microsoft.

I have a similar problem at work. I have long lists of documents with cryptic names that meet a standard naming convention for my department. Knowing that I’m meeting the naming convention doesn’t help me one bit when I’m rooting around for a document and I have someone breathing down my neck while I do it. It’s like dealing with a four-year-old as they repeatedly ask, “Are we there yet?”

One thing that I’ve learned to do to make my life easier is to complete document properties. Properties are tracking elements that are built in to Word documents. After you complete properties for a Word document, you can display the properties when you begin to search for a specific document.

Adding Document Properties
1. Open a completed document.
2. Display properties.

In Word 2003, select File, and then Properties.
In Word 2007, select the Office button to display a menu, and then select Prepare, Properties. Document tracking properties appear at the top of your document and they match the fields shown in the dialog above.
In Word 2010, select File to display a menu, and then select Info. Look to the right and you’ll see a thumbnail of your document. Below the thumbnail are property fields that match the fields shown in the dialog above.
3. Complete fields. For example, enter the title and subject of the document. Enter comments; for example: In last edit I included the notes sent to me by cousin Ed.
4. In Word 2003, click OK to save your properties and close the dialog.
5. Save your document. In Word 2007 and 2010, updated document properties are saved when you save the document.

Using Document Properties
1. Open Explore. Right-click Start, and then select Explore or Open Windows Explorer. The navigation tree for your system appears.
2. Open the folder with your document in it. More than likely, you’ve saved your document in My Documents. If you’ve saved the document in a sub-folder, open that folder.
3. Display details. More than likely, your system will be set up to display thumbnails of your documents.

Select the Display options button, and select Details. Your display updates to a table display that includes properties; for example, Name, Size, Type, and so forth. You can change the properties (columns) that appear.

4. Right-click in any column title to display a pop-up menu, and select the property fields you completed; for example, author, title, or comments. Select the More option to see more properties that you can display; for example, subject.


Be sure to click this graphic. You can see how Avery Dennison uses properties to add a copyright statement to their templates.
5. Move your cursor over a document name that includes properties. A pop-up appears with property information.

Adding properties to documents takes just a few seconds but it can save you lots of searching and frustration. You can build in all sorts of hidden text using properties, and there are many additional uses for these properties. However, you can’t explore those uses if you don’t know about properties and don’t complete properties for each of your documents.

Saturday, April 2, 2011

Document Word Count

If you submit articles for publication, one of the considerations is word count. Editors of publications need this information because it tells them about how much room they need save for your article. You can sit down with a printed copy and count it yourself, or you can let Word do it for you.

Word Count
1. Open your document.
2. Open Word Count dialog.

In Word 2003, click Tools, and then Word Count. You have a few more options on the Word 2003 dialog. Check the Help (F1) if you want more info on these options.

In Word 2007 or 1010, click the Review tab, locate the Proofing group, and click the Word Count button.

Notice that your word count also appears in the status bar at the bottom of your window.

3. Click Close to exit the Word Count dialog.

Sending the Info to an Editor
If you’d like to simply send the editor a copy of the results in the Word Count dialog, complete these steps.
1. Click in the heading of the dialog beside Word Count to select the dialog.
2. On your keyboard, hold down the ALT key, and press the Print Screen key. A copy of the dialog was just placed on your pasteboard.
Note: On laptop keyboards, you might also need to hold down the Fs or Fn key. On my nifty new laptop, I have an Fs key that I need to hold down when I want to use the Print Screen function.
3. Open an email and paste the dialog into the body of the email. Or, open a document and paste the dialog into the document. To paste, hold down the Ctrl key and type V (Ctrl + V).
4. Email the information to the editor.

You can use this method to copy any Word dialog. This bit of knowledge is handy to know if something is going wrong and you're asking someone else for help. You can send them a copy of the Word dialog so they can perhaps spot your problem.