Monday, January 31, 2011

Searching a Web Page

So, you're on a RootWeb text page. You know the kind I'm takin' about...one of those transcribed text pages that goes on and on. The last thing you want to do is read the entire page looking for your family name. The good news is that you don't have to read the page from stem to stern. You can use a keyboard shortcut to display a Find toolbar that you can use to complete an electronic search.

First, display a web page, and then hold down the Ctrl button, and type F. A Find toolbar appears above the web page.

Second, enter a search term in the Find field. The page usually scrolls to the first instance of the search term. Lots of times, all instances are highlighted.


This sample happens to be for Internet Explorer. The Explorer Find includes a few additional options that others might not offer.

Third, check the entry. If this isn't what you're looking for, click the Next link. In some systems, you click a down arrow beside the Find field.


This sample is from a Google Chrome page.

To close the Find toolbar, click the X.

For the most part, the Find tool will search text on a website. However, it will not search an image or graphic.

The Ctrl + F combo works in some form or fashion in every piece of software I use. So when in doubt, try Ctrl + F, and see what happens.

Friday, January 28, 2011

Slip Sheeting

When I speak to people about constructing books with several chapters on a PC, they are always surprised when I talk about adding blank pages at the end of chapters. Blank pages are necessary, because, as a standard, chapters usually start on right-hand (odd numbered) pages. Open any book to see the layout. You have:
--left-hand pages, which are even numbered pages
--right-hand page, which are odd numbered pages

When you are writing on a PC and you reach the end of a chapter, you need to note whether you are ending on a left or right (even or odd numbered) page. You know that you will want your next chapter to start on an odd numbered page. If the last page of your chapter is an odd numbered page, you need to add a blank page...the slip sheet...as the "back" of your right-hand (odd numbered) page.

To see a physical representation, get two sheets of paper. Note that you have four surfaces to write on. Mark the front and back of the first sheet and the front of the second sheet. What do you have left? The back side of a sheet with no mark on it. This page is the slip sheet...the back of an odd numbered page...the blank page.

When you are on your PC, you have to add the blank page manually. You can add a blank page in a number of different ways. The easiest way is to press Enter until you see a new blank page, and then hold down the Ctrl key and press Enter to add a hard return. If you turn on the hidden codes (see previous post), you'll see this:


Your cursor lands on a new page...an odd numbered page, which is where you want your cursor to be. You can now start writing your next chapter.

Thursday, January 27, 2011

The Road to Englewood w/Pattie and Pam

On Wednesday Pam and I traveled south from Wesley Chapel to do two presentations at the Englewood Genealogical Society of Florida. The occasion was the tenth anniversary celebration of the society.

Pam started the afternoon with her signature presentation "Taming Templates". The society then celebrated their anniversary with cake, cookies and beverages much to the delight of 111 attendees. The next presentation was one of my favorite "Nurturing the Next Generation of Genealogists".

Pam and I had a great time talking to everyone before and after the presentations and want to thank the society for their hospitality.

Wednesday, January 26, 2011

Stringing Documents Together

After a presentation at the Englewood Genealogical Society today, two people asked me about adding text from other files. Both of these people wanted to be able to write separate chapters of books, and then combine the chapters afterward to form the book. This type of task is usually done with a Master Document. However, using the Master Document requires some advanced Word skills.

After some thought, I realized there was an easier solution. This solution assumes that the person has formatted the text using Styles, including applying Heading 1, Heading 2, and Heading 3 Styles to titles so that they can be used to generate a table of contents.

Here’s the solution to stringing documents together:
1. Open an instance of the Blank document. *
2. Click the Insert tab.


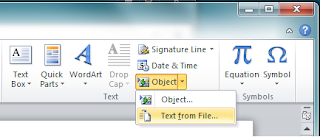
3. Click the arrow beside Object. A drop-down menu appears.
4. Click Text from File. The Insert File menu appears.
5. Navigate to and select the document that includes the text you want to add (Chapter 1).
6. Click Insert.
7. Repeat steps 3 through 6 to add the text from the next document (Chapter 2).
8. Repeat the steps again to add text from a third document, and any text from subsequent documents (Chapter 3...).

* You might want to create a title page, and then add text to the end of the title page rather than opening an instance of the Blank document. Use steps 3 through 6 to add the text from documents.

Tuesday, January 25, 2011

Keyboard Shortcuts

Do you need a list of all keyboard shortcuts? Here's an address that will take you to the list: support.microsoft.com/kb/126449

The list is a long one. If you're new to keyboard shortcuts, one strategy for learning them is to learn them one by one. Pick one, use it, and when you can use it without thinking about it, pick another shortcut. Over time, you'll find that you've learned many of these shortcuts.

I plan on continuing to post information about the shortcuts that I use. Post a comment if you have a question about any of the shortcuts and I'll see if I can help.

See also http://technology-tamers.blogspot.com/2012/02/keyboard-shortcuts.html

Clearing Your Desktop

When you have too many programs open on your desktop, have you ever wanted to just clear your desktop? Instead, you start clicking the Minimize or Close button on each program you have open. It’s a long process to get them all minimized or closed.

A shortcut is available if you are using a Windows keyboard.

Here’s how you use it.
1. Look for a key with the Microsoft Windows logo on it. The key is frequently located in the lower left of your keyboard near the CTRL and ALT keys.
2. Hold down the Windows key, and then type M. The system minimizes all open programs at once. Your desktop is cleared.

Wednesday, January 19, 2011

Thesaurus on the fly


Have you ever wanted to look up a word quickly to confirm its meaning or find a synonym? Here's a quick way to display the Thesaurus in Word:

1. Double click the word to select it.
2. Hold down the Shift key, and press F7.

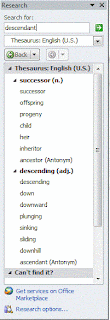
A Research pane appears on the right side of your document. You can check the synonyms for your word and have a loose definition of the word or select a substitute word.

1. With your cursor, point at the substitute word you want to use. A drop-down arrow appears to the right of the word.
2. Click the arrow, and then select Insert. The system replaces the word.

Hidden Word Codes

When you add text to a Word document, the program adds codes behind the scenes. Most of the time, you don’t need to see codes. However, as you are able to do more in Word, being able to see coding becomes a necessity.

You can show and hide the codes by clicking the Show/Hide button on the Home ribbon. You can also use the keyboard short cut: Hold down the Ctrl and Shift keys, and type *. Repeat the keyboard short cut several times to toggle codes on and off. The button is also a toggle.

How can you use these codes? Mostly, you use these codes when something is not behaving and you want to see if a hidden code is responsible for the misbehavior.

What kinds of codes do you see?

A dot appears between words to mark spaces…one dot per space.

A paragraph mark appears at the end of each paragraph. Each time you press Enter, Word inserts this mark. If you know how to use Styles to format paragraphs, the formatting for the paragraph resides in the paragraph mark at the end of each paragraph. In addition, the final paragraph mark at the end of the document contains the page layout information; for example, margins, page orientation, and so forth. A hard page break (Ctrl + Enter) with a paragraph mark appears as follows:


An index entry looks like this:


When adding an index entry, codes appear automatically, which usually startles first-time indexers. Worse, they don't know how to hide the codes. When you want to review index entries, you can Show/Hide codes and make corrections or additions. In addition, when index entries are visible and you spell check, you can make corrections on the fly.

Many other codes are possible. Again, the more you learn to use Word, the more you’ll want to know about these hidden codes. If you’re a casual user, the big item that you should get from this post is that Styles-related information resides in the paragraph marks at the end of each paragraph.

I’ll talk about using Styles later on this blog. Or, you can get adventuresome and do a Google search on Word Styles and Formatting. You’ll find a host of articles that explain what a Style is and how to apply Styles to text. Gaining an understanding of Styles changes how you use a word processor. In my opinion, it's well worth a bit a reading to learn how to use them.

Monday, January 17, 2011

Highlighting Areas of Text in a Word Document

When you are editing several pages of text, you can think of any number of things along the way. You can jot down what you want to do on a list. You can add an electronic comment (sticky note). However, I like to highlight text on which I need to do more work. I've been known to color code my highlights. For example, yellow means add the source citation. Blue means call the person who provided the info and confirm that it's correct. Green means check the spelling to confirm that it is correct; for example, a place name that isn't in the Word dictionary.

Highlighting text is easy.
1. Select the text with your cursor.
2. Click the Home tab.
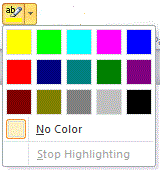
3. Click the arrow beside the highlight button. A color palette appears.
4. Select a color from the palette and a highlight appears on the text.


Removing the highlight is basically the same process.
1. Select the text with your cursor.
2. Click the Home tab.
3. Click the arrow beside the highlight button, and select No Color at the bottom of the color palette.

You can change your cursor to a highlighter. Click the highlight button to engage the highlighter; that is, change your cursor to look like the highlighter and select text to highlight. The highlight appears in the last color you selected. To stop highlighting, click the Esc key and your regular cursor appears again.

Friday, January 14, 2011

Changing Case in Word--Smith to SMITH

When I write about my family history, I like to capitalize surnames; for example, Smith becomes SMITH. Cap'ing names makes them easier for readers to find in running text. I usually forget to capitalize some names and I have to go back to fix them. To make the task easy, I learned the keyboard shortcut to change case. Here's what you do:

1. Double click the name to select it. Word adds a highlight.
2. Hold down the Shift key, and press the F3 key.

Each time you press the F3 key (with Shift), Word changes the case to one of three settings: ALL CAPS (uppercase), Initial cap (sentence case), or no caps (lowercase).

Knowing this shortcut has save me lots of extra typing. In addition, while you have the name highlighted, you can also apply bold or italic attributes. To apply, hold down the Crtl key, and type the letter B or I or both.

Wednesday, January 12, 2011

Pronunciation Marks in Word

Do you ever have to add accents or umlauts over letters? My last name is Tremé. In old document, the name is written Trêmé; however, I use only the accent on the last e because the circumflex over the first e just makes people crazy. Actually, the accent makes them nuts too but I use it anyway.

When typing in Word, I’ve learned the keyboard shortcut to create the accented e on the fly. If I hold down the Ctrl key and type the single quote, and then type the letter e, Word substitutes the symbol; that is, é appears rather than e.

Symbols are available for all letters that require pronunciation marks, and most have a shortcut key combination that you can use to add the symbol on the fly. If you find yourself often typing names and words that require these marks, it’s worth the time to learn the keyboard shortcuts.

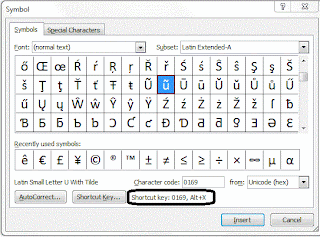
So, where can you find this information? It’s in the Symbol dialog box. In newer versions of Word, the Symbol button is on the Insert ribbon. Click the down arrow (lower part of button), and then click More Symbols… The Symbol dialog box displays. Click the Symbols tab. Click a symbol; for example, click Å©. If you look at the bottom of the dialog box, you’ll find the keyboard short cut: 0169, Alt+X. To get the symbol Å©, you would type 0169, and then hold down the Alt key and type the letter X. The Å© appears.


In older versions of Word (I'm doing this from memory), click Insert, Symbols, and the same Symbol dialog box displays. Comment on this blog if I'm not remembering well and I'll go find an old version of Word to get the correct menu selections.

Tuesday, January 11, 2011

Lost My Cursor in a Word Document

It's easy to lose your cursor while editing a Word document. I routinely am looking for my cursor after adding index entries for my 200+ page family tree book (just names, dates, and places as a reference).

In older versions of Word, if you scroll off the page where your cursor is located, all you have to do is press an arrow key and Word returned you to the location of your cursor.

In newer versions of Word, arrow key pressing doesn't work. However, if you press a key combination, you can return to the location of your cursor: Shift + F5.

Learning keyboard combinations adds to your ability to control Word and is a first step in becoming a power user of the software.

Sunday, January 9, 2011

Grabbing Text from the Net

Of late, I have had occasion to explain to several people how to grab text from the Internet and copy it to a document. The problem is that if you just paste the text you get lots of hidden html formatting, which can make cleaning up the text difficult. Here's how you eliminate the hidden html formatting.

1. Copy the text you want from an Internet page. The text you copy will include hidden html formatting.
2. Open a document (Word or WordPad).
3. Locate the Paste tool. In Word and WordPad (2007 or 2010), the Paste tool is the first button on the Home tab.
4. Click the Paste tool; that is, the bottom part of the button with the word Paste. A small drop-down menu appears.
5. Select Paste special. The Paste Special dialog box appears.
6. Select Unformatted Text, and then click OK. The text appears without any html formatting. You can then clean up the unformatted text, which is remarkably easier than cleaning up text that is littered with html formatting.