Friday, June 29, 2012

Pinterest

Whew! The Florida State Genealogical Society newsletter is complete. I'll deploy it later tonight. As part of the newsletter, I try to make sure I have a practical article. I like articles that present methodology, showcase new websites, or anything else that might be interesting and fun for the membership. I think of it as the value added item in the newsletter. I would love to have some of the many professionals in the society write articles...occasionally, I'm lucky. But when I'm not lucky, I'm either abusing the friendship of my amateur friends or writing an article myself. This month I wrote the article myself. Since I've been consumed with Pinterest, it seemed as likely a topic as any. As such, I came up with a few rules of the road for myself.

Pinning
From reading and watching pinners, I've come to the conclusion that there are a few types of pins for genealogists.
  • Bookmark pins: This type of pin works like a bookmark in a browser but it's easier to see and use. When you gather a bunch of bookmarks on one Pinterest board, you can open several websites quickly by clicking the links at the bottom of each pin. I've got one board set up with the newspaper sites I use when I'm hunting for obits and burials. I can run Pinterest in the background and pop over to it and open all of the obit/burial websites much quicker than I can from my browser. I can just physically see it better.
  • Original Content pins: I've uploaded a few family photos to Pinterest. I've been thinking about this as being akin to the message in the bottle approach. We'll see if I hear from anyone who is interested in the family. I've also thought about doing a few bios and posting them. However, it's still like tossing the bottle off of the cliff into the ocean.
  • Product pins: I'm not a professional genealogist; therefore, I don't have anything to sell. But it occurs to me that if I were in charge of selling books for a society, I would be scanning the covers of every book and journal we sell and adding the scans to the society website with a Pin It button beside each one. The website would grow by leaps and bounds because of all the pictures going up. I'd have members bring their laptops to the next meeting and we'd have a pinning party...and the backup group would be doing repinning to keep the books in the Pinterest flow.

    I keep thinking that selling genealogy services via pins would be tricky for professionals. I've read that pinners on Pinterest frown upon self-promotion in the form of self-pinning. I guess the pros are going to have to work this out for themselves.
Copyrights
You have to really stop and think before you pin. For example, I felt comfortable pinning a bookmark shortcut to Find A Grave. However, during a routing peek at what was flowing through Pinterest, I saw a couple of pins of individual memorials from Find A Grave. I can't imagine the people at Find A Grave going after someone over pinning a memorial. However, in my mind, I kept thinking that this was a violation of copyright law. For example, I go to great pains to write bios for memorials I create--original text--with lots more information than you find in an obituary. If a volunteer posts a picture, that picture belongs to the volunteer and by default is copyrighted. If someone comes behind us and pins the memorial, have they violated copyrights? I'd say yes. That being said, I've started asking myself a question before I pin:
Is this website pinnable?
  • Does the website have a Pin It button? If yes, I pin away.
  • Does the website have other social media buttons (Twitter, Facebook, and so forth)? If yes, I pin away with the idea in mind that the website is already being shared across other social media.
  • Does the website have a Pinterest policy I can read? If I can't tell, I write to the website owner and ask if they have a policy.
  • Does the website have a Please don't pin notice on their website? If yes, I don't pin.
As you can see, pinning isn't necessarily a thoughtless act.

Other Pinners
I've been watching what other pinners are and aren't pinning. My favorites so far have been:
  • Genealogy Bank: They've been pinning "How To" presentations. They are of course a subscription website.
  • The Southern Genealogist: Two sisters have been publishing lots of photographs...wonder if they've checked the copyrights on these or if they simply own that many scanned photos. Anyway these two are steeped in all things Southern.
  • Turning Hearts Genealogy: They've been pinning a cross section for genealogy. They are a commercial outfit.
  • Accessible Archives: They've been pinning scanned documents and photographs. Given their name, I'm assuming they have no copyright issues. It's a Pennsylvania-based subscription service and a good example of a commercial use of Pinterest. I'd love to know if all of their pinning has resulted in an increase in subscriptions.
Google and Pinterest
Pinterest has its own search. However, it's been opened up for Google searches as well. For example, google "Pamela Treme" Pinterest, and you'll find my Pinterest pins.

So that's a rundown of where I am with Pinterest at the moment. I hope you got something from this Friday p.m. ramble.

Thursday, June 28, 2012

Desperately Seeking Hidden Text...Part 2

If you plan to use hidden text all the time, you can make selections that cause all hidden text in a document to appear when you open the document. The setting is personal in that it works in your personal copy of Word. If readers of your document do not have the option turned on, they won't see the hidden text.


Selecting the Option in Word 2007/2010
  1. Open Word Options.
    --Word 2010: Click File, and then Options.
    --Word 2007: Click the Office Button, and then click the Word Options button.
    --Word 2003: Click Tools, and then Options. On the View tab, locate the Formatting marks group. 
  2. Click the Hidden text check box, and then click OK. Hidden text will appear automatically in any document you open. 

The Less Obvious Option--or--the Weasel move...
If you have text that you absolutely do not want anyone to read, here's an option. Select the text and change the font color to white (or whatever the background color is) so that the text simply can't be distinguished from the background.
  1. Highlight the text. 
  2. Open the Font dialog.
    --Word 2007/2010: Go to the Home tab, locate the Font group, click the drop-down arrow (dialog launcher) in the lower right of the group box.
    --Word 2003: Select Format, and then Font
  3. Click the drop-down arrow in the Font color field to display the color palette.
  4. Pick white as the color, and then click OK
If you pick text in the middle of a paragraph, the text will simply disappear but the space for the text will remain. For anyone who knows this trick, it's a hint to them to simply highlight the area, open the Font dialog and pick a color to display the text. So, if you decide to use this method, you might want to make sure you have the text on a line by itself or in an out of the way place like a footer or a header. 

I'll ponder for a while to see if I remember any more about using hidden text. Like so many things with Word, it's the little things that can matter at the oddest of moments. But, if you've played with the option, you have a better chance of remembering that it's there when you need it. 

OneNote, FindAGrave and Debby

OneNote, FindAGrave and Debby

Tuesday, June 26, 2012

Desperately Seeking Hidden Text...Part 1

I like to hide text in my documents. There I've said it! It's out there!

I hide text because I have a terrible memory. For example, I might add the path to a file in the footer of a document and then hide the text. When I send the document to someone and then get it back, I might or might not want to overwrite my original file if the file name is the same. If I don't want to overwrite the file, I have to be able to find the original file. I can reveal the file path in the footer and get a memory boost on where I tucked that file away.

Another instance when I might hide text is when I write a note to myself that I don't want other readers to see.

The only time that a reader knows the hidden text is there is if they know how to reveal it...and not many people know how to reveal it.

Creating Hidden Text
  1. Open a Word document with text in it.
  2. Select some text that you want to hide.
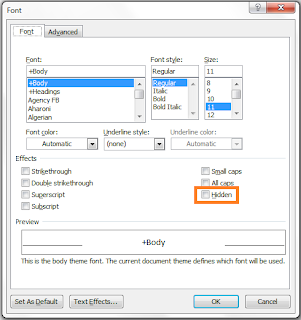
  3. Open the Font dialog.
    --Word 2007/2010, go to the Home tab, locate the Font group, click the drop-down arrow (dialog launcher) in the lower right of the group box.
    --Word 2003, select Format, and then Font.
    The Font dialog appears.
  4. In the Effects group, click the option Hidden, and then click OK. The text disappears.
Revealing Hidden Text
  • Select the area that the hidden text is in and repeat the steps above to display the Font dialog and remove the check mark from the dialog. Select OK and the text is visible again. The check box might have a square in it, which indicates that some of the selected text has Hidden applied while other selected text does not have the attribute applied.
--OR--
  • Select the area that the hidden text is in, hold down the Ctrl key, and press the spacebar once. The text is visible again because you removed local formatting. Long time readers of this blog will remember me going on and on about local formatting versus global formatting. If you want to review, see  Global Changes vs. Local Changes.
--OR--
  •  Select the Show/Hide button. See Hidden Word Codes for more information on the button. The text simply appears. If you click the Show/Hide button again (it's a toggle like a light switch with on/off positions), the text disappears again. Casual users usually don't know about the Show/Hide button and so they won't know about the hidden text using it can reveal.
Next Post
I'll continue talking about what you can do with hidden text.


Pinterest and Genealogy Bank Postings

If you're not on Pinterest, you're missing the posting of links to Genealogy Bank PowerPoint presentations. Several of them are Genealogy Boot Camp. There are also presentions on Using Ancestry, Using Google Books, and Using Family History Archives, and lots of other topics. Pinterest...It's a good thing.

Wednesday, June 20, 2012

Double-Secret Hidden Clipboard


Much of the time, when you copy and paste text or graphics, you do so one time. However, you might have occasion to copy the same text or graphic in different places in the same document.

Each time you copy text to the clipboard, Word adds the clipping to a hidden clipboard. If you click the drop-down arrow (dialog launcher) in the lower right of the Clipboard group on the Home tab, you'll see all of the items you copied or clipped. You can add as many as 24 clips to the clipboard.

Here's an example of when I've used this option. I have a relative with intestate letters that has a long list of heirs. If I copy the details including the list of heirs, I can place copies with text for one of the heirs and add a ... before their name and a ... after their name. I can delete all the names before the ... and after the second...  I have a subset of the list of heirs with an indication (...) of an incomplete list. Presenting the intestate letters in this abbreviated fashion cuts down on the length of my document without losing all of their details. I make sure that the document includes a complete list in at least one location in the document.

Using the Clipboard
  1. Open the document where you want to use repetitive text.
  2. Open the Clipboard pane. 
  3. Copy a piece of text (or graphic) to add it to the Clipboard.
  4. Click in the body of your document where you want to add repetitive text. 
  5. In the Clipboard pane, click the snippet of text your want to add. Word adds the text (or graphic) where your cursor is located. 
Deleting Entries on Clipboard
  • To delete one entry, point your cursor at the entry. Word outlines the entry and shows a drop-down arrow. Click the arrow and select Delete
  • To delete all entries, click the Clear All button at the top of the Clipboard pane. 
Exploring the Options
  • Click the options at the bottom of the Clipboard pane.
  • Click the Show Office Clipboard Automatically option if you plan to use the pane often.
So now you know the location of the double-secret hidden clipboard...but more important, you know how to use it. 

Sunday, June 17, 2012

Fumbling with Numbering

In most of my posts, I haven't spent a lot of time on bullets and numbering. As a general statement, they have business applications but not so much for a genealogist...unless you happen to be a professional who writes instructions.

I'm assuming that any numbered genealogy charts you might want to produce that you're producing them using genealogy software. Please produce them using your genealogy software and copy and paste the results in Word documents.

Numbering in MS Word has a long and sordid history. People have written articles and done hour long presentations trying to explain how Word handles numbering.

For Word 2003, the deal is this...Word creates one long list of numbers. If you have five sections in a document with five number items in the five sections, Word has one list of number 1 through 25. When you restart a list at the number 1, it adds code to restart and show the number 1 but it really really might be 15 in the little mind of Word. If you try to add an additional list or list item before #25 in the list, Word loses its mind and your number system gets messed up. The problem was fixed in Word 2007 and the developers added a cool shortcut that you might want to learn to use if you have occasion to use numbered lists. This shortcut also works in Word 2010.

This shortcut assumes that you're are using the Number button in the Paragraph group on the Home tab rather than a numbered style.

  1. Start your list by clicking the Number button in the Paragraph group on the Home tab. 
  2. Type the text for a step or two (see the sample above). You can then break your list to add a screenshot.
  3. Press the Enter key to get a new numbered line. 
  4. Click  the Number button to turn off the numbering.
  5. Insert a graphic or text that doesn't need to be numbered; for example, a note.
  6. Press the Enter key to get a new line. 
  7. Click the Number button to turn on the numbering. 
  8. Look for a button with a lightning bolt to the left the number. Depending on what you've done, you can get a continued number (3 as shown in the example above) or a new list starting with 1. 
    • If Word continues numbering from the previous list (3):
      • And that's what you want, you can just keep typing. 
      • But you want to start a new list at 1, you can  click the drop-down arrow on the lightning bolt button and select the Restart Numbering option.
    • If Word starts a new list with the number 1:
      • And that's what you want, you can just keep typing.
      • But you want to continue the list, click the drop-down arrow on the lightning bolt button and select the Continue Numbering option.
For anyone who has fought numbering in MS Word documents, this shortcut is a big deal. If you have only occasional need for numbered list, count your lucky stars if you're using Word 2007 or 2010. You'll be spared from hours of hair pulling frustration while trying to get the numbering to work.

Wednesday, June 13, 2012

I Want Control!


Most Word users readily figure out how to select contiguous text; that is, hold down your mouse key and move your mouse to select text. The select skill that isn't so obvious is selecting non-contiguous text. In the sample above, I have non-contiguous text selected in preparation for doing something to the text...apply a style or click the Bold button or whatever. You'll find this skill useful when you copy and paste unformatted text and you need to format the text.

Select Non-Contiguous Text
  1. Using your mouse, select the first text string.
    If you're selecting an entire line similar to the example above, move your cursor past the left margin to change your cursor from an I-beam to an arrow, and then click once to select the entire line.
  2. Hold down the Ctrl key, and select additional non-contiguous text. You can actually select single characters if that's what you need to do. 
  3. Release the Ctrl  key when you are finished selecting, and then apply formatting. 

Over the Next Few Weeks
I'm working on the Florida State Genealogical Society (FSGS) newsletter. I produce three issues a year (February, June, and October). By far and away, the June issue is always the wildest one. The Conference Committee is in the process of planning the November conference and news is breaking by the second. With breaking news, I'm placing, replacing, adding, and deleting all over the place to make sure that each piece shows where it should. The good thing about all this work is that the June issue is usually an interesting one for FSGS members. 

The June issue is also the one that is most prone to being late! So, over the next few weeks, my postings to this blog might be a bit erratic. I'll apologize in advance and I can tell you that I should get back to regular postings in July if you can just bear with me. 

Friday, June 8, 2012

It's All About You and Your Needs...the Status Bar

Click the graphic to see a larger version.
Tap the ESC key to return to this post.

The Status bar runs across the bottom of your Word document and it can tell you a lot about your document or just a little. The infomation you see depends on what you've turned on or off. Word comes with default settings. Lots of users live with the default settings because they don't know how to change the settings...or even how to look up how to change the settings. Since the Status bar can go a long way toward making your life easy, it's worth the time to look at and adjust it so that it's all about you and your needs.

To see the settings list, right-click in the Status bar. Entries that are checked are enabled and probably visible. Entries with no checkmark are not enabled. On your list, go down the list and click options to turn them on or off. Checked options are turned on while unchecked options are turned off. The list above shows the information I like to see on my Status bar.

Lots of the options are convenient. For example, I like to have the following infomation showing:
  • Page tells me the page number of the document where my cursor is located.
  • Page x of x tells me how many pages are in my document.
  • Words tells me how many words I have in my document.
In addition to information, I can display active buttons. For example, I like to have the Track Changes button on the Status bar.  I can click it on the fly to turn on/off Track Changes and not have to use the ribbons.

If you want more information on what a particular option might offer, look up Status bar in the Help. So there you have it...how you look it up. So go adjust your Status bar and make it all about you, you, you!

Thursday, June 7, 2012

Slippery Table Squares


When you are working with a table, have you ever noticed the two small squares that appear and disappear at the beginning and end of the table? They have a use.
  • Upper Square: Click this square once and you select the entire table. For example, you might want to click this button when you need to copy and paste a table.
  • Lower Square: Point your cursor at this square and your cursor turns into a double-arrow. When you see the double-arrow, click your mouse button once and hold it. Your cursor turns into cross-hairs. Move your mouse and Word resizes the entire table.
The squares can be slippery little buggers--appearing and disappearing as you move your cursor near them. If you're having trouble grabbing one, click anywhere inside the table once to anchor your cursor to the table, and then you should be able to click a square successfully.

Tuesday, June 5, 2012

Document Mapping and Outlining

Writers sorta come from two points of view--some of us outline, some of us don't. I'm lucky in my professional life because the books I write have standard sections. The front matter and back matter are similar from book to book with the chapters in the center based on the system I'm documenting.

For most of you, I imagine that you would write a family history as a standalone book and you might want to outline because it helps you. You can use the Document Map to aid in this process. Again, this post assumes that you have applied Heading styles...the backbone of so many Word functions.


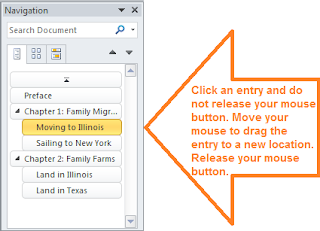
You can move a section and all of its associated text to a new location. For example, in the map above, if I grab Moving to Illinois and move it below Sailing to New York, Word also moves all text under the heading Moving to Illinois.

To Move Text
  1. Click an entry in the list and do not release your mouse button.
  2. Move your pointer to a new location to drag the entry to that new location.
  3. Release your mouse button. 
To Add a New Section
  1. Right-click an entry in the list. The pop-up appears. 
  2. Click New Heading Before or New Heading After. A blank entry appears in the list of entries and the document scrolls to that location.
  3. Type the new heading. When you press the Enter key, you get a new line to start the running text for the section. 
To Promote or Demote an Entry in the List
  1. Right-click an entry in the list. The pop-up appears.
  2. Click Promote or Demote to apply the next heading level up or down to the text. 
To Expand and Collapse the List 
Be sure to notice that the list includes Expand All and Collapse All options.
  1. Right-click an entry in the list. The pop-up appears.
  2. Click Show Heading Levels. The levels appear on a separate list.
  3. Click Show Heading 1 levels. The list collapses to show only Heading 1 entries. When you have only Heading 1 levels showing, you can rearrange the headings. Word moves the Heading 1 entry, associated text, and any Heading 2, 3, etc. and associated text. You are rearranging chapters. 
  4. To expand the list again, repeat the steps above and select Show Heading 3 level.  
To Delete
Use caution when deleting from the list. When you delete a heading, Word deletes all associated text. 
  1. Right-click an entry in the list. The pop-up appears.
  2. Click Delete. Word deletes the heading and all associated text. 
Conclusion
While I don't always feel the need to use the map, it's nice to know it's there when I need it. 

Sunday, June 3, 2012

Pinterest: Pick a Name and Stick with It

In my zeal to oganize my Pinterest boards, I renamed one of them. When I clicked Save, I managed to rename the public URL...the address of the board...which broke the link to the board. From what I'm reading, anyone who shared the board on Facebook or added an online bookmark to the board got dumped. The next time they attempt to use the link they will get the dreaded 404 error...Page not found. In addition, if the board was liked on Facebook, I just dumped my count, which is reset to zero.

My best advice is to think long and hard before you name a board. If you want to use a naming pattern, plan it out early. And once you pick a name for a board...stick with it!

The good news in all of this is that I haven't had much time to play with Pinterest, and so, I only had a few links broken. I sorta feel a need to apologize to the people I accidentally dumped! However, on Printerest, tracking them would be impossible. After you pin something and it gets repinned, you quickly lose the thread of any further pinning.

And the search goes on for a Picnik replacement...

I ran across a site that made me laugh. The site presents 500 (500!) alternatives to Picnik. Driven souls at more of it have create bots to search the web looking for Picnik replacements. I've settled in happily with iPiccy, but if you're still searching, you might want to check out the more of it list.

The interesting thing about the list is that it includes a line at the bottom of each entry that allows you to quickly evaluate each entry. Here's a sample of the bottom line.