Wednesday, November 30, 2011

Generated Lists Part 1


Click the graphic to see a larger version of it.

This page shows a graphic with a title that has a Heading 3 style applied so that the title can be picked up in a generated table of contents. Below the graphic, you'll find an electronic caption (Figure 3...) that can be picked up in a generated list of figures. At the end of the caption, you'll notice an electronic footnote number with a corresponding footnote at the bottom of the page. This example is typical of a page you might want to include in a family history you might write. Over the next posts, we're going to be discussing the skills you need to produce a similar page.

Your desire to learn these skills is going to be directly related to your need to be able to produce electronic lists. Word can produce all sorts of electronic lists. You already know what you have to do to set up a document so that you can generate a Table of Contents...an electronic list.  In addition, you also know how to set index entries and generate an Index...an electronic list. In this post, you are going to learn to insert the electronic caption. In the next post, we'll discuss generating a list of these figure notations.

Insert a Caption
  1. Open a blank Word document, and insert a graphic (Insert, Picture). Any graphic will do. You can use the sample pictures that come with your system if you don't have any pictures loaded in your system.
  2.  Press the Enter key to move to a new line.
  3. Open the caption dialog.
    --Word 2003: Select Insert, Reference, Caption.
    --Word 2007/2010: On the Reference menu, locate the Captions group, and click the Insert Caption button.
  4. In the Caption field, Word has started the caption for you with Figure 1. I usually click beside the 1, type a colon, and then type the text of the caption.
  5. Click OK, and Word adds the caption below your graphic.
  6. Repeat steps 1 through 5 several times, and then save your document. You want several graphics with several captions to be able to generate a list. Notice that word automatically numbers the captions for you. (It's a computer thing...it loves to count.)

Have fun and we'll insert the electronic list of captions on Friday. 

Monday, November 28, 2011

Graphic Text Wrapping Options

Now that all the cooking and eating are over...it's back to posting.

Handles
When you insert a graphic, the graphic comes in with visible handles. Handles are small circles at the sides and corners of graphics. You can use them to resize the graphic. The top center handle is different because you can use it to rotate the graphic. Click outside of the graphic (lower right will put you in the style applied to the graphic) and the handles disappear. Click inside of the graphic and the handles appear. 
Text Wrapping
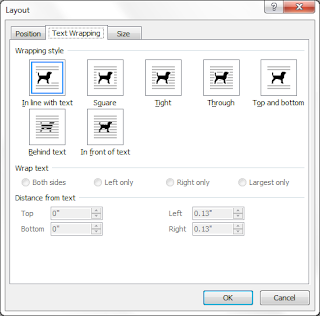
Text wrapping gives you some options that allow you to dress up your graphic presentation. 

Right-click the graphic to display a pop-up menu. 

Word 2007 or 2010: Select Size and Position
Word 2003: Select Format Picture, click the Layout tab, and then click the Advanced button. 

This graphic is from Word 2010. Slight differences based on the version of Word you are using are possible.
Wrapping style
The default In line with text is most likely selected. Study the wrapping option. Notice that each option has a small preview of the option.

Wrap text
Depending on the wrapping style you select, you might need to select a side. For example, if you select Left only, the graphic moves to the left margin and the text wraps around the right side of the graphic. 

Distance from text
Depending on the wrap text option you select, you might need to adjust the white space that appears between the edge of the graphic and the text. For the most part, you'll find that Word does a good job of suggesting a distance; however, you are able to adjust it. Notice that the adjustment is in inches. 

Click OK and look at your graphic. If you need to make adjustments, right-click the graphic and display the Text Wrapping tab again. 

Trouble
These types of graphics can wander. If they do, you can click the graphic (don't let go of your mouse button) and drag the graphic where you need it. If it is still misbehaving, turn on hidden codes, locate the anchor, click the anchor (don't let go of your mouse button), and drag the anchor. 

I don't normally lock an anchor in place; however, locking is possible. If you look on the Position tab, the Options group includes the Lock anchor option. Click the option to engage the lock, and then click OK.
When you add text before the paragraph with the graphic, the graphic moves with the paragraph. You can tell that the lock is engaged because the anchor includes the lock.
Next Post
In the next post, I'm going to move on to other types of automatic lists that you can produce for a document. You already know about two types of automatic lists: Table of Contents, Index. Other types of list can also be helpful, and because you're working on a computer, your best bet is to let the computer do its job and create the lists for you. I'll show you how. 

Thursday, November 17, 2011

Inserting Graphics

Inserting a graphic (picture or clip art) is easy. Depending on what you do after you insert the graphic can make dealing with it not so easy. Let's start with just inserting a graphic.

Insert Graphic in Running Text

In Word 2003: Select Insert, Picture, and then select Clip Art... or From File...
  • If you select Clip Art..., the Clip Art pane open on the right side of your page. Your system comes with a few pieces of clip art and you can add to the collection. Type a word in the Search For field, and the available clip art appears. Try typing the word line.
  • If you select From File..., the Insert Picture dialog appears and it defaults to the My Pictures folder. You can use the dialog to navigate to and select a picture to add to your document. If you're practicing and don't have any pictures of your own, Word includes a few samples.
In Word 2007/2010: Select Insert, and then select Picture or Clip Art.

  • If you select Picture, the Insert Picture dialog appears and it defaults to the My Pictures folder. You can use the dialog to navigate to and select a picture to add to your document. If you're practicing and don't have any pictures of your own, Word includes a few samples.
  • If you select Clip Art..., the Clip Art pane open on the right side of your page. Your system comes with a few pieces of clip art and you can add to the collection. Type a word in the Search For field, and the available clip art appears. Try typing the word line.
Displaying More Clip Art
You can go to Microsoft's online clip art website from the Word Clip Art pane. Look at the bottom of the pane and you'll see some additional links. Click the link that tells you it's going to the Microsoft website.
  • Clip art on Office Online
  • Find more at Office.com
In Line With Text
When you simply insert a graphic, Word picks an alignment of In line with text. Sometimes this is what you want; however, sometimes it's not. We're going to talk about additional options in the next post...and that's when the anchors appear and madness begins.

Tuesday, November 15, 2011

Graphic Anchors


When you paste a piece of clip art into a Word document, it will frequently paste with a position selected based on where you clicked in the document. If you display hidden codes, you will find a small anchor near the clip art, which is your hint that a position has been selected. Note that the anchor is sometime embedded in the clip art and not easy to see.

If the automatically selected position is good; that is, what you need in that instance, you don't need to worry about the anchor. The trouble starts when you begin to edit. The graphic goes where the anchor goes and the anchor can sometimes move to some most unfortunate places.

The workaround that I've already given you is to insert a table. See Word Tables Aren't Just for Lists. However, this workaround isn't always the most convenient way to handle a graphic...any graphic, including clip art. So in the next few posts we're going to talk about properly placing graphics...that is, the method you're supposed to use but attempt to avoid because so much can go wrong! Still, if I'm honest, I should give you all the options I know and I know how to work with graphics.

Sunday, November 13, 2011

Back Home Again

Well we did our presentation at 8:00 a.m. yesterday morning. We were up against Drew Smith (Social Networking). As a result, we had five people attend our presentation. However, this circumstance turned out to be a good thing because we again had no projector. Let me restate that. We had a projector but no cord to attach a laptop to a projector.

Thank goodness for the syllabus where we had all of the notes from the slides. Pattie was able to do the presentation (Family Survey) and we were able to do the mail merge to produce cover letters and labels at the end. We had everybody gather around our two laptops and we showed the mail merge. And because we had so few people, we were able to not only answer questions fired at us but we were able to demonstrate the answers on the laptops.

The other nice thing about having only a few people is that we were able to have conversations...not just respond to questions. Being able to do that means you can really show people exactly what they need to know how to do, which is fun. You get to see the light bulbs go off when they get what you're showing them. The trainer in me likes to see that response.

Pattie wore a running suit instead of pajamas. So we had no wardrobe issues.

The rest of the day we just went to see this, that, or the other presentation. We had a friend with us--Cathy Vance. Cathy probably got to do more than we did. It turns out that when you're a speaker at a conference, you miss quite a bit of it. I didn't count on that.

Oh, and I forgot to mention that on Friday night at the banquet Jack Butler (FSGS President) presented me with a citation for the work I've done on the FSGS newsletter. I was so surprised and so honored. The citations are a presidential prerogative; that is, a president can choose to present them or not. It was most kind of Jack to acknowledge my work on the newsletter. If you're curious about seeing the newsletters, go to the Florida State newsletter page (http://www.flsgs.org/cpage.php?pt=10). I've been working on the newsletters for about the past two and a half years.

Next week it's back to posting. I'm going to start with posting about anchors (I promise!). After a conversation with Bonnie (a follower), I'm going to start talking about more of the automated lists too. You can set up and run all sorts of lists (lists of figures, authorities, etc.) that are automatic like a table of contents. You just need to know how to add them so that you can ask Word to insert a list of them. After that I'll probably do some posting about numbering, and nesting numbering and lettering for numbered family lists.

Friday, November 11, 2011

Florida State Genealogical Conference

We did the Paint presentation today. The projector stopped mid presentation and we just kept right on moving. We took questions while the projector cooled down. One lady was fanning it with her syllabus.

We had gotten through enough of the presentation that I they could picture what we were talking about. When the projector kicked back on, we finished the presentation. We had the time to show them lots of other tools.

Our next presentation (Family Survey) is tomorrow at 8 a.m. Pattie is threatening to turn up in her pajamas. After that, we are free to enjoy the rest of the conference. Let's hope Pattie decides to get dressed.

Wednesday, November 9, 2011

And the conference madness continues...

I'm sitting here cutting 100 CDs...50 per class. Pattie and I are doing two presentations at the FSGS 2011 conference in Maitland, Florida this weekend. Computers are supposed to save paper. However, the opposite is true. We do a mail merge for one of the presentations and it has 24 slides of instructions. It would be awfully hard to expect any society to support printing a 24 page handout or even a 12 page handout...thus I cut CDs.

The other news I have is that it appears that I'm going to have an article published in the upcoming issue of Internet Genealogy. It's about Joliprint. The editor sent me a high resolution copy of the article. Yeah!

And...Pattie and I decided to go to RootsTech. We're both registered and have airline tickets...now we need a room. This event isn't until February. Considering the subject matter, it seemed to be a natural for us.

I'll try to post from the conference. One thing I'm going to do at the conference is talk to Bonnie because she read this blog. I'm hoping to get a reader's view point and suggestions. Of course, I'll have to park my ego so I can hear what she's saying. That task is never easy for anyone.

I promise I'll get back to really posting next week.