Showing posts with label Genealogy_Book. Show all posts

Monday, September 26, 2011

Setting Up a Book Template Part 15

In the last book-related post, I said we'd look at adding a StyleRef field code to automate chapter titles in headings. If you added the last StyleRef field, you should have an idea of how we're going to do this task.

Replacing Introduction with Introduction
  1. Open your saved document Genealogy Book document. 
  2. Scroll to the third page of the Introduction section (page 15/30). 
  3. Double-click in the header area to open the header. 
  4. Double-click the word Introduction
  5. Display the Field dialog. For Word 2003, select: Insert, Field. For Word 2007/2010, select Insert, Quick Parts (Text group), Field.
  6. In Field names, locate and select StyleRef. The field Properties updates, showing the Style name field with a list of all styles used in your document. 
  7. In Style name, locate and select Heading 1. Introduction should replace the typed Introduction
  8. Click anywhere in Introduction and you'll find that Word adds gray fill because what remains is a field code. 
  9. Save your document. Later, we'll save it as a template and replace your current template.
Updating the Remainder of the Document
  1. Scroll to the third page of chapter one (page 19/30). 
  2. Triple-click the words Chapter 1: The First Generations, and then click Delete to remove the text. 
  3. Link to the previous header. In Word 2003, on the View menu, click Header and Footer, and then Link to Previous. In Word 2007/2010, click the Header & Footer Tools Design tab, locate the Navigation group, and click Link to Previous. A confirmation message appears.
  4. Select Yes. The text Chapter 1: The First Generations appears again. The difference is this time it's an automated field code. If you click anywhere in the text, Word adds a gray background to tell you that it's a field code.
  5. Save your document. 
  6. Repeat these instruction for each section you have in your document. Remember that section is the four-pages that appear between section breaks. 
Seeing the Field Code
  1. Hold down the Alt ky and press F9. The field code replaces the text:
    {STYLEREF "Heading 1" \* MERGEFORMAT}
  2. Hold down the Alt ky and press F9. Text replaces the field code. 
Seeing Why It Matters
  1. Go to any chapter title and change it. It doesn't matter how you change it. 
  2. Go look at the third page of the section. Your heading text updates automatically. 
Background Info
With the addition of field codes, the chapter titles you entered when creating the template truly are just place holders for the chapter titles you really want. You can update them as you write and never have to worry about what is happening in the headers because StyleRef has your back.

One caution: Use the Heading 1 style only for chapter titles. When Word executes the StyleRef field code, it looks for the first available Heading 1 above. If you add text using a Heading 1 style between your chapter title and the StyleRef field code, Word will place that intervening text in the header. 

That being said, you should be coming up with all sorts of uses for StyleRef. For example, how many times is an author's name mentioned in a document? If you create a style named Author, and then apply the style to the first instance of the author's name, you can StyleRef any subsequent mention of the author's name...including any special marks...spelled correctly...assuming you spelled it correctly the first time. And if you misspelled it the first time? Just correct the first instance, and all the StyleRefs are auto updated. 

One of the most counter intuitive aspects of Word is generally speaking it applies to what is above it, and not below it. For this reason, when something goes wrong in a document, you start fixing the problem from the end of the document working your way toward the beginning of the document. This idea doesn't always work but it works in enough circumstances that the idea is worth remembering. 

Next Post
We'll take your updated document (with the field codes) and save it so that it replaces your old template.

Wednesday, September 21, 2011

Setting Up a Book Template Part 14

Today we're going to tackle a field code. You won't find much on using field codes. It's considered an advanced use of Word. However, once you understand how to use field codes, you'll find them to be a handy addition to your toolbox. We're going to start with a very easy field code: StyleRef.

We're going to add a StyleRef field code to make the title of the document (McKee Family Tree) an automatic field. Then, we are going to change McKee Family Tree to McKee Family Saga. When we make that change, Word will automatically update all references in your document based on the field code.

Going to Where We'll Add the Field Code
  1. Open a copy of your Genealogy Book template. If you need help, see Setting Up a Book Template Part 12.
  2. Scroll to page 10/30 (or ii). (Shortcut: Ctrl + G, enter 10, and click Go To.)
  3. Look in the header. This location is where you added the book title to the header. In my case, the title was McKee Family Tree. We're going to add a StyleRef based on the style Title.
  4. Double-click in the header area to open it. Your cursor most like is in front of the first word of the book title. If it isn't click before the first word.
Adding the Field Code 


  1. Display the Field dialog. For Word 2003 select: Insert, Field. For Word 2007/2010 select: Insert, Quick Parts (Text group), Field.
  2. In Field names, locate and select StyleRef. The Field Properties updates, showing the Style name field with a list of all styles used in your document.
  3. In Style name, locate and select Title.
  4. Click OK. Now you have McKee Family TreeMcKee Family Tree.
  5. Hold down the delete key to eliminate the second title (McKee Family Tree).
  6. Click anywhere in McKee Family Tree that remains and you'll find that Word adds gray fill because what remains is a field code.
  7. Save your document. Later, we'll save it as a template and replace your current template.
Because you have the headers set up with Same as previous, the field code cascades to all pages where the title was added to the header.

Seeing Why It Matters
  1. Click in the body of the page to close the header and scroll to the first page of the document (1/30). (Shortcut: CtrlG, enter 1, and click Go To.)
  2. Click in the title of your document and change the title of the book. I'm going to change McKee Family Tree to McKee Family Saga.
  3. Scroll to the title page. (Shortcut: Ctrl + G, enter 3, and click Go To.)
  4. Click in the title of your document and change the title of the book (Tree to Saga).
  5. Look again at your header. (Shortcut: Ctrl + G, enter 10, and click Go To.)
  6. Save your document. Later, we'll save it as a template and replace your current template.
Because you have the book title in the header set up as a field code, the title in headers update each time you change the title on the front cover and the title page. If you plan to use a field code for your title, you might want to:
  • Change the style for the book title (page 1/1) on the front page.
  • Make the title on the title page a field code.
Converting the Title on the Title Page
You can convert the title by:
  • Repeating these instructions to replace the typed title with a field code
  • Copy the field code from the header and replaced the typed title with the field code.
  1. Scroll to page 10/30 (or ii). (Shortcut: Ctrl + G, enter 10, and click Go To.)
  2. Double-click in the header area to open it.
  3. Click at the end of the book title in the header and press the space bar once to add a space at the end. The space will prevent you from copying the header style hidden in the paragraph mark you can't see.
  4. Run your cursor over the book title only, excluding the space and the hidden paragraph mark.
  5. Copy it. (Shortcut: Ctrl + C.)
  6. Double-click in the body to close the header.
  7. Scroll to the title page. (Shortcut: Ctrl + G, enter 3, and click Go To.)
  8. Click at the end of the book title in the header and press the space bar once to add a space at the end. The space will prevent you from copying the header style hidden in the paragraph mark you can't see.
  9. Highlight the book title on the title page, excluding the space and the hidden paragraph mark.
  10. Paste the field code.  (Shortcut: Ctrl + P.)
  11. Save your document. Later, we'll save it as a template and replace your current template.
If you get unexpected results, do you know why? Because you picked up the Header style when you copied.

Go to the cover and change the title again, and then check each place where the book title appears. You'll find that it changes each time in each place where the book title appears.

Seeing Field Codes Word 2003
  1. Display the View dialog...Select Tools, Options, and then click the View tab.
  2. Click the Field codes option  to add a check mark. Remove the check mark when you want to hide field codes.
  3. Click OK, and then save your document. Later, we'll save it as a template and replace your current template.
--OR--
  1. Use the shortcut: Hold down the Alt key and press F9.
  2. Here's what the field code looks like: {STYLEREF Title \* MERGEFORMAT}
  3. Look at a footer and you'll see a field code that looks like this: {PAGE \* MERGEFORMAT}
Seeing Field Codes Word 2007/2010


  1. Display the Word Options dialog...Select File, Options, and then click the Advanced option.
  2. Scroll to the Show document content group, and then click Show field codes instead of their values to add a check mark. Remove the check mark when you want to hide field codes.
  3. Click OK, and then save your document. Later, we'll save it as a template and replace your current template.
--OR--
  1. Use the shortcut: Hold down the Alt key and press F9.
  2. Here's what the field code looks like: {STYLEREF Title \* MERGEFORMAT}
  3. Look at a footer and you'll see a field code that looks like this: {PAGE \* MERGEFORMAT}
Next Post
We're going to set up the same type of field code for chapter titles. I want you to see the many uses you can have for a StyleRef field code.


Monday, April 18, 2011

When Headers and Footers Go Awry

After you know how to set up mirror margins and add headers and footers, creating a book is just a few steps away.

Preliminary
--Write separate chapters (Word documents with just your text).
--Be sure to apply heading styles to your text.
--Be sure you have an even number of pages...remember slip sheeting.

Construct a Book
--Open a blank document and set up mirror margins and headers and footers.
--Put in a few blank pages at the beginning of your document for an electronic table of contents,
--Insert a New Page section break for your first chapter and update headers and footers.
--Insert the text from chapter one. See the posting Stringing Documents Together.
--Insert a New Page section break for your second chapter and update headers and footers.
--Insert the text from chapter two.
--Repeat until you have added all of the chapters.
--Insert an electronic index if you added the entries.
If you haven't, you can do it later and insert the index at any time. Just insert a New Page section break and then follow the posted instructions to insert an electronic index.

All of this is very ideal world. If you follow the instruction exactly, all will be right with your world.

Documents aren't created in ideal worlds. You can follow these instruction exactly and end up editing and cause your headers and footers to go awry.

Headers and footers are easy to fix...if you know the trick.
1. Go the last page of your document, and look at the footer and header.
2. If they are correct, scroll up to the next header and footer.
3. When you find a header or footer that is incorrect, look to see if the Same as Previous is turned on.
4. If yes, turn it off and fix the footer or header.
5. If no, look for a section break that you didn't intend to put in.
As you move toward the beginning of your document, you'll come to a place where all of the footers and headers are correct.


If things get too bad, you can start from scratch. Follow the book instructions above to create chapter 1, and then copy and paste the text of chapter 1. Because the text and the header and footer on any given page are on different layers of the document, you can place the text without affecting the header or footer. Repeat the instructions to add each subsequent chapter.

If you never have to look at this post again because all of your books are ideal, you'll still use what you learn here when you begin to deal with templates. The instructions I've been posting are lots of what you need to know to create templates. We are not going to go into templates yet. However, before the end of the year, I'll get to them. They're fun. With the background you'll have by the time we get to them, they won't be intimidating.

Monday, February 28, 2011

Adding an Electronic Page Number for a Cross Reference

Adding a page number for a cross reference to another place in a long document is a common task. For example, if you are talking about a parent on one chapter, one of the things you would do is list the person's children. If you have a subsequent chapter about one or more of the children, you may want to add cross references so that your readers can turn directly to the page about the child or vice versa; that is, a cross reference back to the parent's page.

You can add a cross reference based on:
--headings (Style headings that you've applied)
--bookmarks (that you've added to the document)
--footnotes (that you've added to the document)
--endnotes (that you've added to the document)
--equations (an item you probably won't use)
--figures (that you've added to the document)

Because the last post talked about applying heading styles, I'm only going to address that type of cross reference in this post. I'll talk about the other types of cross references in subsequent posts.

1. Confirm that you've applied several heading styles in your document.
2. Click your cursor where you want to add the page cross reference. For example, you might add text like: Refer to page XX for more information. You would replace the XX with your page number cross reference.
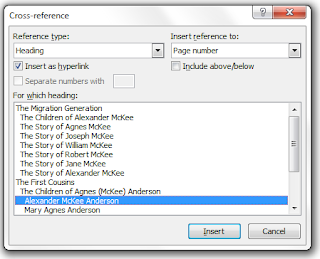
3. Display the Cross-reference dialog.

In Word 2007 or 2010, click the Reference tab, and select Cross-reference in the Captions group.
In Word 2003, select Insert, Reference, and then Cross-reference.
4. Select Heading from the Reference Type drop-down list. The heading list appears in the box below.
5. Select Page number from the Insert reference to drop-down list.
6. Select a heading in the For which heading box.
7. Click the Insert button. Word inserts an electronic page number.

Now here's the best part, you can continue to add text to your document without worrying about the electronic page number. You can ignore it because it's electronic. When you added the cross reference, Word added hidden coding. So if you add text that causes the page number to change, all you have to do is update.

To update:
1. Select the entire document. Hold down the Ctrl key, and type A.
2. Press F9. Word updates cross reference page numbers.
3. If you inserted a Table of Contents (TOC), the Update Table of Contents dialog appears. Select OK to update page numbers only, or click Update entire table to update the TOC. Word updates all electronic reference, including the TOC, cross references, and the index.

We haven't talked about indexing yet; however, it's not too soon for you to understand that you create index entries as electronic references so that they can be updated automatically too.

Again, you can add text before and after an electronic reference and have them move all over the place. When they are electronic, all you have to do is update to correct the page numbers.

Wednesday, January 26, 2011

Stringing Documents Together

After a presentation at the Englewood Genealogical Society today, two people asked me about adding text from other files. Both of these people wanted to be able to write separate chapters of books, and then combine the chapters afterward to form the book. This type of task is usually done with a Master Document. However, using the Master Document requires some advanced Word skills.

After some thought, I realized there was an easier solution. This solution assumes that the person has formatted the text using Styles, including applying Heading 1, Heading 2, and Heading 3 Styles to titles so that they can be used to generate a table of contents.

Here’s the solution to stringing documents together:
1. Open an instance of the Blank document. *
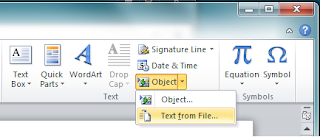
2. Click the Insert tab.


3. Click the arrow beside Object. A drop-down menu appears.
4. Click Text from File. The Insert File menu appears.
5. Navigate to and select the document that includes the text you want to add (Chapter 1).
6. Click Insert.
7. Repeat steps 3 through 6 to add the text from the next document (Chapter 2).
8. Repeat the steps again to add text from a third document, and any text from subsequent documents (Chapter 3...).

* You might want to create a title page, and then add text to the end of the title page rather than opening an instance of the Blank document. Use steps 3 through 6 to add the text from documents.