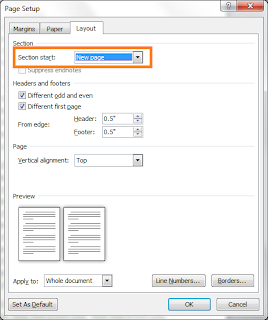
When we left off, I had you setting up mirror margins and checking two options on the Layout tab of the Page Setup dialog:
--Different odd and even
--Different first page
If you played around with a document that is several pages long, you discovered that the snippets of information that you put in an odd page header or footer repeated in all pages that included an odd page header or footer. The same holds true for any snippets of information you placed in an even numbered header or footer.
Here's what we didn't address:
1. What do you do with the different first page?
2. What do you do when you're finished with Chapter 1 and you need to change the header snippet to Chapter 2; that is, you're starting a new chapter?
Dealing with First Page Header and Footer
Because you checked the option, the header and footer of the first page of your chapter is separate from even and odd page headers and footers. The separation allows you to put something different in your first page header.
For example, do you have a family crest that you'd like to place in the center top of the first page of each chapter? Or, do you want to repeat a smaller version of a cover graphic? You don't have to put anything at all in the header. You can just use the white space as a signal to your reader that a new chapter has started. When your reader thumbs through your book, they'll see the white space breeze by and know they are in a new chapter in a flash.
With this layout, you've most likely included page numbers in your footer, and you're going to want the page numbers to be continuous; for example, 1-20 for chapter 1, 21-36 for chapter 2, 37-44 for chapter 3, and so forth. Be sure to notice that chapters always end on an even number page. If you remember when we started talking about printing on two sides of a piece of paper, the front side was an odd numbered page and the back side was an even numbered page. So, if your text ends on page 35 of chapter 2, you need to create a page 36, which will be blank. The blank page is call a slip sheet. Look for a previous post on slip sheeting.
So make a decision on what you do or do not want to add to your first page.
Starting a New Chapter

Look at the circled Section start with the default selection New page . Your selection in this field tells Word when to start a new chapter with a First Page header and footer.
Using the Option:
1. Open the document I had you create so that you could play with headers and footers.
2. Confirm that it's several pages long.
3. Scroll to the end of the document.
4. Double-click your footer and confirm that it's an even page footer.
If it's an odd page footer, double-click in the text area to close your footer, click your cursor at the end of the text, and enter a page break (hold down the Ctrl key, and press Enter). Word inserts an even numbered page. Press Enter a few time to add a few blank lines.
5. Double-click in the text area to close your headers and footers.
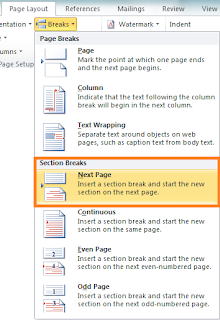
6. Insert a Next Page section break.
For Word 2007 or 2010, select Breaks on the Page Layout tab. A drop-down menu appears. Under Sections Breaks, select Next Page.

For Word 2003, click Insert on the menu bar, and then select Break. The Break dialog appears. Under Sections break types, select Next Page.
A new blank page appears.
7. Double-click in the header of the new blank page.
You'll find that it's a First Page Header. You'll also find that any changes you made to your first First Page, appear in this page automatically. Notice the Same as Previous off to the right. Word has copied your first First Page.
8. Close your header and add more text to your document.
When you naturally overflow to a new page, you'll notice your header says the same thing it did in Chapter 1. That's because this header also has the Same as Previous applied. You can break it and make this header and subsequent even numbered pages say Chapter 2.
9. Remove the Same as Previous.
In Word 2007 or 2010, notice that you've had a new tab turn up with the title Header & Footer Tools Design. Click the tab, locate the Navigation Group, and click the highlighted Link to Previous.
In Word 2003, on the View menu, click Header and Footer, and then click Link to Previous .
The Same as Previous disappears, and you can type anything you want in the header. For these instructions, type Chapter 2. If you look at previous even headers, you'll notice that they are unaffected.
10. When you get to your first odd numbered page, remove the Same as Previous and update your header as necessary.
This same process works for footers that have Same as Previous applied.
Have fun playing with this, because next we are going to start talking about troubleshooting when something goes wrong and Word gets confused.
P.S. If you check my research blog, you'll find that I've been consumed with a British website. That's why I missed posting yesterday. Somehow I think my fellow researchers will understand.
No comments:
Post a Comment