Insert Page Numbers: Word 2003
1. Open a document and confirm that your view is Page Layout. Click View, Print Layout to change it. This view shows a print version of your document, including headers and footers.
2. Click Insert, and then Page Numbers. The dialog appears.
3. In Position, accept the default of Bottom of page (Footer).
4. In Alignment, accept the default of Right.
5. For Show number on first page, you can leave it checked or you can remove the check mark. Page numbering will start on page 2.
6. Click OK. The page numbers appear in the footer of your document.
Insert Page Numbers: Word 2007 or 2010
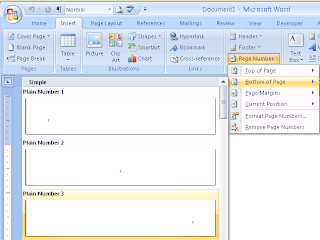
1. Open a document and confirm that your view in Page Layout. Click View and locate the Document Views group. Click Print Layout to change it. This view shows a print version of your document, including headers and footers.
2. Click Insert, and locate the Heading & Footer group.
3. Click Page Number. A menu appears.
4. Click Bottom of Page. The sample menu appears.
5. Click Plain Number 3. The page numbers appear in the footer of your document.

When you look at the page number in Word 2003, the number just appears as grayed out below your normal typing area. If you want to add information to the footer area—for example, a revision date, double-click near the page number. When you do so, the footer (and header) appears. You can type in the footer (and header) but not in the body of your document. To return to the body of your document, double-click in the body. The footer (and header) gray and you are again able to type in the body of your document but not in the header or footer.
When you look at the page number in Word 2007 or 2010, you can see the footer because Word has automatically opened it for you. The assumption is that you might want to add information—for example, a book or chapter title for document navigation. You can’t type in the body of your document until you close the footer. To do so, double-click in the body of the document. The footer (and header) gray and you are able to type in the body of your document again but not in the header or footer. If you want to display the footer area again, double-click near the page number.
Playing with this should lead you to understand that your document is layered. If you could turn your electronic page on its side and look at its thickness, you would see layers.
1. The layer with your typing area.
2. The layer with your graphics, floating over your typing area.
3. The layer with your header and footer, floating over your graphics layer.
If you can learn to think of your documents as layered, your understanding of how graphics, and headers and footers work expands. When you can separate the layers, you have a better chance of fixing graphics, and headers and footers when things go astray. I’ll continue talking about headers and footers in subsequent posts. In the meantime, take a few minutes to play with the layers.
P.S. Pattie and I are going to see Megan Smolenyak in Lakeland, Florida. Look out Imperial Polk! The Tech Tamers are coming.
I'm an avid student of these great tips. I can't wait for the next one!
ReplyDeleteThank you for the layers analogy. The light bulbs are now going off!
ReplyDeleteGlad you found the layers helpful. Inevitably, when I explain this to users, it changes their view of what a document looks like. They begin to separate the pieces mentally, which greatly increases their understanding and their ability to fix things when they go wrong. They know what layer to look at to begin to fix problems.
ReplyDelete