My presentation partner Pattie used to be my boss. When I worked for Pattie, she always wanted me to write on a sixth grade level. Try as I might, the best I could dial it back to was eighth grade.
Dealing with the situation was a problem of my own making because Pattie and I had a conversation one day about the readability of a piece of text. I ran the stats. Pattie asked, “How did you do that?” I showed her. Now Pattie uses this bit of knowledge to benchmark everyone who writes anything for her. You have to be careful what you show Pattie. It can come back to haunt you!
The grade level you write at is important for getting information across to your reader. With a little practice, anyone can write compound sentences with high flown words that send readers scurrying to a dictionary. However, if your objective is a pleasant read that is readily understood, trooping out your high-end English skills may not be the best way to go.
Knowing the grade level that you’re writing at can help you make adjustments. For example, I learned that long paragraphs that include more than one idea quickly pumped up the grade level. If a paragraph reaches somewhere in the neighborhood of five or six lines, I start looking at it to make sure that I haven’t let a new idea creep in. Besides, if a paragraph goes over nine lines, Pattie won’t read it, and I think Pattie is typical of many modern readers.
In addition, compound sentences that require your reader to slow down and dissect the sentence to ensure that they understand it is, in my opinion, counterproductive too. These types of sentences also pump up the readability stats on your document.
To gauge your normal writing level—and eighth grade in my opinion is just fine—you can set up Word to run readability statistics routinely. Here’s how you do it.
Word 2003
1. From the main menu, select Tools and then Options. The Options dialog appeared.
2. Click the Spelling & Grammar tab.
3. Look in the Grammar group for the option Show readability statistics, and click it to add a check mark.
4. Click OK. The next time you run a spelling and grammar check on a document, the statistics display automatically when you finish the check.
Word 2007 and 2010
1. In Word 2007, click the Office button (big button in upper left of screen). A pop-up menu appears. In Word 2010, click the File tab.
2. In Word 2007, click the Word Options button at the bottom of the pop-up menu. In Word 2010, click Options. The Word Options dialog appears.
3. Select Proofing. The Proofing dialog appears.
4. Look for When correcting spelling and grammar in Word.
5. In the group, look for Show readability statistics, and click it to add a check mark.
5. Click OK to save your change and close the dialog. The next time you run a spelling and grammar check on a document, the statistics display automatically when you finish the check.
To stop displaying statistics, repeat the steps and remove the check mark.
Wednesday, March 30, 2011
Monday, March 28, 2011
Suppressing the Spell Checker
When genealogists transcribe old documents, the spelling and grammar can sometimes be questionable at best. We are told to stay true to the document as presented, misspellings, grammar errors, and all. We are after all in the pursuit of truth; therefore, a faithful representation of a document is a tenet of our shared obsession.
Compounding this circumstance is the fact that people do not seem to learn that language is a living breathing being that evolves. All you have to do is watch a 12 year-old text on a phone and you’ll understand immediately why the child can’t handle spelling or grammar. Or, at least spelling and grammar as older adults would expect it to be.
Complicating the matter is that we all cling to what Miss Jones told us about grammar in grade school without realizing that grammar morphs over time. For example, when I was taught to use quote marks, they were always placed inside of any punctuation. However, modern usage has quote marks placed outside of punctuation.
“The rain in Spain falls mainly on the plain”. (old)
“The rain in Spain falls mainly on the plain.” (new)
I wouldn’t be surprised if this custom changes again at some point in my lifetime.
All of this gets us to suppression, specifically the suppression of the spell checker and grammar checker. If you have a large section of a document that you have transcribed and you have confirmed that the transcription is faithful to the original, you can suppress the checkers so that you don’t have to go through that section of your document every time you want to check the document. Here’s what you do.
1. Open your document and locate the section with the transcription.
2. Select the section (highlight the transcription with your cursor).
3. Display the Language dialog.
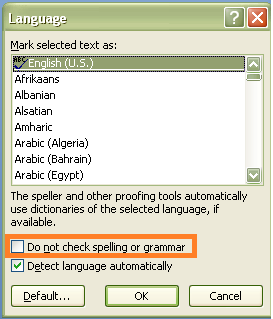
4. Click the Do not check spelling or grammar option, and then click OK. Word suspends spelling and grammar checking on the selected section.
Undoing the Suppression
Here’s the not so good part. You have no way of knowing—other than your memory—where the option was applied. And trust me, you won’t necessarily remember every spot you did it. However, you do have an out. You can undo this command. Here’s what you do.
1. Select the entire document (Ctrl + A).
2. Display the Language dialog. The Do not check… option will be checked. Or, it might be grayed out or filled in with a colored square.
3. Click the check box until it is cleared. You might need to click a few times to get to a completely blank check box.
4. Click OK.
5. Run the spell checker again, and you’ll find that Word is picking up all of the wayward words in your document, including the transcribed section.
Compounding this circumstance is the fact that people do not seem to learn that language is a living breathing being that evolves. All you have to do is watch a 12 year-old text on a phone and you’ll understand immediately why the child can’t handle spelling or grammar. Or, at least spelling and grammar as older adults would expect it to be.
Complicating the matter is that we all cling to what Miss Jones told us about grammar in grade school without realizing that grammar morphs over time. For example, when I was taught to use quote marks, they were always placed inside of any punctuation. However, modern usage has quote marks placed outside of punctuation.
“The rain in Spain falls mainly on the plain”. (old)
“The rain in Spain falls mainly on the plain.” (new)
I wouldn’t be surprised if this custom changes again at some point in my lifetime.
All of this gets us to suppression, specifically the suppression of the spell checker and grammar checker. If you have a large section of a document that you have transcribed and you have confirmed that the transcription is faithful to the original, you can suppress the checkers so that you don’t have to go through that section of your document every time you want to check the document. Here’s what you do.
1. Open your document and locate the section with the transcription.
2. Select the section (highlight the transcription with your cursor).
3. Display the Language dialog.

In Word 2003, select Tools, Language, and then select Set Language.
In Word 2007 or 2010, click the Review tab, locate the Proofing group, and click the Set Language button to the right of the Thesaurus button.
4. Click the Do not check spelling or grammar option, and then click OK. Word suspends spelling and grammar checking on the selected section.
Undoing the Suppression
Here’s the not so good part. You have no way of knowing—other than your memory—where the option was applied. And trust me, you won’t necessarily remember every spot you did it. However, you do have an out. You can undo this command. Here’s what you do.
1. Select the entire document (Ctrl + A).
2. Display the Language dialog. The Do not check… option will be checked. Or, it might be grayed out or filled in with a colored square.
3. Click the check box until it is cleared. You might need to click a few times to get to a completely blank check box.
4. Click OK.
5. Run the spell checker again, and you’ll find that Word is picking up all of the wayward words in your document, including the transcribed section.
Saturday, March 26, 2011
Take a Break with The Genealogy Guys
Everyday Genealogy: Take a Break with The Genealogy Guys: "Sometimes genealogy research can be overwhelming. There are so many websites to visit, sources to cite and county histories to read you just..."
Friday, March 25, 2011
Using Change Tracking to Collaborate
Because you can turn change tracking on and off, you can use it to collaborate. For example, you’ve written a 10 page article and had your cousin review it. When you got the document back, you worked your way through your cousin’s suggested changes/corrections. However, you have a few new ideas, a few new comments to make, and a few new questions.
Next Round
In yesterday’s instructions, I had you turn off change tracking while you were accepting/rejecting changes. After you have incorporated all of your cousin’s changes, you can send your cousin a document that includes your markup.
1. In the edited document, turn on Track Changes.
2. Add your new ideas, comments, and questions. They will appear in red text as edits.
3. Email the document to your cousin. Remember to leave Track Changes on.
4. When your cousin responds, your cousin’s edits and answers will appear in a different color.
5. When your cousin emails the document back to you, open it and save it. Also, save it as a copy in case you have questions down the line.
6. Turn off Track Changes.
7. Go through the document to see what your cousin’s responses might be, accepting and rejecting as you go along.
Another Option
You don’t have to work with just one document. For example, when your cousin sends you the article with a response you can open it in one session of Word. You can open a second session of Word and display your edited document. Resize your documents so that they display side by side on your screen. You can then see your cousin’s comments and make the actual changes in your Final document or not as you choose.
Resizing Screens
1. Click the minimize button beside the red X in the upper right of your page. This action releases the screen from a full-screen display.
2. Move your cursor over the edge of the screen. For example, point your cursor at the top left corner. A double headed arrow appears.
3. Click to grab the corner and move your mouse to resize the screen.
Running more than one session of software—any software—gives you an extra set of options you don’t have when working in one session. One of those options is being able to run the sessions side by side without have to flip back and forth between documents.
Wednesday, March 23, 2011
Dealing with Reviewed Text
This post is a continuation of my last post on tracking changes...
So you wrote a ten page article, turned on Track Changes, and emailed a copy to your cousin (the one you've never met but who is your BFF). Your cousin (the English maven) went through the document and made changes...lots of changes...and emailed it back to you. You open up the document and it's a sea of red marks. What is an author to do?
You need to be able to consider each suggested change/correction. To do that you need to move from change to change and accept or reject the change.
To Start
1. Open the document...the one with all the red marks...and save it and also save as a copy. You are saving a marked up copy because you always want the original with all the marks as a back up to refer to in case you have questions.
2. Turn off Track Changes. Remember it's a toggle with an on/off position. In Word 2003, it's at the bottom of the page.

Click graphics to make them bigger.
Word 2003
You need to turn on the Reviewing toolbar.
1. Click View, Toolbars, and Reviewing. Word adds the new toolbar at the top of your page.

2. Click the blue arrows to move to the next or previous change. Word highlights the change.
3. Click the blue check mark to accept a change.
4. Click the red x mark to reject a change.
5. Work your way through the document accepting or rejecting each change.
6. Remember that you can alway undo (Ctrl + Z) if you accept or reject a change in error.
Word 2007 or 2010
You already have the necessary buttons displaying to the right of Track Changes in the Changes group on the Review tab.

1. Click the Previous and Next buttons to move from change to change.
2. Click the Accept or Reject button to accept or reject a change.
3. Work your way through the document accepting or rejecting each change.
4. Remember that you can alway undo (Ctrl + Z) if you accept or reject a change in error.
Options on Pop-Up Menu
In addition to the buttons, accept and reject options turn up on a pop-up menu. Right-click on any change and the menu appears. Assuming you have no spelling issues, accept and reject options are on the menu.
Accept All Changes
If your English maven cousin is always right, you also have the option of accepting all changes. Notice that the Accept button has a drop-down arrow beside or below it. Click the arrow to display a menu and you'll see that one of the options on the menu is Accept All Changes in Document. Similarly, this method also works for rejecting all changes just in case your cousin was having an off day.
Finalizing Your Document
If you plan to PDF your document, be sure to change Final Showing Markup to Final in the show markup option field. If you have any other option selected, it can affect the presentation of your document when it is displayed in a PDF reader.
Monday, March 21, 2011
Getting Help from Friends and Relatives
One of the things that you end up doing when you write professionally is have your work reviewed by teams of experts. You might have several people looking at a document at once and making changes or corrections. Without change tracking, you'd go crazy trying to keep up with what reviewers changed in a 200 page document.
As a genealogist, you should also have your work reviewed by fellow researchers (your family and friends too if you can get them to read it) and use the Track Changes tool to keep track of the suggestions or corrections your reviewers might make.
When you get ready to send a document out for review, make a copy of the document. You always want to have a backup copy of your original work, especially if you have several people looking at your work.
Open the extra copy (if necessary) and turn on Track Changes.
--In any version of Word, hold down Ctrl and Shift and type the letter E.
--Or, in Word 2003, look at the status bar at the bottom of the screen, and double-click the Trk text button.
--Or, in Word 2007 or 2010, select the Review tab, locate the Tracking group, and click the Track Changes button.

Track Changes is a toggle that you can turn on and off.
Email the document to your reviewers. When they open the document and start making changes, Word marks the changes. Have your reviewers save the document on their PC, and then email the reviewed document back to you.
When you open the document from your reviewer, look for red markings...deleted text is red with a line through it and added text is red. In additional, Word adds a change bar outside the left margin to tell you that a change was made on the marked line(s). Depending on your setting, Word might also add comments to the right side of your document. The suggestions/corrections are obvious enough that you won't miss them.
As an experiment, you can open any document, turn on Track Changes, and make a few changes to see what tracked changes look like. In later posts, I'll talk about consolidating changes and additional things you can do with a document that has tracked changes.
Sunday, March 20, 2011
Graphics in a Google Blog
On my last post I noticed that the graphics came out small and hard to read. When you post graphics you don't have much control over the size when the post is published. It's worth noting that if you simply click a graphic a full size copy appears. When you are finished viewing the graphic, click the Back button to return to the blog page.
Friday, March 18, 2011
Web Wobblings
Have you clicked a link on a Web page to see another page, and then tried to click the Back button to no avail? You click the button and nothing happens. The developers who programmed the page you are on programmed it so that the Back button is disabled. Try double clicking the Back button to get back to where you were.
Have you ever wanted to display several pages from a list of links and skip all the flipping back and forth to work with various pages? For example, you just added the parents of eight children that you already have on Find A Grave, and you want to link the parents to the children's memorials. You're fumbling with going back and forth as you look up memorial numbers. Pattie had a suggestion for this problem that I've found to be most useful.
1. Look up the father's memorial, and right-click on the link. A pop-up menu appears.
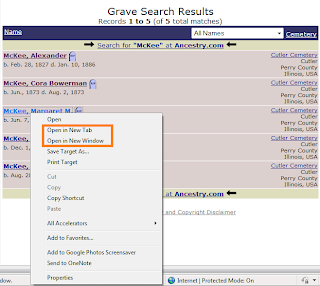
2. Select Open in New Tab.
3. Look up the mother's memorial, and right-click the link.
4. Select Open in New Tab.
5. Look at the tabs near the top of your browser page. Notice that you've got tabs for each of the parents. If you point your cursor at a tab, a pop-up with details appears.

6. Look up child one, and click the Edit link beside Family Links. The Family Links page appears.
7. Click the tab for the father, and copy the memorial number at the bottom of the page. (Highlight the memorial number, hold down the Ctrl key and type the letter C.)
8. Click the Find A Grave tab (memorial for child), and paste the father's memorial number in the Father field. (Hold down the Ctrl key, and type the letter V.)
9. Click Tab to move the cursor to the Mother field.
10. Repeat steps 7 and 8 to copy and paste the mother's memorial number.
11. Display the next child and repeat the process.
Displaying a link on an additional tab will work in almost any instance. In addition, notice that I've also circled Open in New Window. When you select this option, another instance of the browser opens and shows the contents of the linked page.
None of this is earth shattering; however, having options can prove to be convenient at the oddest of times. So tuck these suggestions away for a time when you need an option...
Wednesday, March 16, 2011
Creating an Electronic Index
We’re going to take a rest from dealing with styles. The topic is complicated with still lots more for you to understand. However, when you’re learning, a rest is sometimes a good thing. It gives you some time to get used to an aspect of the Word processor that might be new to you. You can internalize the ideas and steps that have to do with using styles. A rest also gives you some time to read about styles. So for the next few posts, I’m going to go in a different place in Word. Today, it’s a simple index.
If you liked the post about creating an electronic table of contents, you’re going to love this post about creating a simple electronic index.
All of my documents have extensive indexes. When I create long documents, I sit at night with my laptop in front of the TV, listening to whatever drivel is pouring out, and I index.
To complete the tasks I’m suggesting for this post, you need to have a document with a few pages. It doesn’t make any difference what the topic of the document might be. You just need a few pages. However, you’ll understand the process better if you use a family-related document with names for both people and places.
Indexing Family Names
1. Open your document.
2. Locate a place where you want to add an index entry and click to place your cursor. For example, you would click immediately behind Smith in the following name: Mary Jane (McKee) Smith.
3. Hold down the Shift and Alt keys, and then type the letter X. (Shift + Alt + X). The Main Index Entry dialog appears.
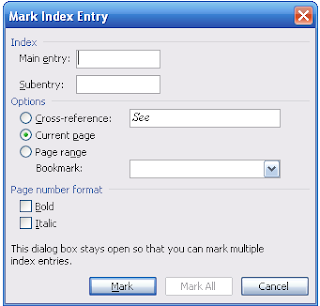 4. In the Main entry field, enter the person’s last name. For example, enter Smith.
5. In the Subentry field, enter the person’s given name. For example, enter Mary Jane (McKee).
6. Click the Mark button at the bottom of the dialog…and don’t jump out of your skin when you see all of the hidden marks come up. You didn’t do anything wrong. Word is showing you the index entry, which looks like this:

The dialog remains open.
7. In the Main entry field, enter her maiden name: McKee.
8. In the Subentry field, enter her given name: Mary Jane. Entering a woman’s name in this manner gives you a cross-reference under both her maiden and married name.
9. Click the Mark button at the bottom of the dialog.
10. Click Cancel to close the Mark Index Entry.
11. Go to the next place where you want to make an index entry, and repeat steps 3 through 10.
12. Complete entries for several names in your document.
Indexing Place Names
1. Locate a place where you want to add an index entry. For example, click immediately behind a place name: Sparta, Randolph County, Illinois.
2. Click to place your cursor.
3. Hold down the Shift and Alt keys, and then type the letter X. The Main Index Entry dialog appears.
4. In the Main entry field, enter the state or county name. For example, enter Randolph County.
5. In the Subentry field, enter the town name. For example, enter Sparta.
6. Click the Mark button at the bottom of the dialog. Your index entry looks like this:

7. Repeat steps 1 through 6 for several place names in your document.
Turning off the Hidden Codes

I’ve talked about hidden codes before; however, it may not have meant much to you at the time. Turning these codes on and off involves pressing the Show/Hide button, which is a toggle (like a light switch with an on/off position).
--In Word 2003, the button is a Toolbar option.
--In Word 2007 or 2010, the button is on the Home tab in the Paragraph group.
Or, you can turn codes on and off by holding down the Shift and Ctrl keys, and typing * (an asterisk). You need to turn the codes off to get correct page numbering in a generated index. You need to turn the codes on to be able to see and make corrections to index entries.
Generating the Index
1. Go to the end of your document and hit Enter once to get a blank line.
2. Type the word Index and apply a Heading 1 style to it. Applying a Heading 1 ensures that Index appears in the electronic Table of Contents.
3. Hit Enter once to get a blank line.
4. Display the Index and Tables dialog.
--In Word 2003, select Insert, Reference, and then Index and Tables.
--In Word 2007 or 2010, click the References tab. Locate the Index group. Select the Insert Index button.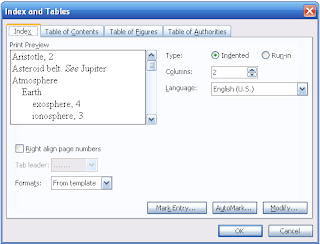
5. Look at the Print Preview box, which shows you a preview of what your entries will look like.
6. Locate the Right align page numbers check box below the preview, and click it to select it. Notice that your preview changes.
7. Click OK. Word inserts an electronic index.
Editing Index Entries
1. Inspect your index. I almost always find something that I’ve fat fingered.
2. Note the page number so that you can go to it.
3. Hold down the Ctrl key and type the letter G to display the Go To dialog.
4. Enter the page number, and then click Next. Word scrolls to the page.
5. Turn on hidden codes (Shift + Ctrl + *).
6. Look for the entry that is in error and correct it. Be careful not to remove or alter any of the special marks included in the entry. Alter only the text you entered.
7. Turn off hidden codes.
8. Go to the end of your document, and update the index.
9. Select one or two lines in the index, and press the F9 button.
10. Look for the index entry that had an error in it to confirm that it is correct.
This post covers inserting a simple index. However, I’m sure you’ve noticed that there are lots of other options in the dialogs that you’ve seen today. Some are more useful than others and over the next year or so I’ll discuss many of them. I’ll try to relate them to something a genealogist would actually do. However, it won’t be today!
If you liked the post about creating an electronic table of contents, you’re going to love this post about creating a simple electronic index.
All of my documents have extensive indexes. When I create long documents, I sit at night with my laptop in front of the TV, listening to whatever drivel is pouring out, and I index.
To complete the tasks I’m suggesting for this post, you need to have a document with a few pages. It doesn’t make any difference what the topic of the document might be. You just need a few pages. However, you’ll understand the process better if you use a family-related document with names for both people and places.
Indexing Family Names
1. Open your document.
2. Locate a place where you want to add an index entry and click to place your cursor. For example, you would click immediately behind Smith in the following name: Mary Jane (McKee) Smith.
3. Hold down the Shift and Alt keys, and then type the letter X. (Shift + Alt + X). The Main Index Entry dialog appears.
 4. In the Main entry field, enter the person’s last name. For example, enter Smith.
5. In the Subentry field, enter the person’s given name. For example, enter Mary Jane (McKee).
6. Click the Mark button at the bottom of the dialog…and don’t jump out of your skin when you see all of the hidden marks come up. You didn’t do anything wrong. Word is showing you the index entry, which looks like this:

The dialog remains open.
7. In the Main entry field, enter her maiden name: McKee.
8. In the Subentry field, enter her given name: Mary Jane. Entering a woman’s name in this manner gives you a cross-reference under both her maiden and married name.
9. Click the Mark button at the bottom of the dialog.
10. Click Cancel to close the Mark Index Entry.
11. Go to the next place where you want to make an index entry, and repeat steps 3 through 10.
12. Complete entries for several names in your document.
Indexing Place Names
1. Locate a place where you want to add an index entry. For example, click immediately behind a place name: Sparta, Randolph County, Illinois.
2. Click to place your cursor.
3. Hold down the Shift and Alt keys, and then type the letter X. The Main Index Entry dialog appears.
4. In the Main entry field, enter the state or county name. For example, enter Randolph County.
5. In the Subentry field, enter the town name. For example, enter Sparta.
6. Click the Mark button at the bottom of the dialog. Your index entry looks like this:

7. Repeat steps 1 through 6 for several place names in your document.
Turning off the Hidden Codes

I’ve talked about hidden codes before; however, it may not have meant much to you at the time. Turning these codes on and off involves pressing the Show/Hide button, which is a toggle (like a light switch with an on/off position).
--In Word 2003, the button is a Toolbar option.
--In Word 2007 or 2010, the button is on the Home tab in the Paragraph group.
Or, you can turn codes on and off by holding down the Shift and Ctrl keys, and typing * (an asterisk). You need to turn the codes off to get correct page numbering in a generated index. You need to turn the codes on to be able to see and make corrections to index entries.
Generating the Index
1. Go to the end of your document and hit Enter once to get a blank line.
2. Type the word Index and apply a Heading 1 style to it. Applying a Heading 1 ensures that Index appears in the electronic Table of Contents.
3. Hit Enter once to get a blank line.
4. Display the Index and Tables dialog.
--In Word 2003, select Insert, Reference, and then Index and Tables.
--In Word 2007 or 2010, click the References tab. Locate the Index group. Select the Insert Index button.

5. Look at the Print Preview box, which shows you a preview of what your entries will look like.
6. Locate the Right align page numbers check box below the preview, and click it to select it. Notice that your preview changes.
7. Click OK. Word inserts an electronic index.
Editing Index Entries
1. Inspect your index. I almost always find something that I’ve fat fingered.
2. Note the page number so that you can go to it.
3. Hold down the Ctrl key and type the letter G to display the Go To dialog.
4. Enter the page number, and then click Next. Word scrolls to the page.
5. Turn on hidden codes (Shift + Ctrl + *).
6. Look for the entry that is in error and correct it. Be careful not to remove or alter any of the special marks included in the entry. Alter only the text you entered.
7. Turn off hidden codes.
8. Go to the end of your document, and update the index.
9. Select one or two lines in the index, and press the F9 button.
10. Look for the index entry that had an error in it to confirm that it is correct.
This post covers inserting a simple index. However, I’m sure you’ve noticed that there are lots of other options in the dialogs that you’ve seen today. Some are more useful than others and over the next year or so I’ll discuss many of them. I’ll try to relate them to something a genealogist would actually do. However, it won’t be today!
Monday, March 14, 2011
Changing Styles
Now that you know what a style is and know how to apply and remove a style, it's time to talk about changing a style.
I touched on this when I talked about changing the Name character style. Aside from getting the consistent look and feel that styles provide, using styles allows you to make massive changes that get applied to every instance where a style was applied.
Suppose you've written a 100 page book using the default styles that are part of the Blank document template. In Word 2007 and 2010, the heading styles are all blue. It's a nice shade of blue; however, most documents get printed in black font. In addition, the font is Cambria. You may want Arial.
You could change each instance...or you could change the style and change every place that the style was applied to the text.
Grand Experiment
1. Open a blank document.
2. Type a heading, and apply a Heading 1 style.
3. Type a paragraph. The Normal style is applied automatically.
4. Copy the heading and paragraph two times.
5. Confirm that you have three headings and three paragraphs.
6. In the Style list, right-click the Heading 1 style. A pop-up menu appears.
7. Select Modify from the menu. The Modify Style dialog appears.
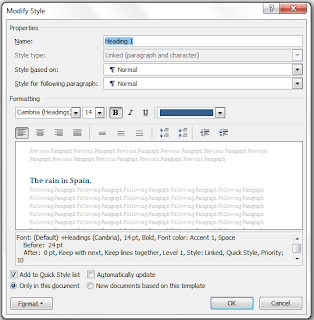
Note: These instructions are valid for Word 2003 too.
Modify the Style
1. Locate the Formatting section of the Modify Style dialog.
2. In the first field (font), click the drop-down arrow beside the field.
3. Select Arial from the displayed list.
4. In the next field (font size), click the drop-down arrow beside the field.
5. Select 16 from the displayed list.
6. In the color field, click the drop-down arrow beside the field.
7. Click Automatic (black) from the displayed color pallette.
8. Click OK.
The Results
Look at the three places where you applied the Heading 1 style. All three instances have changed. Any style and any type of style can be changed using this method.
The dialog has a lot more going on. You should spend some time clicking some buttons on the Modify Style dialog. Be sure to click the Format button at the bottom of the dialog. This button gives you access to additional dialogs that allow you to apply a variety of types of formatting to the style.
I plan on addressing each of these dialogs over the next few months. For the moment, I think I've thrown enough at you.
Friday, March 11, 2011
Removing Formatting
When newer users begin to use paragraph styles, most immediately understand the concept. You click in a paragraph, click a paragraph style from the Styles list, and the format of the text in the paragraph changes. If you select several paragraphs and click a paragraph style, the format of the text for all of the paragraphs changes.
When newer users begin to use character styles, they can get carried away. I suggest that users limit the use of characters styles to family and place names. However, I know the temptations that exist to create more character styles.
In addition, when users copy and paste text from other sources (for example, text copied from a website that includes invisible HTML coding), you can get all sorts of mixed result. Mixed results are also possible when you generate from genealogy software and save an RTF file as a Word document. You can have multiple fonts, with multiple font sizes, and various attributes applied.
Lots of times it’s easier to get rid of all formatting, and then apply the formatting you want rather than trying to track down applied formatting and fix it. Following are strategies for getting rid of paragraph styles, character styles, and anything else lurking in text.
Paste Special
When you copy text from another source, Word places a copy of the text on your clipboard. The copy includes formatting (style selections and HTML code), which can be hard to get rid of. Here’s a suggestion to solve the problem.
1. Click in the document where you want to paste the text, and press the Enter key to add a new empty line.
2. Open the Styles pane, and then select the style you want to apply to pasted text.
3. Display the Paste Special dialog.
--In Word 2007 or 2010, click the Home tab. Click the drop-down arrow on the Paste button. A small menu appears. Click Paste Special. The Paste Special dialog appears.
--In Word 2003, click Edit, and then Paste Special. A small menu appears. Click Paste Special on the menu. The Paste Special dialog appears.
4. Select Unformatted Text, and then click OK. Word pastes the text using the style you selected in step 2.
Note: This note applies if you are using Word 2007 or 2010. Complete steps 1 and 2, and then click the Home tab. Click the drop-down arrow on the Paste button. A small menu appears. Look at the buttons at the top of the menu. The button to the far right is the Keep Text Only button. Click the button and Word pastes text only with no formatting. You can display the same set of button by right-clicking in your document to display a floating menu. Click the Keep Text Only button from this floating menu to accomplish the same task. As I have said before, frequently Word offers more than one way to accomplish the same task.
Keyboard Shortcuts for Removing Formatting
It’s easy to forget to use Paste Special when copying text. As a result, your document can become a mishmash of formatting…a general mess. You want the text but you also want to remove the formatting. Here’s a suggestion for doing that task.
1. Select a few paragraphs in your document. Or, select the entire document (Ctrl + A).
2. Get rid of as much formatting at you can automatically. Hold down the Ctrl key, press the spacebar once, and then type the letter Q.
--When you press the spacebar, Word removes all character formatting and attributes.
--When you type the Q, Word resets all applied styles to their original settings.
You can stop here. Or, you can select another style to apply to all of the selected text. For example, you might want to select Normal, and then scan your document to apply other styles where appropriate.
Note: If you use Word 2007 or 2010, you have an additional option. Select text (step 1), and then in the Styles list, select Clear All. Word strips all formatting from the text and applies the Normal style for you. Again, Word gives you multiple methods to accomplish the same task.
This post may not seem to be very useful at the moment. However, I promise there will come a day when knowing how to get rid of formatting is as important as knowing how to apply it using styles. So tuck away these pieces info for that frustrating day.
Wednesday, March 9, 2011
Create a Name Character Style
In my last post, I promised to tell you how to create a Name character style. You can use this process to create several character styles. Another handy character style is a Place name style. This same process is also used to create other types of new styles.
Creating the style:
1. Open a document and add text that includes a family name. You can also open an existing document.
2. Display the Styles pane. (See earlier posts on Styles).
3. Locate and select the New Style button. The new style dialog appears.
--In Word 2003, the New Style button is at the top of the list.
--In Word 2007 and 2010, the New Style button is circled in the illustration below.
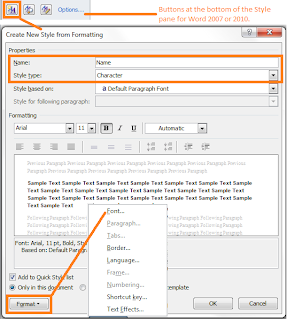
4. Complete the following:
--In the Name field, enter Name.
--In the Style type field, select Character from the drop-down list. The dialog updates.
--Click the Format button at the bottom of the page, and then select Font from the pop-up menu. The Font dialog appears.
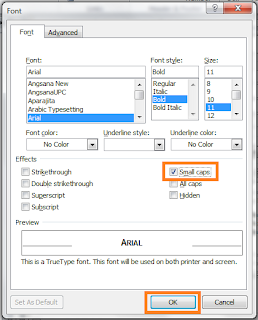
5. Complete the following:
--In the Font field, select a new font if you want a different font.
--In the Font style field, select the attribute Bold.
--In the Size field, select a new size if you want a different size.
--In the Effects group, select Small caps. A check mark appears in the check box.
6. Look at the Preview pane. Does the text look like you want it to look?
7. Click OK on the Font dialog. The dialog closes.
8. Click OK on the new style dialog.
9. Look at the list of styles. The Name style appears as a character style in the list.
Apply the New Character Style
1. Use your cursor to select a name in your open document.
2. Click the new Name character style.
3. Look at the results.

4. Apply the Name character style to the remaining family names in your document.
Modifying a Character Style
After a style is established, you can make changes. For example, you might want to change the font color to red just to practice.
1. Display the Styles pane if it isn’t already showing.
2. With your cursor, right-click the Name style with your mouse. A pop-up menu appears.
3. Select Modify. The modify dialog, which looks exactly like the new style dialog, appears.
4. Complete the following:
--In the Formatting group, click the drop-down arrow beside the unlabeled field with the word Automatic in it. A color palette appears.
--Click a shade of red.
5. Click OK at the bottom of the dialog.
6. Look at your document. Each place where you have applied the Name character format is red.
One of the values of using styles is that you can make sweeping changes to your entire document with just a few clicks and selections.
b.t.w. If you don’t like the red and you haven’t done anything else, undo the change (Ctrl + Z). If you did several other things, repeat the steps above to modify the character style to change the color.
We have lots more that we can do with styles. However, I think I've probably exhausted my welcome for the night. So I bid you good night and good styles.
Monday, March 7, 2011
Other Types of Styles
Sorry for the break. Like almost everybody I know in Florida, I'm having sinus issues. But it's time to get started again. Let's see, where was I...heading styles.
I've only spoken about heading styles so far. While looking for the heading styles, you should have noticed there are several other styles in any lists that you display. These styles are used to format text to present it in a certain fashion. That is, a style has a preselected font (type face), font size, spacing before and after the paragraph, and any number of other attributes like being indented from a margin. You need to experiment with these styles to learn to use them.
Grand Experiment
1. Open Word and the Blank document template appears automatically.
2. Type a few short paragraphs.
3. Open the list of styles. (See earlier posts for styles.)
4. Notice that the Normal style is selected automatically.
5. Click in a paragraph and pick another style. For example, click the paragraph style Quote or Intense Quote. The presentation of the paragraph changes based on your style selection.
Style lists can contain a number of different types of styles. In Word 2010, the Blank document template style list is limited to two types: paragraph style and character style. Notice that a few in the list below are a combination of both.
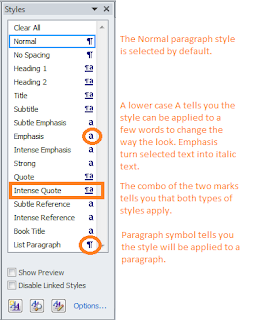
Understanding that a paragraph style changes a paragraph and a character style changes just a few selected words in a paragraph is a distinction that you need to internalize.
Another Grand Experiment
1. In a different paragraph, use your cursor to select a few words.
2. Click the Strong character style. Word applies bold to the selected text.
Now comes the interesting part for a genealogist. While the use of the paragraph styles can save you lots of button pressing to format text, the character styles are downright convenient. Here's how...
I like to format all of my family names as bold in small caps so that they stand out in running text. I format my place names as bold and italic. I don't want to make all of these changes each time I add a family name or place name to my document. So, I add the character styles Name and Place. When I add a name to my document, I use my cursor to select the text and apply Name or Place depending on the name. Word completes the formatting for me.
This post is getting long and I've thrown out a lot of ideas for you to process. So I'm going to stop here for tonight. In my next post, I'll give you the exact steps for creating the Name and Place styles.
Styles are a huge topic so we're going to be talking about them for awhile. However, there is one item for note left for this post. Word 2003 users get a complete list of styles automatically. Word 2007 and 2010 users have to hunt for them.
Displaying All Styles in Word 2007 or 2010
1. Look at the bottom of the Styles pane. (See graphic above.)
2. Click the Options... link. The Style Pane Options dialog appears.
3. In the Select styles to show box, select All styles from the drop-down list.
4. Click OK, and then look at your styles list. You'll find many more pre-defined styles.
Wednesday, March 2, 2011
Heading Styles, PDF Bookmarks, and Books
When you PDF a document in which you've applied heading styles, you can create the PDF with hyper linked bookmarks that are based on heading styles. I happen to be the editor of Florida Lines, the Florida State Genealogical Society newsletter. When I create a newsletter PDF, I can do so with the bookmarks in place because I have applied heading styles in the Word version that Acrobat can use to create the hyper linked bookmarks. Here's a sample of what it looks like.
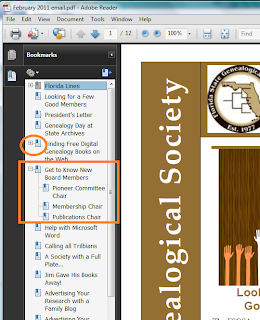
All primary hyper links that you see have a Heading 1 style applied in the Word version. Click the link in the PDF and you go to that place in the document.
The entries with plus signs beside them have other heading styles applied on a single page. For example, a Heading 2 or Heading 3 style applied to create divisions within an article on a page. Click the plus sign and the additional hyper linked bookmarks appears. Click a bookmark link in the PDF and you go to that place in the document.
If you expand this example to what would be possible in a PDF version of a long document like a family history, you begin to see how convenient it would be to have these bookmarks available for your readers. Providing that convenience means that you have to be diligent enough to add headings in the Word version of your document so that the document is set up to create these bookmarks automatically.
Creating Books
I'm an advocate for writing an actual book and not just generating a family history from genealogy software. However, I am also aware that for any number of reasons that the best a person might be able to do is generate a book rather than write one from scratch. Here are some things to consider.
Most software produces the book as an RTF (Rich Text Format) document, which is diffcult for most users to handle. In Word, you can do a Save As and change the Save as type to Word Document, which makes the document easier to handle. However, all of the text in your document has the Normal style applied to it by default. You can change the styles that are applied just like you can change the text.
My software titled my book Ahnentafel Chart for Willie Madge Henderson. I changed it to Forebears of Willie Madge Henderson. By default, my software divided the book by generations: First Generation, Second Generation, and so forth. I found each of these entries in the book and applied a Heading 1 style. I also looked at each person's named in the document. I added a line with the person's name and applied a Heading 2 style. With the styles in place, I was able to add an electronic table of contents, which my genealogy software did not include in my generated book.
All of these tasks took less than 1/2 hour to complete. Completing the tasks gave me a much more dynamic Word document, and when I PDFed this document, a much more usable document for my readers.
Heading styles...such a good thing...
Subscribe to:
Posts (Atom)