Creating the style:
1. Open a document and add text that includes a family name. You can also open an existing document.
2. Display the Styles pane. (See earlier posts on Styles).
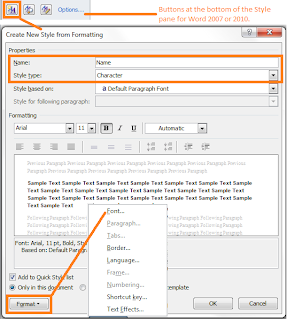
3. Locate and select the New Style button. The new style dialog appears.
--In Word 2003, the New Style button is at the top of the list.
--In Word 2007 and 2010, the New Style button is circled in the illustration below.

4. Complete the following:
--In the Name field, enter Name.
--In the Style type field, select Character from the drop-down list. The dialog updates.
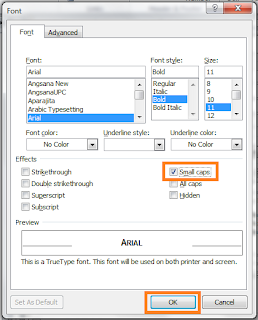
--Click the Format button at the bottom of the page, and then select Font from the pop-up menu. The Font dialog appears.

5. Complete the following:
--In the Font field, select a new font if you want a different font.
--In the Font style field, select the attribute Bold.
--In the Size field, select a new size if you want a different size.
--In the Effects group, select Small caps. A check mark appears in the check box.
6. Look at the Preview pane. Does the text look like you want it to look?
7. Click OK on the Font dialog. The dialog closes.
8. Click OK on the new style dialog.
9. Look at the list of styles. The Name style appears as a character style in the list.
Apply the New Character Style
1. Use your cursor to select a name in your open document.
2. Click the new Name character style.
3. Look at the results.

4. Apply the Name character style to the remaining family names in your document.
Modifying a Character Style
After a style is established, you can make changes. For example, you might want to change the font color to red just to practice.
1. Display the Styles pane if it isn’t already showing.
2. With your cursor, right-click the Name style with your mouse. A pop-up menu appears.
3. Select Modify. The modify dialog, which looks exactly like the new style dialog, appears.
4. Complete the following:
--In the Formatting group, click the drop-down arrow beside the unlabeled field with the word Automatic in it. A color palette appears.
--Click a shade of red.
5. Click OK at the bottom of the dialog.
6. Look at your document. Each place where you have applied the Name character format is red.
One of the values of using styles is that you can make sweeping changes to your entire document with just a few clicks and selections.
b.t.w. If you don’t like the red and you haven’t done anything else, undo the change (Ctrl + Z). If you did several other things, repeat the steps above to modify the character style to change the color.
We have lots more that we can do with styles. However, I think I've probably exhausted my welcome for the night. So I bid you good night and good styles.
No comments:
Post a Comment