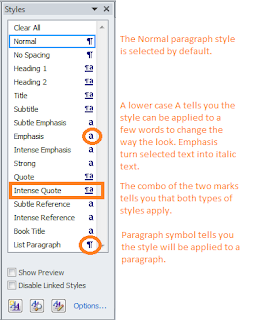
I've only spoken about heading styles so far. While looking for the heading styles, you should have noticed there are several other styles in any lists that you display. These styles are used to format text to present it in a certain fashion. That is, a style has a preselected font (type face), font size, spacing before and after the paragraph, and any number of other attributes like being indented from a margin. You need to experiment with these styles to learn to use them.
Grand Experiment
1. Open Word and the Blank document template appears automatically.
2. Type a few short paragraphs.
3. Open the list of styles. (See earlier posts for styles.)
4. Notice that the Normal style is selected automatically.
5. Click in a paragraph and pick another style. For example, click the paragraph style Quote or Intense Quote. The presentation of the paragraph changes based on your style selection.
Style lists can contain a number of different types of styles. In Word 2010, the Blank document template style list is limited to two types: paragraph style and character style. Notice that a few in the list below are a combination of both.

Understanding that a paragraph style changes a paragraph and a character style changes just a few selected words in a paragraph is a distinction that you need to internalize.
Another Grand Experiment
1. In a different paragraph, use your cursor to select a few words.
2. Click the Strong character style. Word applies bold to the selected text.
Now comes the interesting part for a genealogist. While the use of the paragraph styles can save you lots of button pressing to format text, the character styles are downright convenient. Here's how...
I like to format all of my family names as bold in small caps so that they stand out in running text. I format my place names as bold and italic. I don't want to make all of these changes each time I add a family name or place name to my document. So, I add the character styles Name and Place. When I add a name to my document, I use my cursor to select the text and apply Name or Place depending on the name. Word completes the formatting for me.
This post is getting long and I've thrown out a lot of ideas for you to process. So I'm going to stop here for tonight. In my next post, I'll give you the exact steps for creating the Name and Place styles.
Styles are a huge topic so we're going to be talking about them for awhile. However, there is one item for note left for this post. Word 2003 users get a complete list of styles automatically. Word 2007 and 2010 users have to hunt for them.
Displaying All Styles in Word 2007 or 2010
1. Look at the bottom of the Styles pane. (See graphic above.)
2. Click the Options... link. The Style Pane Options dialog appears.
3. In the Select styles to show box, select All styles from the drop-down list.
4. Click OK, and then look at your styles list. You'll find many more pre-defined styles.
No comments:
Post a Comment