Wednesday, April 24, 2013

Four Generation Chart in Word SmartArt...Altering the Chart


Click here to see post 1 in this series--The Introduction.
Click here to see post 2 in this series--Layout Page and Insert SmartArt

As noted in my last post, you can use two different methods to alter the graph.
  • Replace [TEXT] with the text you want.
  • Add text using a text dialog. 
In addition, you can use the text dialog to add new text boxes to the chart and rearrange text boxes to alter the display.

Default Hierarchy Chart

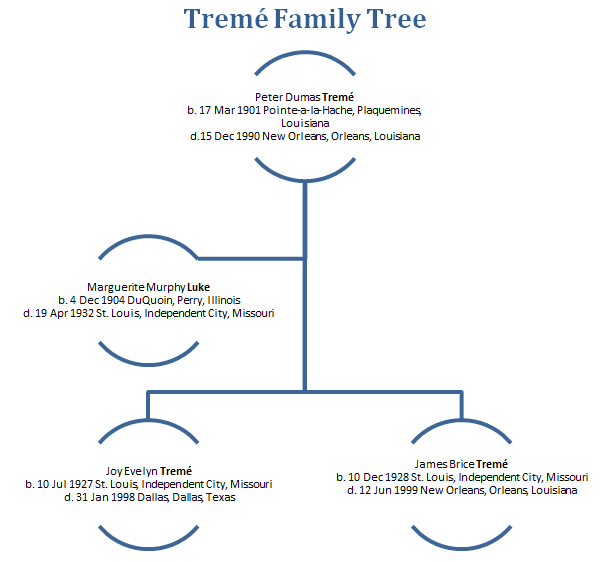
Template You Want to Create
The double arrows that you click to open the text dialog are circled in this graphic.

To replace [TEXT]: 
  1. In the chart, click [TEXT] in the first text box. 
  2. Type the following text:
    --Name, and then press the Enter key.
    --b. DatePlace, and then press the Enter key.
    --d. DatePlace, and then press the Enter key. 
This method is fine as long as you don't want to add boxes or adjust the display. To do that you need to display and use the text dialog. 

To use the text dialog:
  1. Click anywhere inside the chart but not in a [TEXT] box.
    --The chart frame appears, with double arrows on the left side of the frame.
    --The SmartArt Tools tab opens on the ribbon with two tabs: Design and Format. 
  2. Click the double arrows and the text dialog opens. The double arrows are circled in the graphic above.
  3. In the text dialog, click the first [Text] entry and type the following text:
    --Name, and then press the Shift + Enter combination.
    --b. DatePlace, and then press the Shift + Enter combination.
    --d. DatePlace.
    You may have already completed this step above when you replaced [TEXT] directly in the graphic. 
  4. Click the second [Text] entry and type the following text:
    --FatherName, and then press the Shift + Enter combination.
    --b. DatePlace, and then press the Shift + Enter combination.
    --d. DatePlace
  5. Click the third [Text] entry and type the following text:
    --Grandfather, and then press the Shift + Enter combination.
    --b. DatePlace, and then press the Shift + Enter combination.
    --d. DatePlace
  6. Click the fourth[Text] entry and type the following text:
    --Grandmother, and then press the Shift + Enter combination.
    --b. DatePlace, and then press the Shift + Enter combination.
    --d. DatePlace
  7. Add a new [Text] entry to create a parent entry for the paternal grandmother.
    --Press the Enter key. Word adds a [Text] entry below the Grandmother text entry.
    --On the SmartArt Tools tab, click the Design tab.
    --In the Create Graphic group, click Demote to move the [Text] to the fourth column position.

  8. Type the following text:
    --GreatGrandfather, and then press the Shift + Enter combination.
    --b. DatePlace, and then press the Shift + Enter combination.
    --d. DatePlace
  9. Press Enter to add a new [Text] entry, and then type the following text:
    --GreatGrandmother, and then press the Shift + Enter combination.
    --b. DatePlace, and then press the Shift + Enter combination.
    --d. DatePlace
  10. Add the great grandparents for the grandfather.
    --In the chart, click once in the Grandfather text box. In the text dialog, Word moves your cursor to the Grandfather text entry.
    --Be sure to click your cursor at the end of d. DatePlace.
    --Press the Enter key. Word adds a [Text] entry below the Grandfather text entry.
    --On the SmartArt Tools tab, click the Design tab.
    --In the Create Graphic group, click Demote to move the [Text] to the fourth column position.
    --Complete the GreatGrandfather entry.
    --Press the Enter key. Word adds a [Text] entry below the GreatGrandfather text entry.
    --Complete the GreatGrandmother entry. 
  11. Repeat steps 7 to 10 to add more [Text] entries and text boxes and use the Demote (or Promote) buttons to arrange and rearrange text boxes in columns one, two, three, and four. 
You might need to fuss with the Demote and Promote buttons to move text boxes around in the graphic to get the four column display that you see in the samples above. 

As long as you have the text dialog open, each time you press Enter, Word adds a new text entry and a text box to the graphic. If you close the text entry dialog (click the X in the upper right corner of the dialog), you can click in a text box and press Enter as you add text to the box. However, you should notice that you affect the spacing in the text boxes. 

In these instructions, I've had you add text using the text box as we went along. Another option you have is to use the text dialog to add and arrange all of the text boxes you need in the graphic, and then close the text box and click in each text box to create your template...clicking Enter after each entry or Shift + Enter, depending on the spacing you want.

The other thing you should notice is that each entry has one word placeholder text; for example, DatePlace. When using the form, you just double-click the one word and start typing. The text dialog opens automatically. You can use it or ignore it and type only in the text boxes. 

Any of the hierarchy charts that you pick will work the same way as the one you've completed for this post. In subsequent posts, we can look at additional things you can do. For example, you might need to resize text boxes to accommodate your text.  

Sunday, April 21, 2013

Four Generation Chart in Word SmartArt...Layout Page and Insert SmartArt

Click here to see post 1 in this series--the introduction.

I'm going to walk through the steps for creating the four generation chart template. After you have the template, you can complete it to create four generation charts for families. 

Layout Your Page

  1. Open Word. The default Normal template displays automatically. Remember that this template is the lowest level template with just a few styles...the starting point for lots of documents.
  2. Select File, Save As, and name the document Four Generation Chart.
  3. Display the Page Setup dialog.
    --Word 2003: Select File, and then Page Setup.
    --Word 2007/2010: Select the Page Layout tab and locate the Page Setup group. Click the small arrow in the lower right of the group (group launch button).
    The dialog appears with the Margins tab displaying by default.
  4. In the Margins group, enter .5 for the top, bottom, left, and right margins. Since this document is a chart, you are going to want to use as much of the surface area of the page as possible.
  5. In the Orientation group, select Landscaped.
  6. Click OK, and then save your document. 
Inserting SmartArt

  1. From in Insert menu, click SmartArt to open the SmartArt dialog.
  2. Select Hierarchy, and then select Horizontal Hierarchy
  3. Click OK. The graphic opens in your Word document. 
  4. Save the document. 

Doesn't look like much at the moment does it? In my next post, we're going to replace [Text] with entries that create a template and we're going to rearrange and add boxes. Depending on what you are doing, you'll use two different methods to affect what appears in the graphic. 

So stay tuned for upcoming posts.

Update 
I included Word 2003 in the page layout instructions above. However, Word 2003 options for this process are very limited. You have only one hierarchy chart that you can use. I'm going to have to work with it to see what you can do with it to make a template. 

Saturday, April 13, 2013

Four Generation Chart in Word SmartArt


  1. Click here to download a copy of this four generation chart (Word 2010).  SkyDrive opens. 
  2. Select File, Save As. A Download button appears.
  3. Click the Download button and complete the download to your system.
  4. If the SkyDrive Enable Editing button appears, click it to begin using the form. 
  5. To complete the form, double-click placeholder text and replace it with your personal text. 
Over the past few weeks, I've been trying to create a generational chart as a fillable form and bombing. When you find that you can't do a task one way, it's worth stepping away from the keyboard for a break. Sometimes, you get struck with inspiration.

I don't have occasion to use SmartArt very often. I just don't use that sort of thing in my professional or personal life. However, there are hierarchy charts that bear a striking resemblance to the charts that genealogists use. So I started playing around and I've discovered you can use SmartArt to produce a number of different types of charts, including the one above, which you can download if you're using Word 2010.

Here are a few more charts that I created using SmartArt on the fly.


So now I'm on a learning curve, trying all of the buttons that turn up on the Design and Format tabs of the SmartArt Tools context sensitive tab. I'll try to share what I'm hacking my way thru in an orderly fashion. I'm also going to have to look at how clipart can be used in conjunction with SmartArt

To display these charts, open an MS Word document and make the following selections: Insert, SmartArtHierarchy. A preview of the pre-formatted charts opens. Select one to begin using it. 

Completing one of these charts is kind of a fun mindless task that I'm doing while watching TV. 

Tuesday, April 9, 2013

Date Calculator...in Windows 7...Way Cool...

In the Facebook group, Technology for Genealogy, Michelle de la Chevrotiere-Eber pointed out that the calculator that's built into Windows 7 is genealogy friendly. I got curious and started clicking and Michelle has unearthed an interesting little item. So here are the instructions.

To display and use the date calculator:
  1. Click the Start button, and select All Programs, Accessories, and then Calculator.  The Standard calculator displays.
    Other option...Click Start. In the Run field, enter calculator, and press the Enter key. 
  2. Click the View tab. 
  3. Select Statistics in the first group, and Date calculation in the third group. The calculator updates with a date calculation pane to the right. 
  4. In the From field, enter the date mm/dd/yyyy or click the drop-down arrow and pick the date from the electronic calendar (button to the right of the field). 
  5. In the To field, enter the date mm/dd/yyyy or click the drop-down arrow and pick the date from the electronic calendar (button to the right of the field).
  6. Click the Calculate button. The system returns:
    --the difference in years, months, and weeks
    --the difference in total number of days

Today is my birthday and I've been alive 22,646 days...62 years. Since it's a computer, I'm assuming leap year days are included.

To return to the Standard calculator, select Standard and Basic from the View tab.

Alas, now I'm going to be clicking all night to see what else is there...

Wednesday, April 3, 2013

Pin4Ever...Pinterest Backup


Success always brings spinoff businesses. Thus we have the launch of Pin4Ever, which is a backup service for Pinterest. You create an account, run a backup, and you're done. Click here if you're interested in trying this free trial. If you like the free trail, the service is moderately priced ($19.99 per year).

If you're in business and want to have a backup of your pins, $19.99 is a drop in the bucket. If you're a casual pinner, I can't see where you'd be all that interested. You can always create a PDF of your boards but that requires more than the one-click Pin4Ever solution.

Click here to see the post on creating PDFs of Pinterest boards.