Sunday, August 11, 2013

An Introduction that Tugs at Your Reader’s Heart

When I begin to write about a person’s life, I try to walk beside that person in real time. I try to tell their story as if I were standing beside that person, living it with the person at the moment, and hopefully, tugging at my reader’s heart. For the most part that means I’m writing in present tense.

Choosing present tense isn’t intuitive for anyone writing about family history. Writers automatically write in the past tense. When you use past tense, you limit your use of livelier action verbs that create a livelier picture for your reader.

In addition to using the present tense, I try to limit the use of the verb to be (am, are, is). When you force yourself to look at every sentence that includes a form of the to be verb and search for other verbs or edit to create a different sentence structure, you immediately strengthen anything you've written. You won't always be able to avoid the use of the to be form; however, awareness of it can make you a more creative writer. 

Use the Thesaurus. MS Word includes a built-in Thesaurus. Double click a verb (or any other word), hold down the Shift key, and press F7 to open a Research pane. The pane includes a list of synonyms with the part of speech in parentheses and sometimes antonyms. If you look at the top of the pane, you can click a drop-down arrow that gives you access to lots of other research options; for example, Thesauruses in other languages. Frequently, the Thesaurus can provide synonyms that you are unaware of or that you just don’t use in your everyday writing and speaking. Surprise your reader. Use peruse instead of read. My favorite things to read always send me scurrying for a dictionary.

Here’s an example of an introduction written in present tense.

Jane massages the tips of her sore pricked fingers as she makes her way home from the workshop. She spends her days sewing leftover bits of fur into hats to be worn by moneyed women. As she rubs her fingertips, she wonders if her job as an Irish maid in an affluent household had been so bad after all. Jane takes solace in the fact that she at least has company when she sews.

Jane lives with her brother Robert and his family but still must earn her way in the world. She needs to raise money to get to her family in Illinois. Once there, Jane can begin to search for a suitable husband and start a life of her own. At nineteen, Jane’s search for a husband is already underway but she has time on her side. Most of Jane’s siblings were well into their twenties before they married.  

As Jane nears her home, the din of the tenement where she and her family live rouses her from her musings. Who would have thought that life would be like this in America? Life in Ireland had been rural and quiet, but meager. The meagerness of life in Ireland had been what caused Jane’s family to come to America in 1837.

Do you want to know more about Jane? I hope so. I hope that by using present tense I’ve made Jane come off the page as a real person—a person you want to get to know. After you have an introduction that will catch your reader's attention, you can write a transitional paragraph that allows you to provide past or future information in any tense you like. The point is that by using the present tense you’ve engaged your reader’s imagination and they will want more.

Writing in real time and shadowing your ancestor takes some practice. However, you should  take heart in that writing is a learned skill just like driving. The more you practice the better you get at the skill. So the next time you begin to write about an ancestor, try picking just a small incident and see if you can work it into an introduction that will tug at your reader's heart. 

Thursday, June 6, 2013

Four Generation Chart in Word SmartArt...Inserting Chart as Graphic

Click below to see the posts in this series:
Click here to see the Introduction
Click here to see the Layout Page and Insert SmartArt
Click here to see Altering the Chart
Click here to see Word 2003
Click here to see Using Chart and Resizing Boxes

While having a working chart as a Word document is convenient when you're creating the chart, trying to control the chart inside of a working Word document--think page in a book--can be a challenge for a host of reasons. In addition, charts frequently must be rotated and resized to fit into a portrait oriented page.

When you create charts, I suggest that you create them as an individual documents, and then use Paint to convert the charts to graphics, which you can insert into your document (article or book). If you need to make corrections later on, you can correct them in the live chart...the individual Word document, use Paint to turn the chart into a graphic again, and replace the graphic in your document. The advantages of this approach are that you can easily rotate and resize the graphic.

If you're a longtime reader of this blog, you know I'm a big time fan of Paint...and you've probably read all of the posts so that you're way ahead of me on this suggestion.

If you're a new reader, following are the posts you need to read to learn how to use Paint to capture the chart and resize and rotate it.
Much Ado About Graphic Software...Part 1 Capturing a Screen
Much Ado About Graphic Software...Part 8 Resizing and Rotating

If you want to read more about Paint, click here to go to the Archive post with links to Paint-related articles listed in sequence.

Tuesday, June 4, 2013

RootsSearch Chrome Extension

During a computer user group meeting, my friend Cathy Vance pointed out a new RootsSearch Chrome extension. Extensions (also called add-ons) are tiny applications that you can add to a browser to do a specific task. For example, you can add an extension that is a stock market ticker that opens and runs each time you open your browser.

How does RootsSearch work?

After setting up RootsSearch, when I open one of the programs covered by the extension and display a record, I see a new icon in the address bar of the webpage. For example, when I open Find A Grave and display any memorial, I see the RootsSearch icon in the address bar of the webpage.


I can click the icon to open the RootsSearch pop-up.
The Extension copies the information from Find A Grave 
to fields in the pop-up.

Using the pop-up, I can add more detail and click a button to search an additional website based on the search criteria in the RootsSearch pop-up.

So, with the Find A Grave memorial displaying, I can click the RootsSearch icon, select the FamilySearch button in the pop-up, and have the search results appear in a new tab in my Chrome browser. In addition, the Find A Grave memorial is still displaying on another tab.

To continue, I select a record in the FamilySearch results and the icon appears again in the address bar again. Note that the RootsSearch icon appears only when I have an individual record displaying. I can click the icon and continue using the pop-up to search across additional websites with each set of search results opening in a new tab.

What do you need to make this magic happen?

You need to add the Google Chrome browser to your system, and then you need to add the extension.
  • Click here to display the Chrome download page and download the browser.
    Note: I suggest that everybody have multiple browsers on their system. At the very least, I suggest Internet Explorer with a Hotmail account so that you can use all things Microsoft and Chrome with a Gmail account so that you can use all things Google. I also happen to have Firefox on my laptop because it on occasion offers better functionality. 
  • Add the extension.
To add the extension:
  1. Click the Chrome Customize button to display a menu, and then select Tools, Extension. The Extensions page opens.

  2. Scroll to the bottom of the page and click the link Get more extensions. The Chrome Web Store page opens.
  3. In the Search the Store field, type RootsSearch and press your Enter key. The extension displays.

  4. Click the Add to Chrome button. A confirmation message opens. 
  5. Click Add. Another confirmation message opens. The extension is available for use.
Upshot
Getting into the swing of using the RootsSearch pop-up takes a bit of practice. However, I’m finding it to be a convenience that I frequently use. So, if you’re a genealogist who is looking to make your online life a bit more efficient, you might want to look at Chrome and this extension to see how it might work for you.

Thank you Cathy for pointing out this useful tidbit.

P.S. Something to make you laugh...I copied lots of this text from a formatted Word document, which makes Blogger just nuts. So, if you think you noticed changing fonts, it's not your eyes...it's me...fighting formatting in Blogger!

P.P.S. I used crgalvin's suggestion in the comments below to fix the formatting. Works like a charm! Thanks again cr!

Wednesday, May 8, 2013

Four Generation Chart in Word SmartArt...Using Chart and Resizing Boxes


Click here to see post 1 in this series--The Introduction.
Click here to see post 2 in this series--Layout Page and Insert SmartArt
Click here to see post 3 in this series--Altering the Chart
Click here to see post 4 in this series--Word 2003

Using the Chart
The point of having created the form is that you're going to want to use it repeatedly rather than having to create the chart every time you want to fill out one for a family. So you will want to save a copy of the chart you created under a new name prior to completing the chart.

Note: If you've created a form that only you will be using, you might want to complete the contact information in your master copy so that information is there when you open the chart.

To use the chart:
  1. Save a copy of the chart under a new name. 
  2. In boxes, double click placeholder text and type in the real information. As you fill the boxes with text, you'll notice that the text flows outside of the box. Don't worry. We'll fix this later.
  3. Save your chart and resize boxes. 

Resizing the Boxes
When you resize, you need to resize all of the boxes in a column at the same time. Resizing based on columns gives you a consistent display.

To select the boxes in a column:

  1. Click in the first box. The handles (circles and squares) appear. 
  2. Hold down the Shift key, and click in the border of the second box. The handles for the second box appear. You'll know you're clicking in the right spot because your cursor will change to a four-headed arrow. 
  3. Repeat step 2 until you have all of the boxes selected. Your screen will look similar to this one.

    Handles are the circles and squares inside the orange squares and circles. 
To resize boxes in a column: 

  1. When you selected the first text box, the SmartArt Tools tab opened on the ribbon. 
  2. Select the Format tab, and locate the Size group.
  3. In the Height field, click the up and down arrow beside the field to increase and decrease the height of the selected boxes.
  4. In the Width field, click the up and down arrow beside the field to increase and decrease the width of the selected boxes.
  5. When you have the arrangement you like, save (Ctrl + S). 

If you find that you can't adjust the height or width, it's most likely because the layout is getting cramped and Word isn't letting you make the adjustment. You might want to consider using abbreviations or otherwise altering the presentation of the information in boxes.

So good luck with resizing. I'm sure you'll do fine. It's easy...you just have to know the trick of how to select multiple boxes to apply the change to all of the boxes in a column.

I'll continue hacking around and seeing what additional functionality you might need.

Wednesday, May 1, 2013

Four Generation Chart in Word SmartArt...Word 2003 options


Click here to see post 1 in this series--The Introduction.
Click here to see post 2 in this series--Layout Page and Insert SmartArt
Click here to see post 3 in this series--Altering the Chart

I had a few minutes today on the computer where I have Word 2003 installed. So I went poking around. While you don't have as many choices as you do in more recent versions of Word, it's not as limited as I originally thought.

Here are the menu selections you make to get to the charts in Word 2003. Word automatically inserts the default organization chart.


In addition, Word displays the Organization Chart toolbar. If you click outside of the chart area, the toolbar closes. To open it again, click inside of the chart area. 


This chart works like all of the others I've been talking about. Click in a box and start typing text. 


Adding boxes in Word 2003 is different. You use options (Assistant, Coworker, Subordinate) from the Insert Shape drop-down list to add boxes in different locations.

If you want additional options for formatting, click the Auto Format button to display the chart style gallery. Pick a style from the gallery to see how it changes your chart.


Use options on the Layout drop-down to change the arrangements of the boxes. 

So there you have some of what you can do in Word 2003. I'll pick up writing about the Word 2007/2010 versions in my next post. 

Wednesday, April 24, 2013

Four Generation Chart in Word SmartArt...Altering the Chart


Click here to see post 1 in this series--The Introduction.
Click here to see post 2 in this series--Layout Page and Insert SmartArt

As noted in my last post, you can use two different methods to alter the graph.
  • Replace [TEXT] with the text you want.
  • Add text using a text dialog. 
In addition, you can use the text dialog to add new text boxes to the chart and rearrange text boxes to alter the display.

Default Hierarchy Chart

Template You Want to Create
The double arrows that you click to open the text dialog are circled in this graphic.

To replace [TEXT]: 
  1. In the chart, click [TEXT] in the first text box. 
  2. Type the following text:
    --Name, and then press the Enter key.
    --b. DatePlace, and then press the Enter key.
    --d. DatePlace, and then press the Enter key. 
This method is fine as long as you don't want to add boxes or adjust the display. To do that you need to display and use the text dialog. 

To use the text dialog:
  1. Click anywhere inside the chart but not in a [TEXT] box.
    --The chart frame appears, with double arrows on the left side of the frame.
    --The SmartArt Tools tab opens on the ribbon with two tabs: Design and Format. 
  2. Click the double arrows and the text dialog opens. The double arrows are circled in the graphic above.
  3. In the text dialog, click the first [Text] entry and type the following text:
    --Name, and then press the Shift + Enter combination.
    --b. DatePlace, and then press the Shift + Enter combination.
    --d. DatePlace.
    You may have already completed this step above when you replaced [TEXT] directly in the graphic. 
  4. Click the second [Text] entry and type the following text:
    --FatherName, and then press the Shift + Enter combination.
    --b. DatePlace, and then press the Shift + Enter combination.
    --d. DatePlace. 
  5. Click the third [Text] entry and type the following text:
    --Grandfather, and then press the Shift + Enter combination.
    --b. DatePlace, and then press the Shift + Enter combination.
    --d. DatePlace. 
  6. Click the fourth[Text] entry and type the following text:
    --Grandmother, and then press the Shift + Enter combination.
    --b. DatePlace, and then press the Shift + Enter combination.
    --d. DatePlace. 
  7. Add a new [Text] entry to create a parent entry for the paternal grandmother.
    --Press the Enter key. Word adds a [Text] entry below the Grandmother text entry.
    --On the SmartArt Tools tab, click the Design tab.
    --In the Create Graphic group, click Demote to move the [Text] to the fourth column position.

  8. Type the following text:
    --GreatGrandfather, and then press the Shift + Enter combination.
    --b. DatePlace, and then press the Shift + Enter combination.
    --d. DatePlace. 
  9. Press Enter to add a new [Text] entry, and then type the following text:
    --GreatGrandmother, and then press the Shift + Enter combination.
    --b. DatePlace, and then press the Shift + Enter combination.
    --d. DatePlace. 
  10. Add the great grandparents for the grandfather.
    --In the chart, click once in the Grandfather text box. In the text dialog, Word moves your cursor to the Grandfather text entry.
    --Be sure to click your cursor at the end of d. DatePlace.
    --Press the Enter key. Word adds a [Text] entry below the Grandfather text entry.
    --On the SmartArt Tools tab, click the Design tab.
    --In the Create Graphic group, click Demote to move the [Text] to the fourth column position.
    --Complete the GreatGrandfather entry.
    --Press the Enter key. Word adds a [Text] entry below the GreatGrandfather text entry.
    --Complete the GreatGrandmother entry. 
  11. Repeat steps 7 to 10 to add more [Text] entries and text boxes and use the Demote (or Promote) buttons to arrange and rearrange text boxes in columns one, two, three, and four. 
You might need to fuss with the Demote and Promote buttons to move text boxes around in the graphic to get the four column display that you see in the samples above. 

As long as you have the text dialog open, each time you press Enter, Word adds a new text entry and a text box to the graphic. If you close the text entry dialog (click the X in the upper right corner of the dialog), you can click in a text box and press Enter as you add text to the box. However, you should notice that you affect the spacing in the text boxes. 

In these instructions, I've had you add text using the text box as we went along. Another option you have is to use the text dialog to add and arrange all of the text boxes you need in the graphic, and then close the text box and click in each text box to create your template...clicking Enter after each entry or Shift + Enter, depending on the spacing you want.

The other thing you should notice is that each entry has one word placeholder text; for example, DatePlace. When using the form, you just double-click the one word and start typing. The text dialog opens automatically. You can use it or ignore it and type only in the text boxes. 

Any of the hierarchy charts that you pick will work the same way as the one you've completed for this post. In subsequent posts, we can look at additional things you can do. For example, you might need to resize text boxes to accommodate your text.  

Sunday, April 21, 2013

Four Generation Chart in Word SmartArt...Layout Page and Insert SmartArt

Click here to see post 1 in this series--the introduction.

I'm going to walk through the steps for creating the four generation chart template. After you have the template, you can complete it to create four generation charts for families. 

Layout Your Page

  1. Open Word. The default Normal template displays automatically. Remember that this template is the lowest level template with just a few styles...the starting point for lots of documents.
  2. Select File, Save As, and name the document Four Generation Chart.
  3. Display the Page Setup dialog.
    --Word 2003: Select File, and then Page Setup.
    --Word 2007/2010: Select the Page Layout tab and locate the Page Setup group. Click the small arrow in the lower right of the group (group launch button).
    The dialog appears with the Margins tab displaying by default.
  4. In the Margins group, enter .5 for the top, bottom, left, and right margins. Since this document is a chart, you are going to want to use as much of the surface area of the page as possible.
  5. In the Orientation group, select Landscaped.
  6. Click OK, and then save your document. 
Inserting SmartArt

  1. From in Insert menu, click SmartArt to open the SmartArt dialog.
  2. Select Hierarchy, and then select Horizontal Hierarchy. 
  3. Click OK. The graphic opens in your Word document. 
  4. Save the document. 

Doesn't look like much at the moment does it? In my next post, we're going to replace [Text] with entries that create a template and we're going to rearrange and add boxes. Depending on what you are doing, you'll use two different methods to affect what appears in the graphic. 

So stay tuned for upcoming posts.

Update 
I included Word 2003 in the page layout instructions above. However, Word 2003 options for this process are very limited. You have only one hierarchy chart that you can use. I'm going to have to work with it to see what you can do with it to make a template. 

Saturday, April 13, 2013

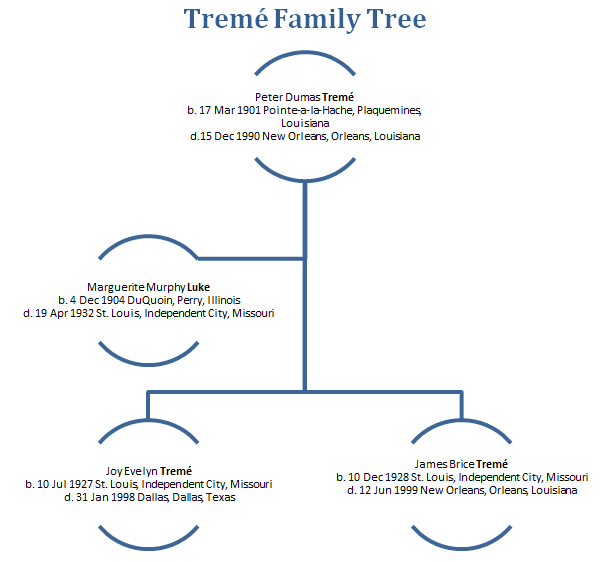
Four Generation Chart in Word SmartArt


  1. Click here to download a copy of this four generation chart (Word 2010).  SkyDrive opens. 
  2. Select File, Save As. A Download button appears.
  3. Click the Download button and complete the download to your system.
  4. If the SkyDrive Enable Editing button appears, click it to begin using the form. 
  5. To complete the form, double-click placeholder text and replace it with your personal text. 
Over the past few weeks, I've been trying to create a generational chart as a fillable form and bombing. When you find that you can't do a task one way, it's worth stepping away from the keyboard for a break. Sometimes, you get struck with inspiration.

I don't have occasion to use SmartArt very often. I just don't use that sort of thing in my professional or personal life. However, there are hierarchy charts that bear a striking resemblance to the charts that genealogists use. So I started playing around and I've discovered you can use SmartArt to produce a number of different types of charts, including the one above, which you can download if you're using Word 2010.

Here are a few more charts that I created using SmartArt on the fly.


So now I'm on a learning curve, trying all of the buttons that turn up on the Design and Format tabs of the SmartArt Tools context sensitive tab. I'll try to share what I'm hacking my way thru in an orderly fashion. I'm also going to have to look at how clipart can be used in conjunction with SmartArt. 

To display these charts, open an MS Word document and make the following selections: Insert, SmartArt, Hierarchy. A preview of the pre-formatted charts opens. Select one to begin using it. 

Completing one of these charts is kind of a fun mindless task that I'm doing while watching TV. 

Tuesday, April 9, 2013

Date Calculator...in Windows 7...Way Cool...

In the Facebook group, Technology for Genealogy, Michelle de la Chevrotiere-Eber pointed out that the calculator that's built into Windows 7 is genealogy friendly. I got curious and started clicking and Michelle has unearthed an interesting little item. So here are the instructions.

To display and use the date calculator:
  1. Click the Start button, and select All Programs, Accessories, and then Calculator.  The Standard calculator displays.
    Other option...Click Start. In the Run field, enter calculator, and press the Enter key. 
  2. Click the View tab. 
  3. Select Statistics in the first group, and Date calculation in the third group. The calculator updates with a date calculation pane to the right. 
  4. In the From field, enter the date mm/dd/yyyy or click the drop-down arrow and pick the date from the electronic calendar (button to the right of the field). 
  5. In the To field, enter the date mm/dd/yyyy or click the drop-down arrow and pick the date from the electronic calendar (button to the right of the field).
  6. Click the Calculate button. The system returns:
    --the difference in years, months, and weeks
    --the difference in total number of days

Today is my birthday and I've been alive 22,646 days...62 years. Since it's a computer, I'm assuming leap year days are included.

To return to the Standard calculator, select Standard and Basic from the View tab.

Alas, now I'm going to be clicking all night to see what else is there...

Wednesday, April 3, 2013

Pin4Ever...Pinterest Backup


Success always brings spinoff businesses. Thus we have the launch of Pin4Ever, which is a backup service for Pinterest. You create an account, run a backup, and you're done. Click here if you're interested in trying this free trial. If you like the free trail, the service is moderately priced ($19.99 per year).

If you're in business and want to have a backup of your pins, $19.99 is a drop in the bucket. If you're a casual pinner, I can't see where you'd be all that interested. You can always create a PDF of your boards but that requires more than the one-click Pin4Ever solution.

Click here to see the post on creating PDFs of Pinterest boards.