Showing posts with label Shortcut. Show all posts

Friday, January 17, 2014

To select or not select...selecting partial text...

I had the pleasure today of teaching a day long class on using MS Word to execute a template (and all the attendant skills a writer needs) as well as showing the class how to create a template. During the class, when we were talking about getting text from an existing document into an instance of a template, I recommended two ways of adding the text.

Method 1:
  1. Select a template to create a new document. 
  2. Open the document with the source text. 
  3. Highlight the text you want to copy.
  4. Copy and paste the text into the instance of the template. 
  5. Use Paste Special to paste the text as unformatted text so that you can apply the styles associated with the template. 
Method 2: 
  1. Select a template to create a new document. 
  2. Place your cursor in the document where you want to add existing text.
  3. On the Insert tab in the Text group, select the Object drop-down button. A pop-up menu opens. 
  4. Select Text from File. A navigation dialog opens. 
  5. Navigate to the file with the text you want to add to the instance of the template, select the file name, and then click the Insert button. All of the text from the selected document flows into the new document you are creating. 
The problem arose in my neat little world when a class member asked this question: Suppose I have a book with ten chapters and I just want to copy the text in chapters three to six. How do I copy just what I want?

I never do this task so I had only the two methods described above to offer as a solution. Another class member offered this nifty bit of instruction.

Method 3: 
  1. Open the document with the text you want to copy.
  2. Click your cursor before the first word in chapter three.
  3. Scroll to the end of chapter six.
  4. Hold down the Shift key and click behind the last word in chapter six. Word selects the text from chapters three to six. 
  5. Copy the text (Ctrl + C). Word places the text on the clipboard. 
  6. Select a template to create a new document.
  7. Click your cursor in the location where you want the copied text to appear. 
  8. Paste (Ctrl + V) the selected text into the new instance of the template. 
Regardless of how long I use MS Word, I'm constantly learning to do new tasks, which are frequently tasks that I would never have thought of on my own. So here's another example of a place where I had the a class member teach me to do something new. I'm writing about it here in case you have to do this type of task too. 

Click here to go to a list of shortcuts, including selection shortcuts. For the most part, I don't use selection shortcuts but that doesn't mean that you won't find them helpful. 

Wednesday, May 23, 2012

It's the Little Things that Make Me Happy...


If you're a long time reader of this blog, you've read lots about the hidden codes in Word.

If you're new to this blog, you're going to want to learn about the hidden codes that help you troubleshoot a document when it goes south on you. See Hidden Codes

When you copy text from one place to another and you've applied a style--for example, a Heading style, you can select the Paragraph mark to copy the style with the text...or not if you don't want to copy the style too.

When I select text to copy, my options are set so that I select the Paragraph mark automatically. When I don't want to include the Paragraph mark in the selected text, I struggle. I could reset my select options but I like them the way they are for most tasks.

I've recently had someone show me an extremely helpful shortcut. When I select text and the Paragraph mark is selected automatically, I can hold down the Shift key and press the left arrow key once to deselect the Paragraph mark. Problem solved!

I read about shortcuts all the time. Understanding them in a practical way that makes the knowledge useful sometimes eludes me. Since I've written so much about using Word, I thought you'd like to know that I still have lots to learn too...perhaps not the big stuff...but lots and lots of little and extremely helpful stuff like the topic of this post.

Wednesday, February 29, 2012

Table It!...Part 9...Borders and Shading Button

When you click the Borders and Shading... button on the Table tab, the dialog appears with three tabs...You're three layers down in Word and perhaps it's more than you bargained for! However, if you treat the layer like any other complicated thing, you simply dissect and digest it bit by bit.

Borders Tab

Use the Borders tab to control the lines appearing around cells in your table. I use this dialog frequently.
Page Border Tab

Use the Page Border tab to control the lines appearing on the edge of pages. I've never had a reason to use this particular dialog. However, you can see that it should function in much the same way as the Borders tab with the difference being that the borders will apply to the larger area of the page...think of the page as one big cell.
Shading Tab

Use the Shading tab to add color (and/or a pattern) to one or more cells in a table. Or, if you've used the Page Border tab, use this tab to add color (and/or a pattern) to the page.

The Fill drop-down on the Shading tab should look familiar to you. You've seen and used the color palette before in the post Frame Up Part Three...Adding Color. You might want to read that post if you're not up on using the color palette. The exact same palette appears when you select the Color drop-down on the Borders or Page Border tabs. After you learn to use the palette in one context, you can apply that knowledge throughout Word because Word consistently uses the same palette each time that color is an option.

Apply to Field
The one field on these dialogs that will get you into trouble quickly is the Apply to field. If you don't make a selection in this field, it's a real crap shoot as to what you'll wind up with. At least once a day, I miss making a selection in this field. When you do it and mess up your table, the fix is easy.

Hold down the Ctrl key and type the letter Z (Ctrl + Z) to undo the mistake. Make your selections again...and remember to pick Table, Cell, or Paragraph in the Apply to field.

By now you know, I'm a shortcut key kinda gal. However, you might like buttons better. So, you can also click the Undo button, which is visible in Word 2003. In Word 2007/2010, you need to add a Quick Access Toolbar, and then add the Undo button. See the post Displaying Buttons You Need for more information.

Next Post
So, now that I've told you where you're likely to get into trouble and how to get out of it, I can start talking about what you can do on the Borders tab in the next post.

Friday, February 10, 2012

Keyboard Shortcuts

I checked the stats on this blog. I noticed that lots of you have been reading about keyboard shortcuts. The shortcuts that I added were for Windows. The link below will take you to shortcuts for MS Word. After I finish the table series, I'll add notes for Word shortcuts that I actually use.

Of note...I'm a touch typist. I find using the keyboard shortcuts saves me lots of time and effort. The key to learning the shortcuts is to learn to use them one at a time. When you consistently use a shortcut (you've internalized it) then it's time to learn a new one. Over time they add up.

http://office.microsoft.com/en-us/word-help/keyboard-shortcuts-for-microsoft-word-HP010370109.aspx#BM5

Wednesday, February 2, 2011

Word "Find Next" Workaround

When I’m searching a Word document for a repetitive word or phrase, I find it distracting to have the Find dialog displaying while I’m searching. As you search, the dialog can move all over the screen as Word moves it out of the way so that you can see the instance of what you searching for. Or worse, the dialog sits right on top of the text that shows the word or term. You can’t minimize the dialog because you need to see it to click the Find Next button. A workaround is available. Here are the steps.

For earlier versions of Word:
1. Open a document to search.
2. Display the Find dialog (Ctrl + F) in Word, and enter a search term in the Find what field.
3. In the dialog, click Find Next to find the first instance of the search term, and then click Cancel to close the dialog box.


4. Hold down the Ctrl button and press the Page Down button to move to the next instance of the search term. To move backward through the document, use Ctrl + Page Up.
OR
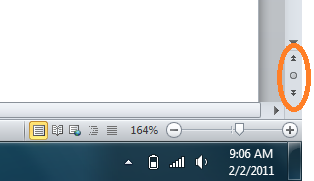
5. Move your cursor to the buttons at the end of the page scroll bar. They are set to Previous Page and Next Page by default. However, when you start a search, the button change to Previous Find/Go To and Next Find/Go To.
6. Click the down button to find (go to) the next instance of your search term. To move backward through the document, click the up button.


For Word 2010:
1. Open a document to search.
2. Confirm that the Navigation pane is displaying. You’ll see the pane on the left side of the document.

If the pane isn’t displaying, click the View tab, and click the Navigation Pane option on the Show portion of the ribbon.

3. Enter a search term in the search field immediately below the pane title Navigation and press Enter.

All instances of the search term are immediately highlighted, and the system automatically scrolls to the first instance. In addition, the buttons at the end of the page scroll bar have been changed to Previous Find/Go To and Next Find/Go To automatically. Click the down/up buttons to search. Or, you can also use Ctrl + Page Up or Page Down buttons to move to the next instance of the search term.

Searching for Other Stuff
As an aside, if you click the radio button between the down and up buttons at the end of the page scroll bar, a pop-up menu appears. As you can see from the sample below, you have lots of options for changing what the down and up buttons browse for. For example, if you added comments to a document, you can click the Comments icon, and use the down and up buttons to move from comment to comment in your document.

Friday, January 14, 2011

Changing Case in Word--Smith to SMITH

When I write about my family history, I like to capitalize surnames; for example, Smith becomes SMITH. Cap'ing names makes them easier for readers to find in running text. I usually forget to capitalize some names and I have to go back to fix them. To make the task easy, I learned the keyboard shortcut to change case. Here's what you do:

1. Double click the name to select it. Word adds a highlight.
2. Hold down the Shift key, and press the F3 key.

Each time you press the F3 key (with Shift), Word changes the case to one of three settings: ALL CAPS (uppercase), Initial cap (sentence case), or no caps (lowercase).

Knowing this shortcut has save me lots of extra typing. In addition, while you have the name highlighted, you can also apply bold or italic attributes. To apply, hold down the Crtl key, and type the letter B or I or both.