Showing posts with label Cell Padding. Show all posts

Wednesday, March 21, 2012

Table It!...Part 14...Cell Formatting


The Cell tab on the Table Properties dialog is the last tab that we'll be looking at for properties. Here's a run down.
  • Size/Preferred width: You can set column widths. I prefer to do this using the ruler because you can see the table when you start changing column widths.  
  • Vertical alignment: You can select an alignment for cell text flush to the top or bottom or centered. Word includes another option on a pop-up menu that is easier to use for setting alignments. 
  • Options button/Cell margins: Click the button to display a Cell Options dialog. The dialog should look familiar. It's similar to the Table Options dialog that we looked at in part 12 when we looked at cell padding. This one is a bit confusing...bear with me. 
    • If you use the Table Options dialog to set cell padding, Word applies the setting to the whole table.
    • If you select the entire table and then use the Cell Options dialog to set cell padding, Word applies the settings to the whole table. If you're using Word 2003, use this method to set cell padding for tables. 
    • If you select one or more cells (for example a column or a row) and then use the Cell Options dialog to set cell padding, Word applies the settings to the selected cells only. You may find that you can use this option to call extra attention to an area of a table without using anything more. 
  • Options button/Options: Click the button to display a Cell Options dialog. 
    • Wrap text: Leave this option selected so that text will wrap automatically within each cell.
    • Fit text: Select this option when you want the system to force everything you type into one line. Word will alter the font size to accomplish the tasks. I've never found a use for this option; however, you should play with it and see how you feel about it. I can see where you might want to use the option in a title row. 
Next Post
We'll be looking at the pop-up menu and the main menu (ribbon) options. A few options you've seen on properties tab also appear on the pop-up or the main menu and are easier to use from those locations. So, until the next post, I hope you're having fun with tables. 

Monday, March 12, 2012

Table It!...Part 12...Cell Padding


Review
We've been working on a table using the Table Properties. After you insert a table, you display the properties by right clicking anywhere in a table to display a popup menu, and then selecting Table Properties from the menu.

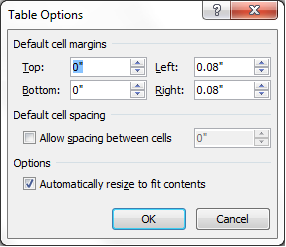
The last item on the Table tab that we need to look at is Options. Click the Options button to display a popup.


Default cell margins
The fields Top, Bottom, Left, and Right control the distance between the cell border and the text within the cell. The space is also referred to as cell padding, which is white space. White space enhances the readability of a document. Thus cell padding makes the contents of a cell easier to read because a reader can readily distinguish text from border lines...think in terms of old eyes.

If you look closely at the details of rows in the samples below, you'll see that the second version is longer. Click the sample and you'll see that the second table has more white space above and below the text within the cell. To be precise, the top and bottom cell padding is 0.08". You'll need to play with these settings to see what you like. My preferred setting is 0.03" for all four settings.

Click the graphic to see a larger version of it.
Press the ESC key to return to this post.

If you stop and think about this, you already know another way to control the space before and after text...our good old friend Styles. If you create a style named TableCell, you can use it to control the space before and after text with the style applied to it. In addition, if you create a style names TableHead, you can add the bold attribute and apply it when you apply the style to the heading line of a table. Creating styles to control space and attributes is yet another example of the choices you make when deciding how to affect text in a document. The choices are what make Word so useful to its many fans.

Default cell spacing (Allow spacing between cells)
Click the check box to enable the size-field arrows (called spinners). The size field defaults to 0.01. Change the setting to 0.03 and then click OK to apply the setting. Word creates a table within a border. This option is one of the decorative elements that you can use to create interesting table layouts.

Options (Automatically resize to fit contents)
Accept the default to have the table resize itself automatically based on the size of cell contents. This option applies to eventual width of the table. I never use this control. There are too many other places where you can control width that are much easier to display and use than this particular control.

What You Should Take Away
Controlling cell padding adds to the readability of your tables and you have one option on the Table Options dialog to create a decorative table.

Next Post
We'll be looking at the next tab on the Table Properties: Row. This tab includes options that are useful for long tables that cover more than one page.