One of the items you should look at when you finish a document—for example, you write a bio for a relative—is how you are going to present and/or distribute that document. If you want a document that can be read by anybody on any computer regardless of software, hardware, or operating system, you should be looking at converting the document to a PDF.
Adobe Systems created the PDF format. Through the years it has become the standard for documents that can be emailed, posted to a website, stored on any computer, and sent to any printer. If you are interested in more information about PDF, click here.
For many years, users had to buy Adobe Acrobat to create PDFs. The Reader—the software that most users are familiar with—was always a free download. On the other hand, Acrobat has always been relatively expensive for anybody who creates PDFs only occasionally. Other companies created software that could be used to create PDFs; however, Adobe Acrobat remained the gold standard.
When I bought my new laptop, I was delighted to find that Microsoft had included an Adobe PDF maker in the 2010 Home/Student version of their software. Having the PDF maker is a real convenience and it’s easy to use.
Method 1:
1. With an open document, click File, and then Save As. The dialog appears.
2. At the bottom of the dialog, click the Save as type drop-down arrow. A list displays with available formats, including PDF.
3. Click PDF, and then click Save. The document appears as a PDF in the Adobe Reader.
Method 2:
1. With an open document, click File, and then Save & Send. The dialog appears.
2. Click Create PDF/XPS Document. The dialog updates.
3. Click the Create PDF/XPS button. A publish dialog appears.
4. Click the Publish button. The document appears as a PDF in the Adobe Reader.
The Reader allows you to do many PDF-related tasks. It's worth your time to check out a few of the menus and perhaps read a bit of the Help file to find out more about what you can do in the Reader.
Showing posts with label PamTreme. Show all posts
Showing posts with label PamTreme. Show all posts
Friday, February 18, 2011


Friday, February 11, 2011
Spell Checking and Ignore All Command
Here's the scene. You're editing, and you find a red underlined word--a misspelling--but you think it's correct. So you point your cursor at the word, right click your mouse, and select the Ignore All command. Later, you realize that you've made a mistake and the word really is misspelled.
When you use the Ignore All command, Word does exactly what you told it to do; that is, it ignores the word. You can close the document and open it again and Word will still ignore the word.
--If you haven't closed your document and you just selected the command, you can hold down the Ctrl key and type Z (Ctrl + Z) to undo the command.
--If you've made several other edits and you don't want to undo them, you can use the Recheck Document command. Here's how.
For Word 2007 and 2010, you need to display the Proofing page, and then select the Recheck Document button.
In Word 2007, click the Office Button, and then Word Options. The Word Options dialog appears.

In Word 2010, click File, and then Options. The Word Options dialog appears.
For Word 2007 or 2010, select Proofing from the menu on the left, and then click the Recheck Document button. A warning appears. Click Yes. Click OK on the Word Options page to save. Your document appears again with all of the words you used the Ignore All command on as misspelled; that is, red underlined.
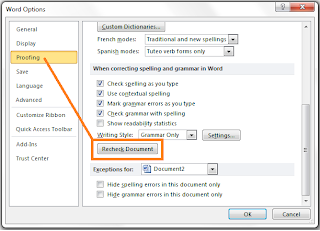
For Word 2003, select Tools, and then Options. The dialog appears. Click the Spelling and Grammar tab. Click the Recheck Document button at the bottom of the tab, and then click OK.

Your document appears again with all of the words you used the Ignore All command on as misspelled; that is, red underlined.
Note: Like most tools in Word, you have access to the Options from more than one dialog. When you are spell checking, look at the bottom of the Spelling and Grammar dialog and you'll see an Options button. Clicking this button causes the dialog with the Recheck Document button to appear.
When you use the Ignore All command, Word does exactly what you told it to do; that is, it ignores the word. You can close the document and open it again and Word will still ignore the word.
--If you haven't closed your document and you just selected the command, you can hold down the Ctrl key and type Z (Ctrl + Z) to undo the command.
--If you've made several other edits and you don't want to undo them, you can use the Recheck Document command. Here's how.
For Word 2007 and 2010, you need to display the Proofing page, and then select the Recheck Document button.
In Word 2007, click the Office Button, and then Word Options. The Word Options dialog appears.

In Word 2010, click File, and then Options. The Word Options dialog appears.
For Word 2007 or 2010, select Proofing from the menu on the left, and then click the Recheck Document button. A warning appears. Click Yes. Click OK on the Word Options page to save. Your document appears again with all of the words you used the Ignore All command on as misspelled; that is, red underlined.

For Word 2003, select Tools, and then Options. The dialog appears. Click the Spelling and Grammar tab. Click the Recheck Document button at the bottom of the tab, and then click OK.

Your document appears again with all of the words you used the Ignore All command on as misspelled; that is, red underlined.
Note: Like most tools in Word, you have access to the Options from more than one dialog. When you are spell checking, look at the bottom of the Spelling and Grammar dialog and you'll see an Options button. Clicking this button causes the dialog with the Recheck Document button to appear.
Tuesday, February 8, 2011
Auto Correct Options
Every version of Word that I’ve used has included the auto correct option. Word comes with a list of commonly misspelled words. When you misspell a word on the list, Word automatically corrects it. You can add words to the list. For example, you might have a difficult to spell place name or surname that you never get right.
In my case, I have an accent over the last e in my name. Treme is properly presented as Tremé. I’ve learned to use a key combination to add the accent. However, another option is to add an entry to the auto correct list. Adding an entry is a two-step process. First, you need to open the AutoCorrect dialog box, and then you need to make an entry.
Open the AutoCorrect Dialog
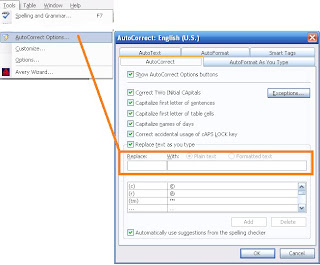
For Word 2003, click Tools, and then AutoCorrect Options.
For Word 2007 and 2010:
In Word 2007, click the Office Button, and then Word Options. The Word Options dialog appears.
In Word 2010, click File, and then Options. The Word Options dialog appears.
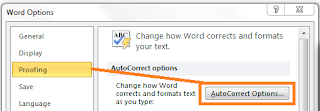
For Word 2007 or 2010, select Proofing from the menu on the left, and then click the AutoCorrect Options button. The AutoCorrect dialog appears.

Make an Entry
1. In the Replace field, enter the word you misspell as you misspell it.
2. In the With field, enter the word as it should be spelled.
3. Click OK.
4. For 2007 and 2010, click OK on the Word Options dialog.
Open a Word document and test the auto correct; that is, misspell the word as you usually would. When you press the spacebar, Word should substitute the correct spelling.
I’ve used auto correct to great advantage. For example, when I type AJB and hit the spacebar, Word automatically corrects it to Ananias Jackson Booth because I’ve set it up to do that for me. If you have to type something like Saute Sainte Marie repeatedly, it’s easy to add SSM as an entry to be corrected to Saute Sainte Marie.
When the auto correct corrects something incorrectly, hold down the Ctrl key and type Z (Ctrl + Z) to undo the correction.
The upshot is that auto correct gives you additional options for a variety of circumstances. Like most things with Word, you are limited only by how imaginatively you use the software.
In my case, I have an accent over the last e in my name. Treme is properly presented as Tremé. I’ve learned to use a key combination to add the accent. However, another option is to add an entry to the auto correct list. Adding an entry is a two-step process. First, you need to open the AutoCorrect dialog box, and then you need to make an entry.
Open the AutoCorrect Dialog
For Word 2003, click Tools, and then AutoCorrect Options.

For Word 2007 and 2010:
In Word 2007, click the Office Button, and then Word Options. The Word Options dialog appears.
In Word 2010, click File, and then Options. The Word Options dialog appears.

For Word 2007 or 2010, select Proofing from the menu on the left, and then click the AutoCorrect Options button. The AutoCorrect dialog appears.

Make an Entry
1. In the Replace field, enter the word you misspell as you misspell it.
2. In the With field, enter the word as it should be spelled.
3. Click OK.
4. For 2007 and 2010, click OK on the Word Options dialog.
Open a Word document and test the auto correct; that is, misspell the word as you usually would. When you press the spacebar, Word should substitute the correct spelling.
I’ve used auto correct to great advantage. For example, when I type AJB and hit the spacebar, Word automatically corrects it to Ananias Jackson Booth because I’ve set it up to do that for me. If you have to type something like Saute Sainte Marie repeatedly, it’s easy to add SSM as an entry to be corrected to Saute Sainte Marie.
When the auto correct corrects something incorrectly, hold down the Ctrl key and type Z (Ctrl + Z) to undo the correction.
The upshot is that auto correct gives you additional options for a variety of circumstances. Like most things with Word, you are limited only by how imaginatively you use the software.
Monday, February 7, 2011
Mini Toolbar
With Word 2007 a mini toolbar was added. Highlight any word in a document and the mini toolbar materializes. The toolbar includes some of the most used formatting buttons. I find the mini toolbar distracting; therefore, I’ve disabled it. Here’s how.
1. Open the Word Options dialog.
In Word 2007, click the Office Button, and then Word Options. Select Popular from the list on the left side of the Word Options window.
In Word 2010, click File, and then Options.
2. Remove the check mark beside Show Mini Toolbar on selection.
3. Click OK.
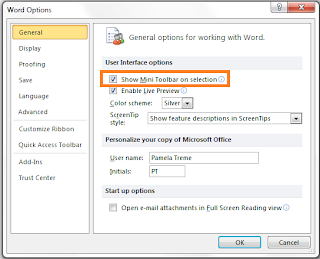
1. Open the Word Options dialog.
In Word 2007, click the Office Button, and then Word Options. Select Popular from the list on the left side of the Word Options window.
In Word 2010, click File, and then Options.
2. Remove the check mark beside Show Mini Toolbar on selection.
3. Click OK.

Sunday, February 6, 2011
Tips for the Mac version of Word
I’ve been asked if the tips I’ve been posting could be used by a Mac Word user. I’m not a Mac user; however, finding information about the topic was easy. A quick Google search brought me to an MVPS website that explains the differences. Here’s the address for the website: http://word.mvps.org/mac/differences.html
According to this website, two keystrokes are the primary difference between the Windows (PC) and Apple (Mac) versions of Word.
Ctrl Key: When PC instructions say to use the control (Ctrl) key, a Mac user would select the Command key. For example, Ctrl + C on a PC is copy. The same command on a Mac is Command + C.
Right-Click: When Windows instructions say to right-click, a Mac user would select the Control key, and then click. On the Mac keyboard, the Control key is a symbol, which you can see when you visit the website.
In addition, the website includes a list of keyboard equivalents for Mac users along with complete information on other differences.
So the answer to the question of whether these tips would work for a Mac user is yes if you make the appropriate substitutions.
According to this website, two keystrokes are the primary difference between the Windows (PC) and Apple (Mac) versions of Word.
Ctrl Key: When PC instructions say to use the control (Ctrl) key, a Mac user would select the Command key. For example, Ctrl + C on a PC is copy. The same command on a Mac is Command + C.
Right-Click: When Windows instructions say to right-click, a Mac user would select the Control key, and then click. On the Mac keyboard, the Control key is a symbol, which you can see when you visit the website.
In addition, the website includes a list of keyboard equivalents for Mac users along with complete information on other differences.
So the answer to the question of whether these tips would work for a Mac user is yes if you make the appropriate substitutions.
Saturday, February 5, 2011
Word's Sticky Keys
Do you find yourself pressing a key—for example, the Shift key—while you ponder what you’re going to write next? If you hold down the Shift, Ctrl, or Alt key for too long or idly press one of these keys while you think, Word automatically pops up a dialog box that asks you if you want to enable sticky keys.
In a panic, many users click the wrong response and enable a tool designed to help disabled people use a computer keyboard more easily. To add to the problem, many users don’t know how to turn off sticky keys. Lots of users just close down the document and start again…never sure of what triggered sticky keys in the first place.
By default, Word enables sticky keys, but you can turn them off permanently.
In Word 2003 or 2007:
1. Display the Accessibility Options. Click Start, Control Panel, Accessibility, and then Accessibility Options. The dialog appears.
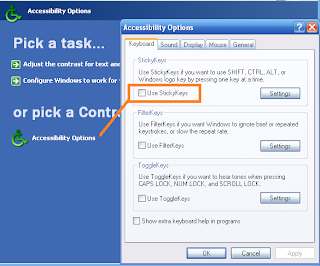
2. Remove the check mark from the Use Sticky Keys field, and then click OK.
In Word 2010:
1. Press the Shift key five times to display the sticky key message.
2. Click the link: Go to the Ease of Access Center to disable the keyboard shortcut. The Set up Sticky Keys dialog appears.
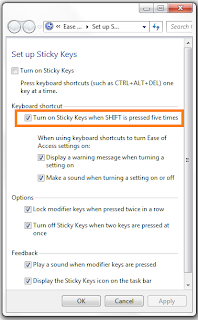
3. Remove the checkmark from the option: Turn on Sticky Keys when SHIFT is pressed five times, and then click OK.
In a panic, many users click the wrong response and enable a tool designed to help disabled people use a computer keyboard more easily. To add to the problem, many users don’t know how to turn off sticky keys. Lots of users just close down the document and start again…never sure of what triggered sticky keys in the first place.
By default, Word enables sticky keys, but you can turn them off permanently.
In Word 2003 or 2007:
1. Display the Accessibility Options. Click Start, Control Panel, Accessibility, and then Accessibility Options. The dialog appears.

2. Remove the check mark from the Use Sticky Keys field, and then click OK.
In Word 2010:
1. Press the Shift key five times to display the sticky key message.
2. Click the link: Go to the Ease of Access Center to disable the keyboard shortcut. The Set up Sticky Keys dialog appears.

3. Remove the checkmark from the option: Turn on Sticky Keys when SHIFT is pressed five times, and then click OK.
Wednesday, February 2, 2011
Word "Find Next" Workaround
When I’m searching a Word document for a repetitive word or phrase, I find it distracting to have the Find dialog displaying while I’m searching. As you search, the dialog can move all over the screen as Word moves it out of the way so that you can see the instance of what you searching for. Or worse, the dialog sits right on top of the text that shows the word or term. You can’t minimize the dialog because you need to see it to click the Find Next button. A workaround is available. Here are the steps.
For earlier versions of Word:
1. Open a document to search.
2. Display the Find dialog (Ctrl + F) in Word, and enter a search term in the Find what field.
3. In the dialog, click Find Next to find the first instance of the search term, and then click Cancel to close the dialog box.
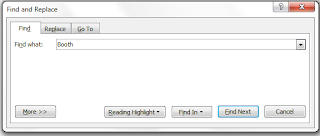
4. Hold down the Ctrl button and press the Page Down button to move to the next instance of the search term. To move backward through the document, use Ctrl + Page Up.
OR
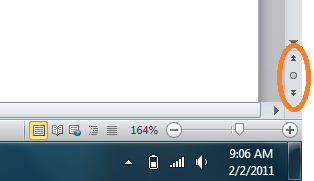
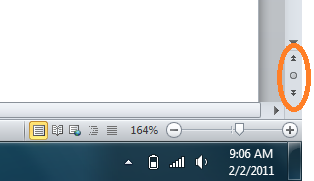
5. Move your cursor to the buttons at the end of the page scroll bar. They are set to Previous Page and Next Page by default. However, when you start a search, the button change to Previous Find/Go To and Next Find/Go To.
6. Click the down button to find (go to) the next instance of your search term. To move backward through the document, click the up button.
For Word 2010:
1. Open a document to search.
2. Confirm that the Navigation pane is displaying. You’ll see the pane on the left side of the document.
If the pane isn’t displaying, click the View tab, and click the Navigation Pane option on the Show portion of the ribbon.
3. Enter a search term in the search field immediately below the pane title Navigation and press Enter.
All instances of the search term are immediately highlighted, and the system automatically scrolls to the first instance. In addition, the buttons at the end of the page scroll bar have been changed to Previous Find/Go To and Next Find/Go To automatically. Click the down/up buttons to search. Or, you can also use Ctrl + Page Up or Page Down buttons to move to the next instance of the search term.
Searching for Other Stuff
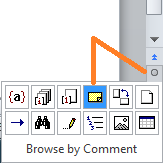
As an aside, if you click the radio button between the down and up buttons at the end of the page scroll bar, a pop-up menu appears. As you can see from the sample below, you have lots of options for changing what the down and up buttons browse for. For example, if you added comments to a document, you can click the Comments icon, and use the down and up buttons to move from comment to comment in your document.
For earlier versions of Word:
1. Open a document to search.
2. Display the Find dialog (Ctrl + F) in Word, and enter a search term in the Find what field.
3. In the dialog, click Find Next to find the first instance of the search term, and then click Cancel to close the dialog box.

4. Hold down the Ctrl button and press the Page Down button to move to the next instance of the search term. To move backward through the document, use Ctrl + Page Up.
OR
5. Move your cursor to the buttons at the end of the page scroll bar. They are set to Previous Page and Next Page by default. However, when you start a search, the button change to Previous Find/Go To and Next Find/Go To.
6. Click the down button to find (go to) the next instance of your search term. To move backward through the document, click the up button.
For Word 2010:
1. Open a document to search.
2. Confirm that the Navigation pane is displaying. You’ll see the pane on the left side of the document.
If the pane isn’t displaying, click the View tab, and click the Navigation Pane option on the Show portion of the ribbon.
3. Enter a search term in the search field immediately below the pane title Navigation and press Enter.
All instances of the search term are immediately highlighted, and the system automatically scrolls to the first instance. In addition, the buttons at the end of the page scroll bar have been changed to Previous Find/Go To and Next Find/Go To automatically. Click the down/up buttons to search. Or, you can also use Ctrl + Page Up or Page Down buttons to move to the next instance of the search term.
Searching for Other Stuff
As an aside, if you click the radio button between the down and up buttons at the end of the page scroll bar, a pop-up menu appears. As you can see from the sample below, you have lots of options for changing what the down and up buttons browse for. For example, if you added comments to a document, you can click the Comments icon, and use the down and up buttons to move from comment to comment in your document.

Subscribe to:
Posts (Atom)