Showing posts with label Editing. Show all posts

Wednesday, September 5, 2012

View When Opening Email Attachments

In earlier versions of Word, when you open a document attached to an email, the document opened in a view that allowed you to start editing immediately. However, starting in Word 2007, attached Word documents automatically open in a Full Screen Reading view. You have to click the Close button in the upper right of the document to enable editing. You can change this default view to Page Layout view, which allows you to start editing  immediately.

Changing View Default
  1. Display Word Options.
    --Word 2007: Click the Microsoft Office Button, and then click Word Options.
    --Word 2010: Click File, and then Options.
    The Word Options dialog appears.
  2. On the General tab, locate the Start up options, and remove the check mark from the following field: Open e-mail attachments in Full Screen Reading view.
  3. Click OK. The next time you open a Word document that is attached to an email, it will open in Page Layout view and you can immediately edit the document.

Tuesday, January 17, 2012

Hyperlinks Part 3...ACK!...and a pause for bookmarks

My next post assumes you have a document that includes the application of heading styles and the addition of bookmarks. I went looking for the post on how to add bookmarks. It's at this point that I yelled, "ACK!" It appears that I've only talked about bookmarks in passing. So we're going to pause while I do a bit of back filling...that is, tell you about bookmarks...a very handy item.

After you have added bookmarks to a document, you can either add a cross reference to the bookmark (with a page number) or create a hyperlink to the bookmark.  The decision to add a cross reference as opposed to a hyperlink is based on the type of document you'll be producing. As a general rule of thumb, cross references with page numbers appear in printed documents and hyperlinks appear in online document (for example, a PDF posted at a website).


Why create a hyperlink to a bookmark?
Let's suppose that you have provided an extensive description of a place (Sparta, Illinois) in running text at the beginning of your document. Later in your document, when you mention Sparta, you might want to add a cross reference or hyperlink to the full description as a convenience for your reader. However, since both mentions of Sparta are in the middle of running text, they most likely have a body text type of style applied. You need something on which to hang that cross reference or hyperlink.

If you remember, a cross reference requires a reference type to add the reference. Hyperlinks use two of the same reference types (Headings and Bookmarks). To use these reference types, you must:

  • Apply heading styles to heading text 
  • Add bookmarks in running text 

Insert a Bookmark

  1. Select a place to add a bookmark. For example, you would want to add a bookmark (the destination) to the full description of Sparta.
    --You can simply click beside a word where you want to place the bookmark.
    --You can use your mouse to select text where you want to place the bookmark. 
  2. Open the Bookmark dialog.
    --In Word 2003, click Insert on the main menu, and then select Bookmark.
    --In Word 2007/2010, on the Insert tab, locate the Links group, and then select Bookmark.

  3. In the Bookmark name field, type the name of the bookmark. The name must be one word. The get one word you can use Camel case; for example, SpartaIllinoisDescription. Or, you can use underscores; for example, Sparta_Illinois_Description. If you add any spaces, Word will ignore the bookmark.
  4. Click the Add button, and then click the Close button. Word closes the Bookmark dialog and you see nothing! MS Word adds the bookmark as a hidden mark. You can show bookmarks. If you insist, I'll tell you how but for the most part, you won't really care.  

After the bookmark exists, you can create a cross reference or hyperlink to it. For example, you would add a cross reference or hyperlink to subsequent mentions of Sparta, Illinois that take your reader to the full description (the destination a.k.a. the bookmark).

  • To create a cross reference, see Adding an Electronic Page Number for a Cross Reference. You need to make one change in the instructions. In the Reference type field, select Bookmark. Otherwise, the instructions are the same. 
  • To add a hyperlink, see my next post, which is what I really really was going to post about tonight. 

Additional Usage Tip
When I'm editing a long document and I'm interrupted, I add the bookmark StartHere to mark the place where I stopped editing. I can save and close my document, do several other tasks, and then come back to the document I was editing. To find my place, I open the document, display the Bookmark dialog, click the bookmark StartHere in the list of bookmarks, and then click the Go To button. My document scrolls to the last place where I was editing. I can keep the bookmark or delete it (display the Bookmark dialog, click the bookmark, and then click the Delete button). As is usual with MS Work, your use of this tool is limited only by your imagination.

Saturday, April 2, 2011

Document Word Count

If you submit articles for publication, one of the considerations is word count. Editors of publications need this information because it tells them about how much room they need save for your article. You can sit down with a printed copy and count it yourself, or you can let Word do it for you.

Word Count
1. Open your document.
2. Open Word Count dialog.

In Word 2003, click Tools, and then Word Count. You have a few more options on the Word 2003 dialog. Check the Help (F1) if you want more info on these options.

In Word 2007 or 1010, click the Review tab, locate the Proofing group, and click the Word Count button.

Notice that your word count also appears in the status bar at the bottom of your window.

3. Click Close to exit the Word Count dialog.

Sending the Info to an Editor
If you’d like to simply send the editor a copy of the results in the Word Count dialog, complete these steps.
1. Click in the heading of the dialog beside Word Count to select the dialog.
2. On your keyboard, hold down the ALT key, and press the Print Screen key. A copy of the dialog was just placed on your pasteboard.
Note: On laptop keyboards, you might also need to hold down the Fs or Fn key. On my nifty new laptop, I have an Fs key that I need to hold down when I want to use the Print Screen function.
3. Open an email and paste the dialog into the body of the email. Or, open a document and paste the dialog into the document. To paste, hold down the Ctrl key and type V (Ctrl + V).
4. Email the information to the editor.

You can use this method to copy any Word dialog. This bit of knowledge is handy to know if something is going wrong and you're asking someone else for help. You can send them a copy of the Word dialog so they can perhaps spot your problem.

Friday, March 25, 2011

Using Change Tracking to Collaborate

Because you can turn change tracking on and off, you can use it to collaborate. For example, you’ve written a 10 page article and had your cousin review it. When you got the document back, you worked your way through your cousin’s suggested changes/corrections. However, you have a few new ideas, a few new comments to make, and a few new questions.

Next Round
In yesterday’s instructions, I had you turn off change tracking while you were accepting/rejecting changes. After you have incorporated all of your cousin’s changes, you can send your cousin a document that includes your markup.

1. In the edited document, turn on Track Changes.
2. Add your new ideas, comments, and questions. They will appear in red text as edits.
3. Email the document to your cousin. Remember to leave Track Changes on.
4. When your cousin responds, your cousin’s edits and answers will appear in a different color.
5. When your cousin emails the document back to you, open it and save it. Also, save it as a copy in case you have questions down the line.
6. Turn off Track Changes.
7. Go through the document to see what your cousin’s responses might be, accepting and rejecting as you go along.

Another Option
You don’t have to work with just one document. For example, when your cousin sends you the article with a response you can open it in one session of Word. You can open a second session of Word and display your edited document. Resize your documents so that they display side by side on your screen. You can then see your cousin’s comments and make the actual changes in your Final document or not as you choose.

Resizing Screens
1. Click the minimize button beside the red X in the upper right of your page. This action releases the screen from a full-screen display.
2. Move your cursor over the edge of the screen. For example, point your cursor at the top left corner. A double headed arrow appears.
3. Click to grab the corner and move your mouse to resize the screen.

Running more than one session of software—any software—gives you an extra set of options you don’t have when working in one session. One of those options is being able to run the sessions side by side without have to flip back and forth between documents.

Wednesday, March 23, 2011

Dealing with Reviewed Text

This post is a continuation of my last post on tracking changes...

So you wrote a ten page article, turned on Track Changes, and emailed a copy to your cousin (the one you've never met but who is your BFF). Your cousin (the English maven) went through the document and made changes...lots of changes...and emailed it back to you. You open up the document and it's a sea of red marks. What is an author to do?

You need to be able to consider each suggested change/correction. To do that you need to move from change to change and accept or reject the change.

To Start
1. Open the document...the one with all the red marks...and save it and also save as a copy. You are saving a marked up copy because you always want the original with all the marks as a back up to refer to in case you have questions.
2. Turn off Track Changes. Remember it's a toggle with an on/off position. In Word 2003, it's at the bottom of the page.

Click graphics to make them bigger.

Word 2003
You need to turn on the Reviewing toolbar.
1. Click View, Toolbars, and Reviewing. Word adds the new toolbar at the top of your page.

2. Click the blue arrows to move to the next or previous change. Word highlights the change.
3. Click the blue check mark to accept a change.
4. Click the red x mark to reject a change.
5. Work your way through the document accepting or rejecting each change.
6. Remember that you can alway undo (Ctrl + Z) if you accept or reject a change in error.

Word 2007 or 2010
You already have the necessary buttons displaying to the right of Track Changes in the Changes group on the Review tab.
1. Click the Previous and Next buttons to move from change to change.
2. Click the Accept or Reject button to accept or reject a change.
3. Work your way through the document accepting or rejecting each change.
4. Remember that you can alway undo (Ctrl + Z) if you accept or reject a change in error.

Options on Pop-Up Menu
In addition to the buttons, accept and reject options turn up on a pop-up menu. Right-click on any change and the menu appears. Assuming you have no spelling issues, accept and reject options are on the menu.

Accept All Changes
If your English maven cousin is always right, you also have the option of accepting all changes. Notice that the Accept button has a drop-down arrow beside or below it. Click the arrow to display a menu and you'll see that one of the options on the menu is Accept All Changes in Document. Similarly, this method also works for rejecting all changes just in case your cousin was having an off day.

Finalizing Your Document
If you plan to PDF your document, be sure to change Final Showing Markup to Final in the show markup option field. If you have any other option selected, it can affect the presentation of your document when it is displayed in a PDF reader.

Monday, March 21, 2011

Getting Help from Friends and Relatives

One of the things that you end up doing when you write professionally is have your work reviewed by teams of experts. You might have several people looking at a document at once and making changes or corrections. Without change tracking, you'd go crazy trying to keep up with what reviewers changed in a 200 page document.

As a genealogist, you should also have your work reviewed by fellow researchers (your family and friends too if you can get them to read it) and use the Track Changes tool to keep track of the suggestions or corrections your reviewers might make.

When you get ready to send a document out for review, make a copy of the document. You always want to have a backup copy of your original work, especially if you have several people looking at your work.

Open the extra copy (if necessary) and turn on Track Changes.
--In any version of Word, hold down Ctrl and Shift and type the letter E.
--Or, in Word 2003, look at the status bar at the bottom of the screen, and double-click the Trk text button.
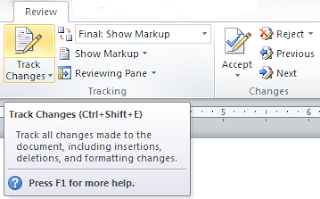
--Or, in Word 2007 or 2010, select the Review tab, locate the Tracking group, and click the Track Changes button.

Track Changes is a toggle that you can turn on and off.

Email the document to your reviewers. When they open the document and start making changes, Word marks the changes. Have your reviewers save the document on their PC, and then email the reviewed document back to you.

When you open the document from your reviewer, look for red markings...deleted text is red with a line through it and added text is red. In additional, Word adds a change bar outside the left margin to tell you that a change was made on the marked line(s). Depending on your setting, Word might also add comments to the right side of your document. The suggestions/corrections are obvious enough that you won't miss them.

As an experiment, you can open any document, turn on Track Changes, and make a few changes to see what tracked changes look like. In later posts, I'll talk about consolidating changes and additional things you can do with a document that has tracked changes.