Tuesday, January 31, 2012

Going to RootsTech

This picture is a bar code--a quick response code (QR code)--for this blog. Pattie and I are headed to Salt Lake City today. We'll be at THE library tomorrow...or perhaps knocking around SLC...we'll see. Thursday, Friday, and Saturday, it's RootsTech. One of the sessions I'm going to attend revolves around using these QR codes.

I've broken down and bought a table (ASUS Transformer) with a docking station and my very own personal hot spot. To think that I can walk around with a hot spot in my purse amuses me to no end. I'm getting used to the table and the Android operating system. It's different but not so much that you can't figure it out without reams of documentation. I figure I'll be hip deep in techies so I needed a "device." I'm hip deep in them at work too but they are different kinds of techies. My work techies are more mainframers and data feed types as opposed to device types. And yet they walk around the office with all of the usual toys...including high-end smart phones and tablets. So I guess as I get better at working with the Transformer I can haul it to work and get pointers.

RootsTech has an app, which includes the conference schedule, speaker bios, list of exhibitors, a news feed, maps of the Salt Palace, conference documents (the handouts), videos, friends, twitter, and a photo gallery. My friend number is 573434. To add me as a friend, another user would tap the Friends icon and a page appears. Click the plus sign in the upper right and add my number in the popup that appears and then we'll be connected. Exactly what that means eludes me at the moment. However, I'm assuming that there will be communications involved. This whole app thing for an event appears to be a new business...a fun business. Having the app makes going to a conference a different experience.

Here's the tentative list of sessions I'll be attending:
  • Mining Newspaper Archives
  • Using Android Devices for Genealogy and Family History
  • Twitter--It's Not Just "What I had for Breakfast" Anymore
  • The Galaxy Girls--Three Genealogist and Their Android Tables
  • Genealogy Uses of QR Codes (Thus the code in this post)
  • Taking Your Family History Electronic--Creating Your Own Amazing Ebook
  • Loc.gov: Using Our Nation's Library Online
  • Everything You Wanted to Known about Fold3
  • Geo-Cashing for Ancestors: Using Smartphones&GPS to Crowdsource Cemetery Data Collection
Some of the sessions are going to be streamed. To see the list, visit RootsTech's home page.

Pattie and I are also registered for a couple of lunches too.
  • Federation of Genealogical Societies (FGS) on Thursday
  • New England Historic Genealogical Society (NEHGS) Lunch on Saturday
I'll try to post during the conference. I plan on simply enjoying this one rather than actually working. So I should have some time to post...but then I might be just having too much fun to post! We'll see.

Wednesday, January 25, 2012

Hyperlinks Part 5 Add an Email Link

You can add an active hyperlink that launches your reader's email program and sets up an email with a subject line. Your need for this type of link will probably be limited. However, you might want to include this type of link in a PDF that is posted to a website so that your reader can easily contact you. When setting up this type of link, you are assuming that your reader has selected a default email program to launch when your reader selects an email link.

Add an Email Link
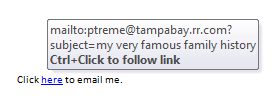
  1. Select text to create the link. For example, you might also want to add a line like: Click here to email me. Highlight the word here to add the link.
  2. Display the Insert Hyperlink dialog.
    --Word 2007/2010: On the Insert menu, in the Links group, click Hyperlink.
    --Word 2003: On the main menu, click Insert, and then click Hyperlink.
    Or, right-click to display a pop-up menu, and then click Hyperlink.
  3. In Link to, select E-mail Address. The fields to the right update.
  4. In Text to display, confirm that your selected text appears (here).
  5. In E-mail address, type your email address. Notice that Word adds the mailto: for you. It also adds the address to the Recently used email addresses box below.
  6. In Subject, add the subject you want to appear in the subject line of any email that is sent to you using the link.
  7. Click OK. Word adds the link to your text.
     
  8. Point your cursor at the link to show a popup with screen tip information. 

Change the Screen Tip
  1. While adding the link, click the Screen Tip... button in the upper right of the Insert Hyperlink dialog. A dialog appears.
  2. In ScreenTip text, type the alternate text to display, and then click OK. After you save the link (click OK on the Insert Hyperlink dialog), point your cursor at the link and your alternate screen tip text appears. You can use these instructions to change the screen tip for any of the hyperlinks you've read about in this blog.
One bit of extra information about email addresses...When you see mid-text link like these, if the details don't pop up when you point your cursor at the link, right-click the link to display a menu, and look for and select Properties. You'll see the email address...just in case you need to know...

Monday, January 23, 2012

Hyperlinks Part 4 Adding a Link to a Place in a Document

If you read my last post, you know that I'm going to talk about adding a hyperlink to a place within the same document. Adding hyperlinks is a convenience for your reader. When you save a document as a PDF, the hyperlinks are saved as active links that your reader can use.

Insert a Hyperlink

  1. To make this work, you must have applied Heading styles to topic headings and/or added bookmarks to mid-topic locations. The destination must be defined before you can link to it.
  2. Locate the place in the text where you want to add the link...the origination...and highlight the text.

    For example, if you've written an extensive description of the ship Helvetia on page 40 of your document (the destination), you would either apply a Heading style to the topic heading or create a mid-topic bookmark. Later, when you mention the Helvetia on page 120, you are going to want to  select the word Helvetia (the origination) and link it to the description on page 40 (the destination).
  3. Display the Insert Hyperlink dialog.
    --Word 2007/2010: On the Insert menu, in the Links group, click Hyperlink.
    --Word 2003: On the main menu, click Insert, and then click Hyperlink.
    Or, right-click to display a pop-up menu, and then click Hyperlink.

  4. In Link to, click Place in This Document. The list of destinations in the box on the right updates to include places where you've applied a heading style or added a bookmark.
  5. Select a heading or bookmark, and then click OK. The text you selected is formatted as a hyperlink.
Testing the Link
If you want to confirm that the link works, hold down the Ctrl key, and then click the link. Your document scrolls from the origination (the link) to the destination (the text with the heading style applied or the bookmark). 

When you test your document, you are functioning as a reader of your document. After you execute the link, you'll note that you have no way to get back! Well, you have no obvious way back. Hold down the Alt key, and then click the left arrow key. The document scrolls back to the origination; that is, the place you were reading.

Links in PDFs

If you're reading in a PDF and you've turned on the thumbnails or bookmarks, the good news is that after you click the link, the PDF saves your place. The PDF shows the last thumbnail or bookmark as the last place you scrolled to; that is, where you clicked the link. Click the thumbnail or bookmark to return to where you were reading. 

More to come in later posts...see you then...

Tuesday, January 17, 2012

Hyperlinks Part 3...ACK!...and a pause for bookmarks

My next post assumes you have a document that includes the application of heading styles and the addition of bookmarks. I went looking for the post on how to add bookmarks. It's at this point that I yelled, "ACK!" It appears that I've only talked about bookmarks in passing. So we're going to pause while I do a bit of back filling...that is, tell you about bookmarks...a very handy item.

After you have added bookmarks to a document, you can either add a cross reference to the bookmark (with a page number) or create a hyperlink to the bookmark.  The decision to add a cross reference as opposed to a hyperlink is based on the type of document you'll be producing. As a general rule of thumb, cross references with page numbers appear in printed documents and hyperlinks appear in online document (for example, a PDF posted at a website).


Why create a hyperlink to a bookmark?
Let's suppose that you have provided an extensive description of a place (Sparta, Illinois) in running text at the beginning of your document. Later in your document, when you mention Sparta, you might want to add a cross reference or hyperlink to the full description as a convenience for your reader. However, since both mentions of Sparta are in the middle of running text, they most likely have a body text type of style applied. You need something on which to hang that cross reference or hyperlink.

If you remember, a cross reference requires a reference type to add the reference. Hyperlinks use two of the same reference types (Headings and Bookmarks). To use these reference types, you must:

  • Apply heading styles to heading text 
  • Add bookmarks in running text 

Insert a Bookmark

  1. Select a place to add a bookmark. For example, you would want to add a bookmark (the destination) to the full description of Sparta.
    --You can simply click beside a word where you want to place the bookmark.
    --You can use your mouse to select text where you want to place the bookmark. 
  2. Open the Bookmark dialog.
    --In Word 2003, click Insert on the main menu, and then select Bookmark.
    --In Word 2007/2010, on the Insert tab, locate the Links group, and then select Bookmark.

  3. In the Bookmark name field, type the name of the bookmark. The name must be one word. The get one word you can use Camel case; for example, SpartaIllinoisDescription. Or, you can use underscores; for example, Sparta_Illinois_Description. If you add any spaces, Word will ignore the bookmark.
  4. Click the Add button, and then click the Close button. Word closes the Bookmark dialog and you see nothing! MS Word adds the bookmark as a hidden mark. You can show bookmarks. If you insist, I'll tell you how but for the most part, you won't really care.  

After the bookmark exists, you can create a cross reference or hyperlink to it. For example, you would add a cross reference or hyperlink to subsequent mentions of Sparta, Illinois that take your reader to the full description (the destination a.k.a. the bookmark).

  • To create a cross reference, see Adding an Electronic Page Number for a Cross Reference. You need to make one change in the instructions. In the Reference type field, select Bookmark. Otherwise, the instructions are the same. 
  • To add a hyperlink, see my next post, which is what I really really was going to post about tonight. 

Additional Usage Tip
When I'm editing a long document and I'm interrupted, I add the bookmark StartHere to mark the place where I stopped editing. I can save and close my document, do several other tasks, and then come back to the document I was editing. To find my place, I open the document, display the Bookmark dialog, click the bookmark StartHere in the list of bookmarks, and then click the Go To button. My document scrolls to the last place where I was editing. I can keep the bookmark or delete it (display the Bookmark dialog, click the bookmark, and then click the Delete button). As is usual with MS Work, your use of this tool is limited only by your imagination.

Thursday, January 12, 2012

Hyperlinks Part 2...Linking from a document to a Web page

Let me set a scene. You've written a book. In that book, you've referenced the work of Mrs. Frank S. Torrens. As it so happens, Google has Mrs. Torrens' book loaded in Google Books...a web page location.

When you publish your book, you're going to produce it in PDF format, which your readers will be able to download after they've paid for it. Since your book will be a PDF, you want to insert an executable link to Mrs. Torrens' book so that your readers can see the reference first hand. To accomplish this task, you need to insert a hyperlink to a the Google web page in your Word document, which you will eventually PDF for publication.

Insert a Hyperlink to a Web Page

  1. On the Internet:
    --Locate the Web page you want to have appear when your reader clicks the hyperlink.
    --Write down the address (the http://webpage.com bit) or highlight the address and copy it to your pasteboard (Ctrl + C). 
  2. In Word, open the document you want to add the hyperlink to and locate the text you want to use as the hyperlink.
  3. Highlight the text you want to have formatted as a hyperlink. For example, I would highlight Mrs. Frank S. Torrens in running text. 
  4. Open the Insert Hyperlink dialog.
    In Word 2007/2010, click the Insert tab, and in the Links group, click Hyperlink.
    In Word 2003, on the main menu, click the  Insert tab, and then click Hyperlink.
    Or, right-click to display a pop-up menu, and then click Hyperlink.


    Click the dialog sample to see a larger version of it. 
  5. Notice that the text you highlighted appears in the Text to display field at the top of the dialog. When you finish adding the hyperlink, this text will be formatted as the hyperlink. 
  6. Look at the options appearing down the left side of the dialog. The option Existing File or Web Page is selected by default and it happens to be the option we need. 
  7. Locate the Address field at the bottom of the dialog. 
  8. Type or paste (Ctrl + V) the Web page address you found in step 1. 
  9. Click OK. Your document is updated with the hyperlink. 
  10. Save your document, and then test the link (hold down the Ctrl key and click the blue underlined text (a.k.a. the hyperlink). The Web page should appear.
Here's what a hyperlink looks like in a typed page.
Click the page sample and look for the text that is blue and underlined. 

There's lots more to do with this dialog. So stay tuned for the next installment of hyperlinks.  

Tuesday, January 10, 2012

Hyperlinks Part 1

Click this screen shot to see a larger version.

Embedded Hyperlinks

When you produce a Word document, you can add hyperlinks in the document. The links can be to:
  • An existing file or webpage (a file stored on your system or elsewhere or the webpage of another researcher)
  • A place in the current document (your reader can move from page 3 to page 23 in one click)
  • A place in a new document that you create on the fly (your new document...a subdocument)
  • An email address (your reader's mail program launches to send an email)
I'm going to be going through setting up each of these hyperlinks. The interesting part is that after you add hyperlinks, they are active links in not only the .doc or .docx (Word document) but also in any PDFs you create. These types of links polish your document and demonstrate your command of Word...you look like a Word hotshot! So get ready to learn to insert hyperlinks.

P.S. You've already done this task in a slightly different form. When you create an electronic table of contents, index entry, or crossreference, you have the option of making each of these elements a hyperlink...which works in the .doc or .docx versions as well as the PDF versions. This functionality again demonstrates the many interconnected pieces and parts of MS Word.

Friday, January 6, 2012

Electronic Footnotes Part 3


  • In Word 2003, when you insert a footnote or endnote, the dialog displays automatically.
  • In Word 2007/2010, you must click the arrow in the Footnotes group, which appears on the References tab.
This dialog allows you to do a number of different tasks. When you insert, Word assumes you want a Footnote.
  • In Word 2003, if you want an Endnote, you can select that option on this dialog. 
  • In Word 2007/2010, you can click an Endnote button to insert an Endnote and accept default settings. If you want to make changes, you need to display the Footnotes and Endnotes dialog.
Location Changes
  • Footnotes: Footnotes appear at the bottom of the page that includes the footnote in running text. When you add text and the text with the footnote moves to a new page, the footnote citation at the bottom of the page also moves. By default, footnotes use Arabic numerals.
  • Endnotes: Endnotes appear at the end of text in the document. By default, endnotes use Roman numerals.
  • Convert button: This button is enabled after you have inserted footnotes, endnotes, or both type of notes. You can use it to make massive changes. You have the option of changing all footnotes to endnotes or vice versa. Or, you can swap footnotes for endnotes. This type of functionality is useful if you make a mistake about the contents of a footnote vs. an endnote. I haven't written much about writing or citation in this blog. I'm assuming you can handle that part on your own. Or, you can at least look it up. However, if you make a mistake, you should know about this button.
Format Changes
  • Number format: Click the down-arrow to see the list of numbering options. Note that footnotes and endnotes use Arabic and Roman numerals (respectively) to avoid confusion between the two types of notes. You can make changes. Just use caution so that your reader is able to distinguish between to two types of notes.
  • Custom mark: If the number format selection doesn't include a marker you want to use, you can use this option to add symbols. Click in your text where you want to add the note, open the Footnote and Endnote dialog, click the Symbol... button to open the Symbols dialog, and pick a symbol. I've never had occasion to use this option; however, you might find it useful.
  • Start at: You can click the arrows to increase or decrease the starting number. Depending on how you are putting together the document, you might have occasion to start a number at a specific number. For example, if you are putting the document together in separate documents that you plan on combining later, you might want to change the numbering in each of the separate documents. You need to experiment to see what works best for you.
  • Numbering: The default Continuous causes numbering to start at the number appearing in the Start at field and continue consecutively. You do have different options that you might want to use.
    --Restart each section: Remember the section breaks you add to documents to create the sections (see creating template topics). Select this option if you want footnote or endnote numbers to restart each time you enter a section break...for example, for each chapter.
    --Restart each page: Select this option if you want footnote or endnote numbers to restart on each new page.
Apply Changes
  • Apply changes to: As a document grows and you add sections, this option becomes important. If you've made changes in the Format section, you need to decide if you want the changes to apply to the whole document or just the current section. If you have a document that isn't broken into section, you won't have a need to deal with this field.
Endnotes
Endnotes--other than the contents of notes--work the same as footnotes. So there you have it...endnotes and footnotes.

Wednesday, January 4, 2012

Electronic Footnotes Part 2

Click this drawing to display a larger version.

When you insert footnotes, it's not uncommon to have a reason to add a cross-reference to the footnote. Because Word assumes you are going to want to cross-reference, it adds Footnote (and Endnote) to the list of Reference types. In addition, Word automatically shows associated cross-reference elements:
  • Footnote number: Word inserts the footnote number as the cross-reference. For example, See footnote 35.
  • Page number: Word inserts the page number on which the footnote appears as the cross-reference. For example, See the footnote on page 96.
  • Above/Below: Word inserts the footnote number with the word above or below based on the location of the footnote in the document. For example, See footnote 35 above.
  • Footnote number (formatted): Word inserts the footnote number as the cross-reference; however, it is presented in superscript, which matches the footnote format.  
In each case, because the option Insert as hyperlink is selected, the cross-reference is formatted as an executable link; that is, click the link to go to that place in the document. These active links remain active when you convert the document to a PDF.

Insert Cross-Reference to Footnote
  1. Confirm that your document has footnotes inserted.
  2. Click in the document where you want to insert the cross-reference to the footnote.
  3. Insert the cross-reference.
    In Word 2007 or 2010, click the Reference tab, and select Cross-reference in the Captions group.
    In Word 2003, select Insert, Reference, and then Cross-reference
    . 
  4. In the Reference type field, select Footnote.
  5. In the Insert reference to field, select a cross-reference element.
  6. In the For which footnote field, select a footnote from the list.
  7. Click the Insert button. Word adds the cross-reference to the footnote.
As you edit a document, add more text so that existing text and footnotes move to new pages, and add more footnotes, Word updates all footnote-related text and numbering automatically. In the case of the page number option (See the footnote on page 96.), you need to update the document (Ctrl + A, and then F9...Update entire table) to update page numbers. Letting Word do what it was designed to do--that is, do the work for you--saves you lots of time and trouble.

There's still more to look at and talk about. So stay tuned for the next post.

Monday, January 2, 2012

Electronic Footnotes Part 1


This picture is from Generated Lists Part 1. When I wrote part one, I said I'd explain everything in the picture, which is a representation of a typical page you'd find in a family history. I explained just about everything about adding captions and labels; however, the picture also includes a footnote. Click the picture to display a larger version and you'll see the circled number and footnote.

Like many attributes in MS Word, you can insert electronic footnotes with the additional ability to cross-reference to the electronic footnote and/or create lists. We'll start this multi-part conversation with the basic skill of simply inserting the footnote.

Steps
  1. Open a Word document and type a few lines. Any text will do.
  2. Click at the end of a sentence in the paragraph.
  3. Insert a footnote.
    --In Word 2003, on the Insert menu, select Reference, click Footnote, and then click OK. Lots of additional choices on this dialog are possible; however, we're going to stick with the basics for this post.
    --In Word 2007/2010, on the Reference tab, click Insert Footnote.
    Word inserts the footnote number and moves your cursor to the bottom of the page. It opens an automatically numbered footnote (matching the number inserted in the text) and applies the Footnote style.
  4. Type footnote text.
  5. Move your cursor back into the text area of your document and click where you want to start typing again.
  6. Repeat these steps each time you need to add a footnote and Word will number footnotes automatically and sequentially regardless of the order in which you enter the footnotes.
Footnote Style
If you don't like the way the footnote looks--for example, you want to use a different font--alter the Footnote style. See Global Changes vs. Local Changes (Change the font for a style (a global change)). Just be sure to pick the Footnote style.

Your version of Word may or may not display the Footnote style automatically. If you can't find it, display all styles. We've displayed them before; see A Style for Every Season for more information.

Cross-Referencing
The follow through is to the cross-reference dialog, where Footnote and Endnote are added to the list of labels automatically. We'll walk through the cross-reference dialog in the next post.

By now, you can begin to see that many things you do in Word are interconnected with other abilities in Word. After you know about the connections, you can begin to use them to your advantage. So stay tuned for more posts.