Monday, February 6, 2012

Too Cool QR Tool...

QR codes are turning up everywhere. They are usually black and white and square...boring! Unitag gives you options. 

QR codes can be in color.

QR codes codes can appear with different alignments.
QR codes can include text.


QR codes can include a background picture.

At RootsTech Thomas MacEntee more or less indicated that QR codes should be on just about anything that you can get them to stick to...a tee-shirt, a mug, anything printed, gravestones... However, as you can see, you don't need to be stuck with the plain black and white version. You can add color and interest. To play with this too cool tool, visit Unitag (http://www.unitaglive.com/qrcode) and get creative.

Table It!...Part 1

While at RootsTech, I had the pleasure of talking to Michelle, a follower of this blog. She suggested that I write about adding tables to a Word document. Michelle explained that she likes to use tables to show census results in reports that she prepares for clients.

I'm going to start this series with a tip on how to add rows to the middle of a table. I'm starting with this piece of info because most people work their way through inserting a table but struggle when they have to add a row mid table. The shortcut is so hidden that most people don't know about it and it's handy to know.

Add a Row Mid Table on the Fly
  1. After you have a table inserted, turn on the hidden codes and look for the little squares to the right of the table. In the example above, you need to insert a row between Michael Jones and Nathan Jones.
  2. Look at the end of the row for Michael Jones.
  3. Click your cursor to the right of the line ending the table row and the left of the little square.
  4. Press the Enter key. Word adds an empty row between Michael Jones and Nathan Jones and moves your cursor to the first empty cell.
This method works in any version of Word. After you know where to place your cursor, you don't need to have the hidden codes showing. You can simply click to the right of the row where you want to add the row and press Enter. However, you need to see the symbols the first time you insert a row so that you know why it's working.

I'll start at the beginning in my next post.

Saturday, February 4, 2012

RootsTech is over...

Went to the final sessions today. Interestingly, they didn't have a closing session. Most big conferences I've attended have had them.

I went to two sessions today--One about using the Library of Congress (LOC) website and the second one about using Fold3.

The LOC one was good. At least I'll have a better chance of navigating the site in the future.

The one on Fold3 was better. They've added so much to Fold3...I didn't realize how it had evolved. I think this is the one I'm more likely to use. Not that I'd turn down info from the LOC but it looks like I can do so much more with Fold3.

In going through the exhibition hall, I found there seems to be a new movement afoot to put every body's work in a cloud (upload it to a server somewhere in a server farm). Lots of commercial software has been moving in this direction. You access the program in the cloud, you work in the cloud, and you store in the cloud. I know the cloud. I trust the cloud. A cloud can be a good place (think Katrina in New Orleans). However, the business model concerns me.

When I buy a software package that I install on my laptop, it's mine. I can put info in it and port it out to anyplace or anyone whenever I want. When you add the info to one of the cloud programs, what do you have in hand and how much control do you have on how the info is used? I'm not saying that any info would be misused. The "cloud people" constantly tell you that you own the information. They just store it for you and provide the program. I kept asking myself the question, "So, why do they keep trying to reassure me?"

When you set up one of these things up, some let you import from your current software while others require that you re-enter all of your information (ugh!). I've got about 1,800 people in one database alone.

The pricing also concerns me. I can go with a version of software I own for $x.xx and I own it. I don't have to pay storage fees, access fees, nothing. When a new version comes out, I can plunk down more cash or not. When your info is in a cloud and you can't or don't want to pay the annual fee anymore, what happens? Do you just walk away from your work? Does the cloud keep it?

From my point of view, it's handing over too much control to another party who will be able to control the price. It's low now but what will it be five years from now?

If I need cloud storage (and I do because I live in Florida), I have lots of other options some of which are free. Yes they require a bit more work; for example, you might have to move copies of files into special folders that get backed up to the cloud. But that's minor when you look five years down the road at how these genealogy-related cloud businesses might be operating. Again, I don't mean to cast stones; however, I do think a "buyer beware" is in order.

Friday, February 3, 2012

At RootsTech and then back at the Library

Went to two sessions this p.m. and both turned out to be good ones.

Thomas MacEntee did one on using QR codes, including places you should use them...everywhere you can get one to stay in place. Some funeral directors are even offering to put them on gravestones.

The second session involved turning a book into an eBook. It looks to be surprisingly easy. I took lots of notes so we'll see how it works out.

b.t.w. The tablet (ASUS Transformer) turned out to be OK for note taking. I'm still not convinced it's a reasonable thing for someone to own. Right now I'm looking at it as a pure luxury. I've got it with me in the library right now. I downloaded group sheets easily enough but they are pretty useless for doing any substantial research. As noted in my previous post, I did break down and buy Roots Magic. The previous version, which I looked at and walked away from, had a mobile app in it. I'm assuming that the current version does too. I'll be very disappointed if it doesn't.

The scanner has turned out to be a good thing. Pattie and I have been using it to scan pages in books. No more copy cards! And no more lugging home stacks of paper!

More to come...

Exhausted! But happy at RootsTech...

I'm hold up in the hotel room this a.m. creating group sheets for research later this morning at the library. The first thing on the conference schedule today that I'm interested in isn't until 1:45 p.m. So I'll go hang out at the library and do research using my new tablet. I figure if this thing is really going to be worth the money then I need to learn to use it and use it well.

I also broke down and bought a copy of Roots Magic. I've used old PAF for years because nobody could ever tell me enough to convince me to give it up. It's very basic but also highly functional. The one thing I've been loath to give up is the Custom User field, which is where I put all of my research coding. I finally got a chance to describe what I'm doing to software people. Most of them had glazed over eyes. Only the Roots Magic guy could tell me how to do what I do in his software. He even told me I could sort based on the codes...new functionally that will help! I plunked down my cash. Pattie took a picture because she couldn't believe that someone had finally talked me into an up-to-date program. Because I'm buying it at the conference, I got a bonus...a user guide. Being a technical writer, I'll read it.

Pattie took off early this a.m. to hang out in the exhibitor's area. There are all sorts of unannounced events happening on the floor. A demo here, a discussion there, and networking like crazy. MicroSoft set up a playground with ping pong and the like. It's getting lots of use.

Geneabloggers are all running around wearing big colorful beads so we can identify each other. Apparently, there are quite a few of us here at RootsTech based on the beads I see going to and fro in the crowd. We've been talking to each other. I need to spend some time reading more of these blogs. The people are interesting and I would imagine that extends to their blogs too.

So it's off to the shower before housekeeping arrives and gets upset with me for not leaving the room so they can do their job and go home.

More later...

Wednesday, February 1, 2012

Pam and Pattie in a two-room suite

Pattie's husband has really really out done himself this time. He booked us into a two room suite. We have the bedroom area and then we have the den...two TVs, loads of drawer space, a table with four chairs (in the den) and a microwave and frig. The bathroom is well planned and the pillows are to die for. We are a bit far a field. So we had to learn to take the Greenline tram. It's easy and kinda fun.

On the tram ride in today, we started talking to someone who directed us to the back door of the Salt Palace...a short cut that saved us lots of walking and put us right where we need to be for registration. We've already got our badges and tote bags.

I'm doing this post from the basement of the Family History Library...still looking for English relatives. It's been several years since we've been to the library and things have changed. Computers are everywhere as are table top plugs. The library allows you to bring bags in. You can roll your computer along rather than lug it. The tables have brass rings at the end. I couldn't figure out what they were for until I saw a lady anchor her bags to one with what looked like a bicycle wire complete with a lock. What a hoot!

Since the conference starts tomorrow, the library is manned by lots of extra people. I've already had one librarian explain how to do a more targeted search with the batch numbers.

More to come later...

Tuesday, January 31, 2012

Going to RootsTech

This picture is a bar code--a quick response code (QR code)--for this blog. Pattie and I are headed to Salt Lake City today. We'll be at THE library tomorrow...or perhaps knocking around SLC...we'll see. Thursday, Friday, and Saturday, it's RootsTech. One of the sessions I'm going to attend revolves around using these QR codes.

I've broken down and bought a table (ASUS Transformer) with a docking station and my very own personal hot spot. To think that I can walk around with a hot spot in my purse amuses me to no end. I'm getting used to the table and the Android operating system. It's different but not so much that you can't figure it out without reams of documentation. I figure I'll be hip deep in techies so I needed a "device." I'm hip deep in them at work too but they are different kinds of techies. My work techies are more mainframers and data feed types as opposed to device types. And yet they walk around the office with all of the usual toys...including high-end smart phones and tablets. So I guess as I get better at working with the Transformer I can haul it to work and get pointers.

RootsTech has an app, which includes the conference schedule, speaker bios, list of exhibitors, a news feed, maps of the Salt Palace, conference documents (the handouts), videos, friends, twitter, and a photo gallery. My friend number is 573434. To add me as a friend, another user would tap the Friends icon and a page appears. Click the plus sign in the upper right and add my number in the popup that appears and then we'll be connected. Exactly what that means eludes me at the moment. However, I'm assuming that there will be communications involved. This whole app thing for an event appears to be a new business...a fun business. Having the app makes going to a conference a different experience.

Here's the tentative list of sessions I'll be attending:
  • Mining Newspaper Archives
  • Using Android Devices for Genealogy and Family History
  • Twitter--It's Not Just "What I had for Breakfast" Anymore
  • The Galaxy Girls--Three Genealogist and Their Android Tables
  • Genealogy Uses of QR Codes (Thus the code in this post)
  • Taking Your Family History Electronic--Creating Your Own Amazing Ebook
  • Loc.gov: Using Our Nation's Library Online
  • Everything You Wanted to Known about Fold3
  • Geo-Cashing for Ancestors: Using Smartphones&GPS to Crowdsource Cemetery Data Collection
Some of the sessions are going to be streamed. To see the list, visit RootsTech's home page.

Pattie and I are also registered for a couple of lunches too.
  • Federation of Genealogical Societies (FGS) on Thursday
  • New England Historic Genealogical Society (NEHGS) Lunch on Saturday
I'll try to post during the conference. I plan on simply enjoying this one rather than actually working. So I should have some time to post...but then I might be just having too much fun to post! We'll see.

Wednesday, January 25, 2012

Hyperlinks Part 5 Add an Email Link

You can add an active hyperlink that launches your reader's email program and sets up an email with a subject line. Your need for this type of link will probably be limited. However, you might want to include this type of link in a PDF that is posted to a website so that your reader can easily contact you. When setting up this type of link, you are assuming that your reader has selected a default email program to launch when your reader selects an email link.

Add an Email Link
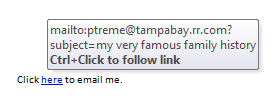
  1. Select text to create the link. For example, you might also want to add a line like: Click here to email me. Highlight the word here to add the link.
  2. Display the Insert Hyperlink dialog.
    --Word 2007/2010: On the Insert menu, in the Links group, click Hyperlink.
    --Word 2003: On the main menu, click Insert, and then click Hyperlink.
    Or, right-click to display a pop-up menu, and then click Hyperlink.
  3. In Link to, select E-mail Address. The fields to the right update.
  4. In Text to display, confirm that your selected text appears (here).
  5. In E-mail address, type your email address. Notice that Word adds the mailto: for you. It also adds the address to the Recently used email addresses box below.
  6. In Subject, add the subject you want to appear in the subject line of any email that is sent to you using the link.
  7. Click OK. Word adds the link to your text.
     
  8. Point your cursor at the link to show a popup with screen tip information. 

Change the Screen Tip
  1. While adding the link, click the Screen Tip... button in the upper right of the Insert Hyperlink dialog. A dialog appears.
  2. In ScreenTip text, type the alternate text to display, and then click OK. After you save the link (click OK on the Insert Hyperlink dialog), point your cursor at the link and your alternate screen tip text appears. You can use these instructions to change the screen tip for any of the hyperlinks you've read about in this blog.
One bit of extra information about email addresses...When you see mid-text link like these, if the details don't pop up when you point your cursor at the link, right-click the link to display a menu, and look for and select Properties. You'll see the email address...just in case you need to know...

Monday, January 23, 2012

Hyperlinks Part 4 Adding a Link to a Place in a Document

If you read my last post, you know that I'm going to talk about adding a hyperlink to a place within the same document. Adding hyperlinks is a convenience for your reader. When you save a document as a PDF, the hyperlinks are saved as active links that your reader can use.

Insert a Hyperlink

  1. To make this work, you must have applied Heading styles to topic headings and/or added bookmarks to mid-topic locations. The destination must be defined before you can link to it.
  2. Locate the place in the text where you want to add the link...the origination...and highlight the text.

    For example, if you've written an extensive description of the ship Helvetia on page 40 of your document (the destination), you would either apply a Heading style to the topic heading or create a mid-topic bookmark. Later, when you mention the Helvetia on page 120, you are going to want to  select the word Helvetia (the origination) and link it to the description on page 40 (the destination).
  3. Display the Insert Hyperlink dialog.
    --Word 2007/2010: On the Insert menu, in the Links group, click Hyperlink.
    --Word 2003: On the main menu, click Insert, and then click Hyperlink.
    Or, right-click to display a pop-up menu, and then click Hyperlink.

  4. In Link to, click Place in This Document. The list of destinations in the box on the right updates to include places where you've applied a heading style or added a bookmark.
  5. Select a heading or bookmark, and then click OK. The text you selected is formatted as a hyperlink.
Testing the Link
If you want to confirm that the link works, hold down the Ctrl key, and then click the link. Your document scrolls from the origination (the link) to the destination (the text with the heading style applied or the bookmark). 

When you test your document, you are functioning as a reader of your document. After you execute the link, you'll note that you have no way to get back! Well, you have no obvious way back. Hold down the Alt key, and then click the left arrow key. The document scrolls back to the origination; that is, the place you were reading.

Links in PDFs

If you're reading in a PDF and you've turned on the thumbnails or bookmarks, the good news is that after you click the link, the PDF saves your place. The PDF shows the last thumbnail or bookmark as the last place you scrolled to; that is, where you clicked the link. Click the thumbnail or bookmark to return to where you were reading. 

More to come in later posts...see you then...

Tuesday, January 17, 2012

Hyperlinks Part 3...ACK!...and a pause for bookmarks

My next post assumes you have a document that includes the application of heading styles and the addition of bookmarks. I went looking for the post on how to add bookmarks. It's at this point that I yelled, "ACK!" It appears that I've only talked about bookmarks in passing. So we're going to pause while I do a bit of back filling...that is, tell you about bookmarks...a very handy item.

After you have added bookmarks to a document, you can either add a cross reference to the bookmark (with a page number) or create a hyperlink to the bookmark.  The decision to add a cross reference as opposed to a hyperlink is based on the type of document you'll be producing. As a general rule of thumb, cross references with page numbers appear in printed documents and hyperlinks appear in online document (for example, a PDF posted at a website).


Why create a hyperlink to a bookmark?
Let's suppose that you have provided an extensive description of a place (Sparta, Illinois) in running text at the beginning of your document. Later in your document, when you mention Sparta, you might want to add a cross reference or hyperlink to the full description as a convenience for your reader. However, since both mentions of Sparta are in the middle of running text, they most likely have a body text type of style applied. You need something on which to hang that cross reference or hyperlink.

If you remember, a cross reference requires a reference type to add the reference. Hyperlinks use two of the same reference types (Headings and Bookmarks). To use these reference types, you must:

  • Apply heading styles to heading text 
  • Add bookmarks in running text 

Insert a Bookmark

  1. Select a place to add a bookmark. For example, you would want to add a bookmark (the destination) to the full description of Sparta.
    --You can simply click beside a word where you want to place the bookmark.
    --You can use your mouse to select text where you want to place the bookmark. 
  2. Open the Bookmark dialog.
    --In Word 2003, click Insert on the main menu, and then select Bookmark.
    --In Word 2007/2010, on the Insert tab, locate the Links group, and then select Bookmark.

  3. In the Bookmark name field, type the name of the bookmark. The name must be one word. The get one word you can use Camel case; for example, SpartaIllinoisDescription. Or, you can use underscores; for example, Sparta_Illinois_Description. If you add any spaces, Word will ignore the bookmark.
  4. Click the Add button, and then click the Close button. Word closes the Bookmark dialog and you see nothing! MS Word adds the bookmark as a hidden mark. You can show bookmarks. If you insist, I'll tell you how but for the most part, you won't really care.  

After the bookmark exists, you can create a cross reference or hyperlink to it. For example, you would add a cross reference or hyperlink to subsequent mentions of Sparta, Illinois that take your reader to the full description (the destination a.k.a. the bookmark).

  • To create a cross reference, see Adding an Electronic Page Number for a Cross Reference. You need to make one change in the instructions. In the Reference type field, select Bookmark. Otherwise, the instructions are the same. 
  • To add a hyperlink, see my next post, which is what I really really was going to post about tonight. 

Additional Usage Tip
When I'm editing a long document and I'm interrupted, I add the bookmark StartHere to mark the place where I stopped editing. I can save and close my document, do several other tasks, and then come back to the document I was editing. To find my place, I open the document, display the Bookmark dialog, click the bookmark StartHere in the list of bookmarks, and then click the Go To button. My document scrolls to the last place where I was editing. I can keep the bookmark or delete it (display the Bookmark dialog, click the bookmark, and then click the Delete button). As is usual with MS Work, your use of this tool is limited only by your imagination.