Wednesday, March 14, 2012

Table It!...Part 13...Row Formatting

Row Tab

Going through the remainder of the Table Properties tabs will be much easier because the dialogs include fewer fields and buttons.
  • Size: Fields in this group allow you to set a height for the row. I rarely use this setting, because if your text over fills a cell in the row, your reader won't be able to see all of the text by just looking at the table.
  • Options: Allow row to break across pagesI routinely select this option when creating long tables. As I complete rows in a table and the table expands to the end of the page, when the text in a cell in the row goes to the next page, the entire row moves to the next page. Having Word automatically move the row gives your table the polished look of a professional document.
  • Options: Repeat as header row at the top of each page
    I routinely select this option when creating long tables. Select a row in the table as the title row (usually the first row), display Table Properties, and then select this option on the Row tab. As the table gets longer and Word automatically moves the last row on one page to the top of the next page, Word also adds the heading row automatically. You need to note that you can only edit in the original heading row, and when you do edit, the changes appear in each of the automatically generated heading rows. Also, of note, you can select more than one row as heading rows (stacked headings).
  • Previous Row/Next Row buttons
    When you are applying formatting using the Row tab, you can click these buttons to move from row to row. When you use the buttons, Word selects the entire row. By that I mean Word selects all cells in the row and the little square at the end of the row that you see when you turn on hidden codes.
    What is important to remember about selecting the  entire row is that the little square at the end includes formatting codes for the row. The best way to see this is to add color to a row and then clicking to the right of the row (between the border and the little square at the end) to add a new row. The row that Word inserts includes the color as part of the formatting of the row. 
Column Tab
The Column tab simply has the option of setting specific widths for columns. I avoid this tab for the same reason that I avoid the Size field for a row. It's too restrictive.

Next Post
We'll look at the Cell tab, and then we'll start looking at menu selections that allow you do other table-related tasks; for example, rotate text in a cell.

Monday, March 12, 2012

Table It!...Part 12...Cell Padding


Review
We've been working on a table using the Table Properties. After you insert a table, you display the properties by right clicking anywhere in a table to display a popup menu, and then selecting Table Properties from the menu.

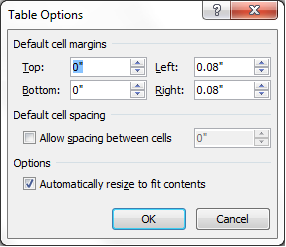
The last item on the Table tab that we need to look at is Options. Click the Options button to display a popup.


Default cell margins
The fields Top, Bottom, Left, and Right control the distance between the cell border and the text within the cell. The space is also referred to as cell padding, which is white space. White space enhances the readability of a document. Thus cell padding makes the contents of a cell easier to read because a reader can readily distinguish text from border lines...think in terms of old eyes.

If you look closely at the details of rows in the samples below, you'll see that the second version is longer. Click the sample and you'll see that the second table has more white space above and below the text within the cell. To be precise, the top and bottom cell padding is 0.08". You'll need to play with these settings to see what you like. My preferred setting is 0.03" for all four settings.

Click the graphic to see a larger version of it.
Press the ESC key to return to this post.

If you stop and think about this, you already know another way to control the space before and after text...our good old friend Styles. If you create a style named TableCell, you can use it to control the space before and after text with the style applied to it. In addition, if you create a style names TableHead, you can add the bold attribute and apply it when you apply the style to the heading line of a table. Creating styles to control space and attributes is yet another example of the choices you make when deciding how to affect text in a document. The choices are what make Word so useful to its many fans.

Default cell spacing (Allow spacing between cells)
Click the check box to enable the size-field arrows (called spinners). The size field defaults to 0.01. Change the setting to 0.03 and then click OK to apply the setting. Word creates a table within a border. This option is one of the decorative elements that you can use to create interesting table layouts.

Options (Automatically resize to fit contents)
Accept the default to have the table resize itself automatically based on the size of cell contents. This option applies to eventual width of the table. I never use this control. There are too many other places where you can control width that are much easier to display and use than this particular control.

What You Should Take Away
Controlling cell padding adds to the readability of your tables and you have one option on the Table Options dialog to create a decorative table.

Next Post
We'll be looking at the next tab on the Table Properties: Row. This tab includes options that are useful for long tables that cover more than one page.

Saturday, March 10, 2012

PicMonkey

I received an email announcing that PicMonkey has launched. If you want to play with it, go to www.picmonkey.com. So far, it's basic; however, this is only the first salvo. I'll be watching this site to see what they offer.

Friday, March 9, 2012

Much Ado About Graphic Software...Part 3

See Much Ado About Graphic Software...Part 1 and Part 2 for background on this post.


When we last looked at Paint, I had explained that you could draw a line around an area of interest in a graphic to call attention to the area. You can also add a text comment and draw a line from the marked area to the comment so that the two are associated. When you add comments, you are creating a call out. 

Adding a Call Out and Drawing Lines
The easiest way to handle the task is to create the text first. After you have the text written and placed, you can draw the line.
  1. Decide what your text is going to say. For example, the comment above is: This 1850 census entry was missed during indexing.
  2. Resize the drawing palette so that you have space to add the comment. Look for small circles in the corners and along the side of the graphic. Point at the circle on the side of the graphic and your cursor changes to a double-headed arrow. Click your mouse once to grab the circle and drag your mouse to the right. Paint adds additional white space to the right of the graphic. Release your mouse button.

    Note: For earlier versions of Windows, the circle might be a small black dot that is very difficult to see. Unfortunately, I have no advice to offer other than they do put the dot exactly half way between the top and bottom of the drawing area.
  3. Pick a color if you want a color other than black, which is the default. Think about your end projection...print (black) or online (color).
  4. Add a text box. Click the Text tool, and then click in the white space beside the graphic.


    If you're using Windows 2007, Paint adds an outlined box with handles and display a Text Tool tab with additional options. You can use the Text Tool menu to make changes to the text. As long as you do not click outside of the dotted outline for the text, you can continue to edit the text box. When you click outside of the dotted outline the text is added and the call out is permanent.


    If you're using an earlier version of Windows, Paint adds the text box. Look for text formatting options under on the Edit menu. Once you click outside the text box, the call out is permanent. Use caution because earlier versions of Paint are not very forgiving.

    Note: You can also type text in a Word document and copy and paste the text as a comment in Paint. Also, if you make a mistake, undo (press Ctrl + Z) and try again.
  5. Draw a line from the call out to the area you have outlined.
    --Select a color for the line.
    --Click the line tool (on the Home tab for the Windows 2007 version of Paint).
    --Hold down the Shift key while drawing the lines to get straight lines.
    You'll have to experiment with line drawing to get the arrangement you like. 
  6. Save your graphic. Select the File button and then Save As. The Save As dialog appears.

  7. In the File Name field, add a name.
  8. In the Save as type field, accept the default of PNG (*.png). If you're using a earlier version of Paint, click the drop-down arrow and select PNG. 
Next Post
In the next post, we'll explore the different formats in which you can save a graphic.  


Thursday, March 8, 2012

Pinterest...An organizational suggestion

The basic premise of Pinterest is that its the electronic version of the old cork boards. When you used the old cork boards, you'd clip a picture from a magazine and pin it to the board...as in, I want those shoes! With Pinterest, you do that same task electronically when pinning but you can pin to many different boards.

Right now I have one genealogy-related pin board...and it's a mishmash mess. If I were seriously going to use Pinterest for genealogy, I'd have to take a good look at what I would do with the boards. Since Pinterest allows you to create lots of different pin boards, I might have a board devoted to my blog posts that I've pinned...My gen blog ramblings. In addition, I might have a board devoted to pins and repins from newspaper websites...My obit sources. Also, I might have a board devoted to pins and repins from blogs with methodology that I want to try...My new gen methods.

Since you can have as many boards as you want, why not sub-divide boards so that they reflect smaller areas of interest...and when you get lots and lots of pins and repins, allow you to find what you're looking for on your own boards!

Can you tell I'm having a good time on Pinterest?

Wednesday, March 7, 2012

Table It!...Part 11...Affecting Cells


Review
We've been working on a table using the Table Properties. After you insert a table, you display the properties by right clicking anywhere in a table to display a popup menu and then selecting Table Properties from the menu.

Further, we've been working specifically with the Borders and Shading dialog to affect the borders around cells and apply colors. On the Table tab, select the Borders and Shading button and you'll see the dialog below.

Remember that:
  • Borders affect the lines around tables and cells.
  • Page Borders affect the lines around the entire page (we haven't used this tab).
  • Shading affects fill color for tables and cells.
Affecting One or More Cells
In this post we're going to affect only a few cells within the table. 

Before you display Table Properties, if you select one or more cells in a table, Word assumes you are attempting to make a change that applies to the selected cells. It updates the Apply to field to Cell. Any changes you make using the Borders and Shading dialog tabs are applied only to the selected cells. You are going to do this task frequently when creating title columns. You did that task when you created the sample table in the post Table It!...Part 6...Creating the Table.

However, there are lots of other ways to affect cells that you might find useful.

For example, when you present a table, you may want to call attention to a few lines within the table and add notes below the table about the selected area. There are lots of ways to do this task. One of them is simply to select the cells you want to highlight and then make selections from the Borders and Shading dialog. In the case of the table above, I highlighted the cells, and on the Borders tab, I picked the Grid setting, a thicker style line, and a width of 3 points. 


Here's another version of the table. To get this type of presentation, I highlighted the cells, and on the Shading tab, I applied a color.


We've been doing these changes using the Table Properties, which is one of a few ways to get to the Borders and Shading tab. One of the things that makes Word confusing is that you can frequently get to the same dialog to complete a task from many different directions. The method you pick depends on what you are doing.

After you have an existing table, you can display Borders and Shading by click in the table so that Word knows you're in a table and using any of these methods.
  • Right click to display a popup menu, select the Table Properties, and select the Borders and Shading button. You'll use this method when you have several tasks to complete on properties tabs.
  • Right click to display a popup menu, and then select the Borders and Shading option from the menu. You'll use this method when you just want to change just borders and shading.
  • In Word 2007/2010, click the Borders or Shading button in the Table Style group on the Design tab, which is a Table Tool (context tool that pops up when you click in a table).
Can you find another way to the Borders and Shading dialog? I'd say yes, there's probably a few I haven't discovered. The one you'll use will depend on what you're trying to do and what you think about at that moment. However, as usual, I'm trying to give you as many options as possible.

What You Should Take Away
  1. There's more than one route to the Borders and Shading dialog.
  2. Pay attention to the Apply to field.
  3. With a little work and experimenting, you can construct tables that will add interest and appeal to your work.
Next Post
We're going to be talking about the Options button which displays a dialog that affect cell padding among other things.

Picnik Replacement...PicMonkey...

Blog reader Jenn posted a comment about a new possible replacement for Picnik. See her comments at  iPiccy...Picnik Replacement.

The new candidate is PicMonkey at http://www.picmonkey.com/. From what Jenn is saying some Picnik alumni have gotten together to create a new and improved piece of graphic software. I can't wait to see it.

If you want to get in on the ground floor, go to the site and enter your email address for updates on their progress. I've already signed up because as you all know I struggle with graphics.

Tuesday, March 6, 2012

Pinterest...and now the bit I forgot...

In all of my ramblings about Pinterest I forgot to tell you that after a blog post is pinned (or repinned), a Pinterest user can click the graphic and get back to the original post on the blog. So as people see either of the photographs that I pinned, they can click a photograph and zip over to my blog posting. This ability is what has all the marketing types all hyped up on Pinterest...and me too.

The suggestion that many marketers are making is that every blog post you make should contain an original graphic that Pinterest can use to make an attractive graphic for pin boards. Creating an original graphic for every post I do on my research blog (and mine are primarily text posts) might be a tall order. I've already been experimenting with how I can create an original .jpg (or .png or .gif) that Pinterest can use to make a Pin It button for each of my blog entries. I've made several abortive attempts and had no successes.

Here's my latest plan. I'm thinking of using children's blocks to spell out My McKee Family Tree. I should be able to place them on a solid background; for example, a tablecloth. If I do a square arrangement:

My McKee
Family Tree

I can then take a photograph and crop the picture to make a small .jpg, which I can place at the end of each of my blog posts. I've noticed that several societies that have been pinned use the society logo as their Pin It graphic. This use is perhaps just happenstance rather than a conscious choice by the societies or the pinners. As people are pinning, Pinterest may be making the choice to use the society logo for the pinner and the society.

Anyway, in the stream of Pinterest pins, my pinned (and repinned) blog posts would be readily identifiable because I would be using the same graphic each time. The pitfall might be that new posts will be missed because it's the same graphic each time. If I adopt this method, the challenge will be to add a description for the pin that clearly labels the blog post as new material. Tis' a puzzlement.

At the moment, the Pin It buttons I added to my blog posts do not work...or at least, I can't make them work! I'm assuming it's because there's no graphic to include in the Java code that Pinterest generates to create the button. The instructions at Pinterest would indicate that the Pin It buttons should work on text-only blog posts. I just haven't had much time to spend on this yet. So perhaps I need to devote a Saturday to learning the ins and outs of Pinterest.

I'll keep you posted on my successes and failures...

Monday, March 5, 2012

Table It!...Part 10...Borders Tab

Click graphic to see larger version.
Press the ESC key to return to this post.

When you insert a table, Word makes choices for you automatically.

  • In Settings, Word selects All, which means that each cell has a border around it.
  • In Style, Color, Width, Word selects a solid line with a 1/2 point width and automatic color (black).
  • In Apply to, Word selects the table. 
You can see the results in the Preview. The Preview on this dialog is different from other previews in that you can use it to make changes...some of the same changes you can make by clicking a button in Settings.

Setting Options: None

Select None and Word removes all cell borders. A table without borders is handy when you want to present a list and you don't want to deal with setting tabs. Word leaves light cell borders so that you are aware that the table is there. However, when you print, the borders do not print. I use this type of table frequently.

Be sure to compare the dialog above with the first dialog. Notice that Word updated the Preview so that it no longer includes cell borders. Notice also that the buttons surrounding the preview have been turned off. You can use these buttons to turn the lines on or off. Again, Word is simply giving you lots of ways to work. Depending on what I'm doing, sometimes I use the Setting buttons, and at other times, I use the Preview buttons. 

Setting Options: Box

Select Box and Word adds a cell border along the outside of the table and updates the Preview to reflect your selection. Be sure to notice the Preview buttons that are selected above. In addition, Word shows the light cell borders so you can see the interior grid; however, the lines do not print. I use this type of table less often; however, you might find a use for it that I'm not thinking of. 

Setting Options: Grid

Select Grid, and then adjust the line width in the Width field. Word adds a heavy outline around the table. The interior of the table also includes border lines that are of a lighter weight. Notice that Word has also updated the Preview to match your selections. 

Setting Options: Custom
I've never found a reason to learn to use the Custom button. The other options have always served my needs. 

This circumstance has been particularly true since I started using Word 2007 and 2010. If you click Design on the Table Tools tab and look in the Table Styles, you'll see you have lots of other pre-formatted table options. If you start selecting the different styles, you should recognize when you're looking at a solid border or just the light border that will not print. 

Other Options on Dialog
  • Style: Be sure to scroll down the list of possible line styles. It's a long list with lots of choices. 
  • Color: I'll bet you know the drill on this one. Click the drop-down to see the color palette
  • Width: Be sure to click the drop-down to see the different widths you can select. b.t.w. One point is one seventy second of an inch...a tiny bit...experiment and see what works for you.

Too Many Possible Combinations...
As you can already see, the possible combinations are so many as to overwhelm. My advice is as usual. Experiment, and then pick what works best for you.

Preview

Remember that the Preview buttons also are available. Here's an example of when you might want to use these buttons. In the example above, I selected Grid, and set the line width to 2 1/4 points. I then clicked the vertical border button in the Preview; it's circled. The result is that I have a normal grid table with only horizontal borders that will print. The vertical dotted borders show but will not print; they simply are a guideline to remind you that you're working with a table. 

Apply to
So far we've accepted the default of applying the changes we are making to the entire table. However, you can apply lots of these changes to a paragraph or a cell. We'll talk about these possibilities in the next post. Right now you need some practice with working with a whole table before we start working with smaller chunks like cells. So happy tabling until the next post. 

Sunday, March 4, 2012

Pinterest...Pinners Beware...Content Providers Beware

Depending on how closely you're following the explosion in the use of Pinterest, you might not be aware of potential problems--fatal flaws if you will.

Problems for Pinners
When you pin copyrighted material, you (personally!) are responsible. Pinterest's terms of use completely absolve them from any responsibility. The debates is on right now and being written about extensively. For details, see this article from today: http://www.ctv.ca/CTVNews/SciTech/20120302/pinterest-copyright-liability-120304/

Problems for Content Providers
The other potential problem is Pinterest's terms of use, which I accepted when I accepted the invitation to join Pinterest. When I pinned photos from my research blog, it is implied that I own the pictures and thus the copyright. In my case, I do and I chose to pin them to put them in the Pinterest stream for other genealogists to see. However, when I pinned the photos, I also gave Pinterest permission to use the photos any way they please.

Stop and think about that last sentence. Pinterest is developing and can go in any direction (for good or evil as my work geeks would tell me).

Here's my view point on it. If I've published family-related info on my blog, I might as well have sent a copy via email to everybody on the Internet. It's out there and is basically unprotected. Ethical genealogists will use it properly, while unethical genealogists won't. I can't be responsible for someone else's ethics. As a result, I'm careful about what I post. I make sure I'm releasing information that I want in the public domain. I also try to be sensitive to living people. Thus, I'm going to be adding Pin It buttons to my posts so that pinners can pin with the confidence that they won't be meeting me in a courtroom setting.

Other people have taken an entirely different track. Photographers in particular (lots of them also lawyers...curious) are pulling everything they have off of Pinterest and doing things like adding the No Pin coding to their websites. They are also adding statements asking pinners not to pin on their websites.

On the other hand retailers--particularly smaller boutique types--don't care how many times you pin from their sites. They view it as free advertisement and like me they are adding Pin It buttons to make pinning easy and give tacit permission to pin.

Think before you pin...
If you're happily pinning and repinning or thinking about pinning, use some caution. Look at what you're pinning or repinning to make sure you're not in questionable territory.

I'm in love with Pinterest. I'm not going to stop using it. When you open it up, it's like opening Forrest Gump's box of chocolate. You never know what you're going to get. However, it is inevitably interesting, beautiful, and engaging. I can get lost in Pinterest for hours.

If you're curious and want to play with Pinterest, email me (info@technology-tamers.com). I'll send you an invitation.

If you have a blog and you want to start using Pinterest, you might want to check out this marketing guide for a quick understanding of how and why Pinterest works: http://hosting.ber-art.nl/marketers-guide-to-pinterest/.

This blog post will give you links to additional Pinterest tools that you may find useful: http://thenextweb.com/socialmedia/2012/03/04/20-awesome-tools-which-will-have-you-pinteresting-like-a-pro/?utm_source=feedburner&utm_medium=feed&utm_campaign=Feed%3A+TheNextWeb+%28The+Next+Web+All+Stories%29.