As I have said in previous posts, I got my ASUS tablet on the run just a few days before going to RootsTech. I should have asked more questions before I ran out of the store, clutching my purchase. As it is, I found out at RootsTech (Galaxy Girls) that surfing the web on a tablet is no different than surfing the web on a PC or laptop. Ya' gotta have virus protection.
So after throwing caution to the wind for a few weeks, I started looking at virus software. Because my ASUS is an Android device, I could find all sorts of free virus apps in the Android App Store. You don't get much of a description when you start looking at the apps. However, you get an eye full when you start reading the reviews, which are extreme. The app is either the best stuff you ever thought about downloading, or after downloading, the app turns the tablet into a paper weight...rendered unusable. Then you get the inevitable tales of what the person had to go thru to recover from the download. All in all, the talk will scare the bejesus out you. It certainly scared the bejesus out of me.
As a result, I decided to haul myself (and the ASUS) into Best Buy to see what they had to say. Well, $21.39 later, I'm the proud owner of Kaspersky Tablet Security. I can't say at this point if this was the best move or not. However, I figure that for this minimal sum, I'm in better safe than sorry territory. We'll see how having the app on the tablet affects it's performance. Virus software is notorious for slowing systems down. Perhaps the tablet won't even notice it's there.
Friday, February 17, 2012


Thursday, February 16, 2012
Mac Messenger...Hard Page Break
I had a reader of this blog (Nova) ask me a Mac-related question. I don't use a Mac. I'm a PC gal all the way. I've had my fingers on the keys of a Mac once for about 10 minutes.
Nova's question: How do you add a hard page break using a keyboard shortcut?
Seems Nova has the newest version of Word for Mac and Mac added the shortcut...but didn't provide details. I googled and according to what I was reading, it's the same as on a PC...Ctrl + Enter. Nova tried it and it didn't work.
So I emailed Pattie who emailed her sister Mary (a Mac user and avid Apple fan). Mary's advice was to press the Ctrl key and the Enter key on the number keypad.

So, if you're a Mac user who needs this solution, you have Nova to thank for asking the question and Mary for suggesting a solution. Me? I'm just the messenger.
P.S. Nova--Did I get the details right? If no, please post a comment with corrections!
Nova's question: How do you add a hard page break using a keyboard shortcut?
Seems Nova has the newest version of Word for Mac and Mac added the shortcut...but didn't provide details. I googled and according to what I was reading, it's the same as on a PC...Ctrl + Enter. Nova tried it and it didn't work.
So I emailed Pattie who emailed her sister Mary (a Mac user and avid Apple fan). Mary's advice was to press the Ctrl key and the Enter key on the number keypad.

Nova reports that this method works!
So, if you're a Mac user who needs this solution, you have Nova to thank for asking the question and Mary for suggesting a solution. Me? I'm just the messenger.
P.S. Nova--Did I get the details right? If no, please post a comment with corrections!
Gedcom Viewer on my oh so expensive Tablet
When I was at RootsTech in Salt Lake City, it was suggested by a presenter that a tablet or smart phone owner could use PDFs generated from genealogy software to successfully do research. I was dubious but I spent a morning in the hotel creating the PDFs, loaded them on to my tablet, and took off for the library.
Talk about a frustrating experience! Trying to use the PDFs was like dragging an anchor around behind me while trying to figure out where I needed to dive into library resources. I don't walk around remembering all of the family details for nearly 2,000 people in one database alone. You have to open and close lots of PDFs to find the info you need to be able to decide if a given library resource is what you need. With the PDFs, unless you have a great memory, they are completely useless.
I went poking around on the web today, and low and behold, there are gedcom viewer apps. I downloaded ezGED Viewer by Source Quest, Inc. The next step was to load a gedcom on to my tablet. I'm lucky enough to have picked a tablet that has USB ports (ASUS), which means I can just attach a wire and download the file from my laptop to the tablet...sorta like using a wire or adapter to download photos from a digital camera or a similar device.
When I opened the viewer, I had to pick a gedcom to display, and then select an icon: Individuals, Families, Reports, Sources, Database Info, or Change GED. The icon labels suggest the type of display you can expect to see and they are accurately labeled. The ezGED Viewer is a free download and very easy to use. If you check it out, you'll see that it's getting well deserved high marks from other users.
I've got to say that had I known enough to download this app while at RootsTech, I would have had a much easier (and more productive) session at the library, because you really can get at your information. In my defense, I had had the tablet less than a week when I went to RootsTech and I was still trying to integrate it into my life...Actually, I'm carrying it around with me everywhere still trying to integrate it into my life...And justify the outragous amount of money I spent for what has been heretofore a toy...an unnecessary toy!
The upshot of all of this...the ezGed Viewer has been the first thing that I've seen that might make having a tablet worth while and cost justifiable.
Talk about a frustrating experience! Trying to use the PDFs was like dragging an anchor around behind me while trying to figure out where I needed to dive into library resources. I don't walk around remembering all of the family details for nearly 2,000 people in one database alone. You have to open and close lots of PDFs to find the info you need to be able to decide if a given library resource is what you need. With the PDFs, unless you have a great memory, they are completely useless.
I went poking around on the web today, and low and behold, there are gedcom viewer apps. I downloaded ezGED Viewer by Source Quest, Inc. The next step was to load a gedcom on to my tablet. I'm lucky enough to have picked a tablet that has USB ports (ASUS), which means I can just attach a wire and download the file from my laptop to the tablet...sorta like using a wire or adapter to download photos from a digital camera or a similar device.
When I opened the viewer, I had to pick a gedcom to display, and then select an icon: Individuals, Families, Reports, Sources, Database Info, or Change GED. The icon labels suggest the type of display you can expect to see and they are accurately labeled. The ezGED Viewer is a free download and very easy to use. If you check it out, you'll see that it's getting well deserved high marks from other users.
I've got to say that had I known enough to download this app while at RootsTech, I would have had a much easier (and more productive) session at the library, because you really can get at your information. In my defense, I had had the tablet less than a week when I went to RootsTech and I was still trying to integrate it into my life...Actually, I'm carrying it around with me everywhere still trying to integrate it into my life...And justify the outragous amount of money I spent for what has been heretofore a toy...an unnecessary toy!
The upshot of all of this...the ezGed Viewer has been the first thing that I've seen that might make having a tablet worth while and cost justifiable.
Wednesday, February 15, 2012
Table It!...Part 4...Popup Menu
In this post, we are going to find all of the pieces you need to work with tables.
Popup Menu
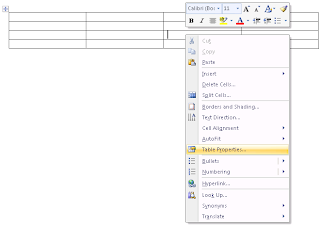
Right-click in any cell of a table and a popup menu appears. The selections on the menu are context sensitive; that is, MS Word is showing shortcuts related to tables. The same options appear on the table-related main menu along with additional options. The popup menu is just another way to complete table-related tasks...sometimes a faster way with less clicking. The version of Word governs the number of options you have. Word 2003 has fewer options on the popup menu, while Word 2010 has more options.
Word 2003

Word 2007


Popup Menu
Right-click in any cell of a table and a popup menu appears. The selections on the menu are context sensitive; that is, MS Word is showing shortcuts related to tables. The same options appear on the table-related main menu along with additional options. The popup menu is just another way to complete table-related tasks...sometimes a faster way with less clicking. The version of Word governs the number of options you have. Word 2003 has fewer options on the popup menu, while Word 2010 has more options.
Word 2003

Word 2007
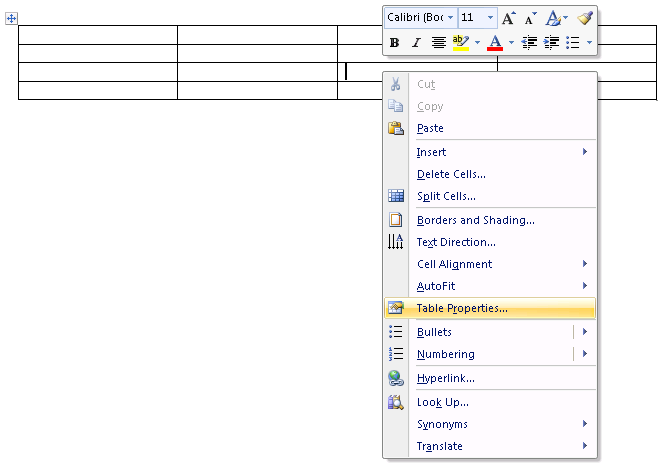
Word 2010

Table Properties
Be sure to notice that in each popup, I've highlighted Table Properties. Click this option and the properties dialog appears. Between the main menu, the popup menu, and the table properties, you format tables. The method you use will end up being the one you find most convenient. I'll show you where it all is, but then it's up to you to pick your method(s).

For the most part, the Table Properties are the same regardless of the version of Word you are using.
Main Menu Ribbon
If you are using Word 2007 or 2010, be sure click in a table cell and look at the ribbon menu. You have lots more main menu options on the Design and Layout tabs than Word 2003 users. Word 2003 users have on the Table drop-down menu.
Now that you know where all of the pieces are we can begin to discuss what you can do in upcoming posts. So until my next post you might want to do some exploring and get accustomed to where all these pieces are located. Tour over...next post, we get to work.
Tuesday, February 14, 2012
Posting...I'll start again soon...
I've been working on the February 2012 issue of the Florida State Gene. Soc. newsletter. I'll try to do a post tomorrow night; however, it may be the weekend before the stream of emails stops. I'm late getting the newsletter out. February is always the worse one to get out. But at least it's complete and now I'm at the stage where I'm making corrections. So until the weekend...
Friday, February 10, 2012
Keyboard Shortcuts
I checked the stats on this blog. I noticed that lots of you have been reading about keyboard shortcuts. The shortcuts that I added were for Windows. The link below will take you to shortcuts for MS Word. After I finish the table series, I'll add notes for Word shortcuts that I actually use.
Of note...I'm a touch typist. I find using the keyboard shortcuts saves me lots of time and effort. The key to learning the shortcuts is to learn to use them one at a time. When you consistently use a shortcut (you've internalized it) then it's time to learn a new one. Over time they add up.
http://office.microsoft.com/en-us/word-help/keyboard-shortcuts-for-microsoft-word-HP010370109.aspx#BM5
Of note...I'm a touch typist. I find using the keyboard shortcuts saves me lots of time and effort. The key to learning the shortcuts is to learn to use them one at a time. When you consistently use a shortcut (you've internalized it) then it's time to learn a new one. Over time they add up.
http://office.microsoft.com/en-us/word-help/keyboard-shortcuts-for-microsoft-word-HP010370109.aspx#BM5
Table It!...Part 3...Resizing Columns
I'm assuming in this post that you've added a table to a Word document (accepting the default settings) and that you have the ruler displaying at the top of the page.

One of the tasks necessary when working with tables in a Word document is resizing columns and rows. For the most part, you should leave rows alone. Adjusting the row height can cause hidden text in cells...not a good thing and you'll go crazy looking for text you know you added.
In the case of columns, you'll want to make adjustments. As is the usual case with MS Word, you can make adjustments in a number of ways. It's important to understand which adjustment method to use to get the desired results.
The most common method is simply to point your cursor at a column line to display the double arrows with the column marks. Click your mouse to grab the line and then move it right or left. For simple tables, this method is fine. However, as your tables become more complicated, you need to know about another method for moving columns.That method involves using the ruler to resize columns. I've posted limited information on the ruler. See Using the Ruler if you want to refresh your memory.
Displaying the Ruler and Moving a Column
- In Word 2003, click Insert, and then Ruler.
- In Word 2007 or 2010, click the View tab, and then click Ruler on the Show pane.
A ruler appears above the document with another ruler running down the left side of the document. The ruler above the document is the one of interest. The white area of the ruler is the typing area on your page.
Click in any cell in the table and the Move Table Column buttons appear in the ruler. Point your cursor at a Move Table Column button and double arrows with a tip popup appear.
To grab a button and move a column, point at the button in the ruler and click your mouse. Move your mouse right or left to move the column.

Why is this method important?
As your tables become more complicated (for example, when you merge cells in the middle of a table), the Move Table Column buttons serve as the master control for resizing columns. The more complicated your table becomes the more important it becomes to know when to use the buttons on the ruler to adjust columns.
You can see this in action by completing these steps.
Click in any cell in the table and the Move Table Column buttons appear in the ruler. Point your cursor at a Move Table Column button and double arrows with a tip popup appear.
To grab a button and move a column, point at the button in the ruler and click your mouse. Move your mouse right or left to move the column.

As your tables become more complicated (for example, when you merge cells in the middle of a table), the Move Table Column buttons serve as the master control for resizing columns. The more complicated your table becomes the more important it becomes to know when to use the buttons on the ruler to adjust columns.
You can see this in action by completing these steps.
- Click your cursor in the third row of column one.
- Hold down your mouse and move it to the right to select the third row of columns one and two.
- Let go of your mouse. Two cells are selected (highlighted).
- Right-click in the selected cells to display a popup menu.
- Click Merge Cells. The two cells becomes one cell that is two columns wide.
- Point your cursor at the row four column line between columns one and two. A double headed arrow with column marks appears.
- Click your mouse to select the column line and move it right or left. Let go of your mouse.
- Notice that the column lines in rows one and two above the merged cells did not move.
- Click Ctrl + Z to undo the change.
- Use the Move Table Column button to move the column line and all lines in the table move...regardless of the merged cells or anything else you've done to the table.
The Move Table Column buttons can also be used to align cells correctly when they just get out of whack...and that can happen to the most experienced of Word users regardless of how easy or complicated the table might be.
I know this is tedious but if you're going to work with tables you need to know about the less obvious controls that can save your sanity on occasion.
Thursday, February 9, 2012
iPiccy on YouTube
YouTube tutorials for iPiccy...
General: http://www.youtube.com/watch?v=SGnBlrDhSdM
Add a watermark: http://www.youtube.com/watch?v=SGnBlrDhSdM
Make a word cloud: http://www.youtube.com/watch?v=_hFSYrm3OXU
...I think I'm in love...with a piece of software...
General: http://www.youtube.com/watch?v=SGnBlrDhSdM
Add a watermark: http://www.youtube.com/watch?v=SGnBlrDhSdM
Make a word cloud: http://www.youtube.com/watch?v=_hFSYrm3OXU
...I think I'm in love...with a piece of software...
iPiccy...Picnik Replacement
For the most part, anyone who knows me will tell you that I hate art. Let me explain. I love art that is produced by other people. I've taken more than one art history course and loved it. I've taken anyone who will go with me to almost every museum available to me to see art. I have always admired the talent it takes to produce art...a talent that I am sadly lacking. Thus, I hate when I have to produce art. I'm at such a loss.
Being a technical writer means you have to produce art. I've become adept at using the tools to capture, crop, and clean up computer screen shots. It's a skill that I use to produce the art for this blog. I've hacked my way through photo editing software, which isn't the easiest software to use and can be mega expensive. In all cases, my employer was paying for the software so it wasn't a problem for me...well, except that I had to try to learn to use the stuff.
Genealogy opened up a whole new can a of worms for me because of photographs. It's easy enough to scan a photograph, but then there is the clean up. I've been using a free online photo editor called Picnik. In one click Picnik makes choices for you that cleans up a host of problems. Google came along and bought Picnik. Now they are going to move Picnik into a Creative Suite inside of Google +.
It's OK because I'm already a member of Google +. However, I always like options. I went poking around the net today, thinking I can't be the only one lamenting the loss of quick and easy access to Picnik and I wasn't. Even better, another searcher came up with what looks to be a more than adequate substitute: iPiccy.
In iPiccy you open a copy of your photo, click the Fix Image button and it does just that for you. You can apply the corrections, and then click the Save and Share button to save (and share if you like) the cleaned up photo. The bonus? If you poke around iPiccy, you'll find that you can do lots more than you could do in the basic Picnik. iPiccy is in beta right now. Who know what they will do with it in the future? But for today, there's an easy to use tool that gives you lots and lots of photo editing options.
With iPiccy, even I can create art...so go forth and be creative with iPiccy.


Being a technical writer means you have to produce art. I've become adept at using the tools to capture, crop, and clean up computer screen shots. It's a skill that I use to produce the art for this blog. I've hacked my way through photo editing software, which isn't the easiest software to use and can be mega expensive. In all cases, my employer was paying for the software so it wasn't a problem for me...well, except that I had to try to learn to use the stuff.
Genealogy opened up a whole new can a of worms for me because of photographs. It's easy enough to scan a photograph, but then there is the clean up. I've been using a free online photo editor called Picnik. In one click Picnik makes choices for you that cleans up a host of problems. Google came along and bought Picnik. Now they are going to move Picnik into a Creative Suite inside of Google +.
It's OK because I'm already a member of Google +. However, I always like options. I went poking around the net today, thinking I can't be the only one lamenting the loss of quick and easy access to Picnik and I wasn't. Even better, another searcher came up with what looks to be a more than adequate substitute: iPiccy.
In iPiccy you open a copy of your photo, click the Fix Image button and it does just that for you. You can apply the corrections, and then click the Save and Share button to save (and share if you like) the cleaned up photo. The bonus? If you poke around iPiccy, you'll find that you can do lots more than you could do in the basic Picnik. iPiccy is in beta right now. Who know what they will do with it in the future? But for today, there's an easy to use tool that gives you lots and lots of photo editing options.
With iPiccy, even I can create art...so go forth and be creative with iPiccy.

Before iPiccy

After iPiccy

After iPiccy
Wednesday, February 8, 2012
Table It!...Part 2
OK...so now we start at the real beginning...adding a table to a Word document in the first place.

The method you use to insert a table in Word depends on the version of Word you are using. Therefore, I'm going to separate the instructions for Word 2007/2010 and Word 2003.
Word 2007/2010: Insert a Table
On the Insert tab, click Tables. The Insert Tables dialog appears. You have a number of options.
If you are still on Word 2003, you have fewer options when creating tables.

Word 2007/2010 selections with the Insert Table dialog.
The method you use to insert a table in Word depends on the version of Word you are using. Therefore, I'm going to separate the instructions for Word 2007/2010 and Word 2003.
Word 2007/2010: Insert a Table
On the Insert tab, click Tables. The Insert Tables dialog appears. You have a number of options.
- If you are a visual person and you're going to accept system defaults (that means Word is picking options for you), move your cursor over the squares (properly called cells) to create a table with rows and columns. Move your cursor around and you'll see an expanding or contracting table in your doc. In the graphic above I have four columns and four rows highlighted in orange (selected). Click in the last highlighted square (lowest and farthest to the right) and that's the table you get. In addition, Design and Layout tabs appear and boy are they loaded with options.
- If you are a person who likes to see the dialog that controls the table, click the Insert Table... option. The dialog appears. This dialog is the long standing one in which you enter the number of columns and rows, and then you have additional options you can select. See the Word 2003 instructions below for information on these fields. After you click OK, Design and Layout tabs appear with lots of options.
- If you like maximum control, click Draw Table. A drawing pencil appears in your doc and you can draw individual cells. After you have drawn cells, click in your document to get rid of the pencil and get your cursor back. I'm usually not driven enough to use this method.
- If you are comfortable with an Excel spreadsheet, click the Excel Spreadsheet option. Word inserts a spreadsheet for you to work in. When you click outside of the spreadsheet, Word converts the speadsheet to a table and also removes boarders (the lines identifying each cell).
- If you want to see what MS Word has already formatted for you, click Quick Tables and the Built In tables dialog appears. If there is a table you like, click it and Word inserts it into your document. You can then replace placeholder text with your text.
If you are still on Word 2003, you have fewer options when creating tables.
- On the main menu, select Table, Insert, Table. The Insert Table dialog appears.
- In Number of columns, enter the number of columns you want for your table. If you make a mistake, you can add columns later.
- In Number of rows, enter the number of rows you want for your table. If you make a mistake, you can add rows later...you already know the shortcut.
- Accept the default AutoFit behavior or alter it.
--In Fixed column width, if you accept the default of Auto, the table will resize itself in relation to the margins; that is, the entire width of the page. You can set the width using the up and down arrows to create a table that isn't as wide; that is, it doesn't go margin to margin. In addition, you can make adjustments on the fly (a topic I'll talk about later).
--In AutoFit to contents, select this option if you want the width of a column governed by its contents. For example, a column with three characters in it will be narrower than a column with ten characters.
--In AutoFit to window, select this option if you want a table that has equal columns spaced across the width of the page. In addition, you can make adjustments on the fly (a topic I'll talk about later). - Click the Auto Format button to display the Table AutoFormat dialog. The dialog includes preformatted tables that Word Pros created for you. If you find one that you like, select it, and then click OK.
- Click Remember dimensions for new tables if you altered the Fixed column width in step 4. Each time you insert a new table, Word does so with the fixed column width you selected. To turn this off, select Auto in Fixed column width.
Subscribe to:
Posts (Atom)